NOVEMBER 3 VICTOR ECHO MIKE
  • Blog
  • Events and Activations
  • Diversions
  • About
  • Gallery
  • Contact
  • Links
  • Subscribe
  • Search
  • Blog
  • Events and Activations
  • Diversions
  • About
  • Gallery
  • Contact
  • Links
  • Subscribe
  • Search
NOVEMBER 3 VICTOR ECHO MIKE

ham radio Projects and musings from a (Relatively) new operator

Spreading the Word

6/15/2019

0 Comments

 
Post contains affiliate links     
     We often hear about the importance of spreading the word of ham radio in order to keep new blood in the hobby.  The right person could pontificate on this topic for quite some time, but I think one of the things we're missing in this effort is remembering to reach out into the world in a way that can touch places outside "the norm" of where we think we'll find future hams.  With this thought, I decided to start some ham radio outreach in a slightly non-traditional manner, and I'm going to ask for your help!  If you don't have time to read my full post, just skip straight to the Easy Steps to Spread the Word! at the end of this post.
    This whole idea ties into something my YL wanted.  If you follow me on instagram you may have seen this post a couple years back, where I dropped a couple pictures of a project that I was starting for the YL, using some of the leftover plywood from my shack build.
Picture

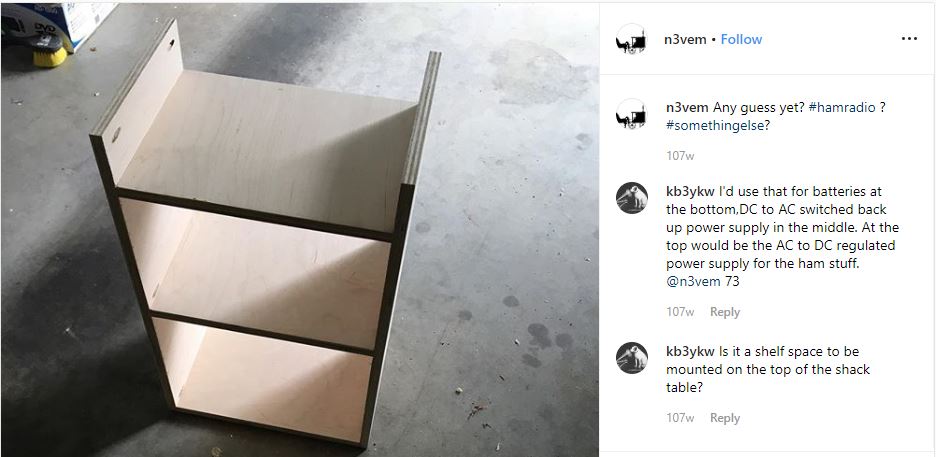
    Well, 2 years later, I finally finished the project, and here is what it turned out to be:
Picture

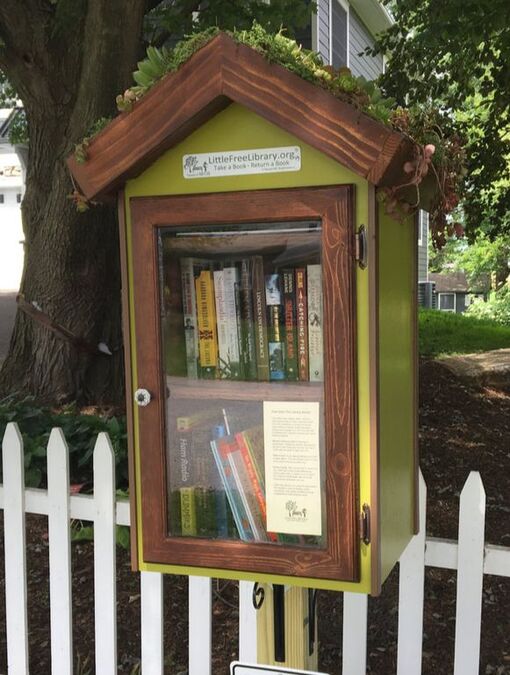
    If you don't know what a Little Free Library is, here's the scoop - random people put up some type of box, little house, etc. and stock it with books that are free for the taking.  Take a book, and when you're done, leave it in the same little library, a different one, or pass it along - I think this type of sharing is certainly in the spirit of ham radio, so if you look close, you'll see one of my contributions to our Little Free Library:
Picture

     With any luck, maybe a neighbor will get curious, take it, and become a new ham!  

So how can you help?  First, you don't need to build your own library - take these easy steps, and you can help spread the ham-radio word to anyone that may stumble across libraries like this that are all over the world:

Easy STeps to Spread The Word!

  • Go to littlefreelibrary.org/ourmap/ to find a little library near you
  • Buy some of the books below, and stick them in!  I'll probably put these on repeat in my own Amazon cart, to make sure that there is always at least 1 or 2 radio books stocked in ours. 
No Nonsense Technician Class License Study Guide - Dan Romanchik
Ham Radio for Dummies - H. Ward Silver
The ARRL Ham Radio License Manual
The ARRL Operating Manual for Radio Amateurs
Or just jump on Amazon and get any books about ham radio that catch your eye!
0 Comments

I Didn't Buy a 7300

5/29/2019

4 Comments

 
     This isn't a knock on the Icom 7300 by any means - it is a pretty slick little radio, and it's really cool to see the newer SDR technology available from a major player, at a price-point that can't be beat.  It just isn't what I decided to get :-)
     As I've been building out my new shack, I spent a good amount of time saving my pennies and debating what rig would become the "main" box for the shack.  With contributions towards savings, retirement, private school tuition and future college for 3 kids, etc. I had to be wise with my money, so even though it was tempting to take my annual bonus and run off and grab an Icom 7610, or a Flex 6400M, my YL gently reminded me that we had other priorities, so I ended up looking in the $1,000 - $1,500 dollar range for my new rig.
     With all the talk about the 7300, Icom's  rig did seem like a no-brainer.  I had to remember however, that for me a large part of ham radio is just the fun of it, and I wanted the radio in my shack to be fun for me.  For me that means big, buttons, and lots of ways to interconnect with other equipment.  Even though the receive performance of the 7300 is awesome, it's wiz-bang touch screen stuff fell just a bit short on the fun-meter for me.  After hanging out and playing for a while at the "local" HRO in Wilmington Delaware, what pegged the fun meter for me was the Yeasu FTDX3000, which at nearly $600 off normal retail during Hamvention week, brought this radio down into my price-range.
     With my new rig in hand, you can also finally see my vision of the "through the wall" equipment starting to come together.   With a combination of MDF, my table saw, my oscillating tool, a drill, and some brackets, I now have the radio mounted in it's home.  The next step is making the face frame to go around the rig to make it pretty, but you get the idea... 
Previous Shack Build
Next Shack Build
Shack Build Part 1
4 Comments

Power to the Shack

5/1/2019

0 Comments

 
Post contains affiliate links     
     Over the last couple months I've shared some nuggets of information here, on Twitter, and on Instagram, about my dc power distribution for my on-going shack build.  I promised some more details, so here they come!
     Pretty early on in the design of my shack, I knew I wanted to have a 12v power distribution arrangement of some type.  The most obvious reason was because that's what most of our gear runs on, but secondarily, I wanted to make sure that some of my task lighting and other shack "appliances" are also 12v, so that I would have the option of some solar, battery-back up, etc. in the future.  This dictated my basic requirements for dc distribution - a hefty power supply and/or batter charger, fuses or breakers for the different 12v circuits, and some basic control options (relays or switches) to turn stuff on and off.  
     Step 1 in this process - figure out what to mount all the stuff in!  I personally like the look and workmanship of a proper cabinet and din rail.  What I ended up using for the box was something re-purposed.  I used to lug around some work equipment for training purposes, but with changes in products, and some abuse from being on so many planes, some of the equipment needed to be scrapped, so after gutting, I kept one of the back-boxes.  To meet my power / future battery charging needs, I ordered a 75amp power supply/charger, and started with that:
Picture

    While I can't help you out with sourcing a back-box exactly like this, I can share a link for the power supply.  I chose the IOTA DLS-75 because they can be had relatively inexpensively, and for a large switcher, they seem to get pretty decent reviews from other hams in regards to being RF quiet etc.  The model I got is a combined power supply / batter charger, so it will also cover me for future battery-backup when I'm ready to add it. 
This is the exact model that I picked up.  You can click on the picture to grab one from Amazon, or if you're lucky like me, you might be able to snag one from ebay for a little bit cheaper.
Next in line (because I like the tidiness that can be ​created using din-rail stuff) I ordered up some din rail and some DC breakers.  To start, I grabbed a 63 amp breaker for the "main" a 25 amp breaker to power the main rig, and a 20 amp breaker to wire up misc. 12 v lighting etc.  I also grabbed some bus-bar, and these nifty little din-rail mount plates to hold a raspberry pi and a couple arduino uno cards.  The plan for these was to build in some power monitoring and logging.  I also picked up a little arduino hat that breaks out screw terminals for the input and output pins, to make it easier to wire up sensors.  It also gives a small prototyping area in the center, which may or may not be useful :-)

     Once I had this stuff and started wiring things up, I realized pretty quickly that I had a noisy fan in the power supply I got, so I ordered a replacement fan.  At the same time, I ordered a couple other tidbits:
Picture

    The little green thing on the right is a din-rail mount dc current sensor, good for up to 100 amps!

​     There's still a lot of bits I need to add, and wiring to tidy up as I do it, but as I started piecing things together, this is what it started to look like:
Picture

    Wiring up the DC current sensor was pretty easy - feed it power with anything from 8 - 35 volts, and then read the voltage output from the sensor connection terminals.  2.5 volts is 0 amps, and up or down from there gives your your current in either direction (after throwing it into a quick formula to convert the voltage to current).  Since this measures current in both directions, you could easily use this to monitory battery charging/discharging as well!

    To monitor the main voltage, I just whipped up a little voltage divider to feed the arduino.  Rather than use something specified somewhere, I just sat down with this calculator, and the pile of resistors in my junk-box until I found a combo I had that worked well.  I then wired up the resistors into a harness, so the voltage divider is now in-line in the wiring between the the arduino and the bus bars where I connected to sample the voltage.
Picture
Picture
Picture

    With basic power and sensors wired up, I mounted up the front panel of the box, which has the display for the Raspberry Pi mounted to it.  (If you missed it, I shared some info when I did that several weeks ago - you can check out the details here.)

   Next, I whipped up some code!  To save time for those who may feel this post is already getting a little long, I'll share the details on that code another time, but if you're super interested, drop me a note and I will send you copies to do with as you please.  The quick summary is that I have the Ardunio reading the voltage and current sensors, and it dumps that data out of it's serial port.   I then have the raspberry Pi running a LAMP stack.  A Python script running on the Pi reads the serial data and stores it in a mySQL database so I can explore and manipulate the data it captures using all the mySQL stuff I'm accustomed to.  I also whipped up a little PHP web site (only accessible on my local network at the moment) that displays the data.  I have the display on the front of the power box showing the page in full-screen mode all the time, and I can also pull it up on my browser any time I want as well - it's fun to pull it up and make contacts while watching the numbers change :-)
Picture
Picture
Picture

     So there you have it - the shack power distribution update!  There's still a lot of work to do on this, but at the moment I have functioning power for the rig and some task lights, and I'm recording data about my power usage.  This means that when I get ready to drop some big back-up batteries on this situation, I'll have a good idea of what size of batteries to shoot for.

​73 for now!
Previous Shack Build
Next Shack Build
Back to Shack Build Part 1
0 Comments

End of an Era (Kinda...)

3/27/2019

2 Comments

 
     Don't worry, I'm not ending my ham-radio career!  I'm still plenty busy and enjoying radio, and I've actually had my rig turned on more in the last few days than I have in the last 2 months.  The era that is coming to an end however, is my "mobile HF" career.

​     When I first got into ham radio, I was doing a TON of traveling in my car - often 6+ hours in a single day, and numerous multi-state trips.  With all that road time, it made sense to invest the time and effort to install HF gear in the car.  Anyone who has done a proper HF mobile install however, can tell you just how time consuming that can be, when you start getting into bonding, the heavy cabling needed for powering an HF rig, etc.  
     Well, as the last couple years have gone by, I have actually been spending less and less time traveling, and more time working from home, and doing meetings via skype, conference call etc.  this is awesome for me and my family, but it also means that the gear just wasn't seeing much use in the car.  It was nice to have it there when I did travel, so I just left well enough alone.
     The time came however, for a new car, and I just got notice that my new one has been delivered to the dealership.  I spent this past weekend pulling all the radio gear out of my old car, and considering that the vast majority of my driving now will be shorter trips, I just don't see the point in going through the effort to put all the gear in the new one.  I'll probably throw in a 2m/70cm dual bander at some point, but I suspect I won't install much more than that in this new vehicle (unless I suddenly go road-warrior again.)
     So with that, N3VEM/M is signing off, but you'll still hear me from the parks operating portable with my go-kit, and you'll probably hear me from the home shack a lot more often!

bye for now!
2 Comments

Sick days - might as well play radio!

3/19/2019

0 Comments

 
Post Contains Affiliate Links     
     The last couple months have been the launch of a major work project, and the start of a second one.  I seem to have this trend, that when I am crazy busy like that, if things slow down suddenly, then I get sick :-(  I guess being so busy, I tend to just push through, and then it sneaks up on me later...
     Anyway, I had just that scenario - the last couple months have been pretty intense, and now I'm sitting home with the flu.  Might as well play radio!  Since I've been so busy, I've just been slowly plugging away at miscellaneous projects, so I'll just give an update on the radio things I managed to sneak in during the last couple months:
  • Started working on the DC power distribution for the ham shack.  If you read this post you might recall that I stuck a raspberry pi in the box, to be the display for the power monitoring.  Since then, in little bits and pieces, I've started fitting out the insides of the box with a power supply/battery charger (so that the shack can have battery backup!) some Din rail, a couple DC breakers, some Arduino boards, and a big hefty current monitoring board that I'll use with the Arduino, to monitor total shack current draw.
  • I also got some 12v lighting installed over the desk.  I was in desperate need of task lighting, and I wanted 12v lighting so that it could run off the shack power supply/charger, and eventually be backed up by the batteries that I plan on adding.
  • I also finally put my "go-box" on my desk, and dropped a coax down into the room, so that I could actually play radio while I continue working, and debate the "big" purchase of a permanent shack-rig.
Picture
  • I also made a new battery purchase to go along with the "go-box."  Most airlines permit up to 2 batteries, under 160 watt-hours, in your carry-on.  A Bioenno 12v 12ah battery fits nicely under that limit :-)
Picture
​
  • Lastly for now - with some changes at work, we E-scrapped the training equipment that I used to lug around (because we upgraded our product) so I was left with a bunch of really nice Pelican cases.  I gave one to my boss, because he wanted one for lugging around camping equipment, I gave one to my radio club for storing club equipment, and I shipped one off to the Ohio Valley Experimenter's Club (OVEC) because I happened to hear KF7IJZ mention on the Workbench podcast, that they needed a tote of some sort for club gear, since it travels between sites regularly.  After passing them around, I was left with 2 - one that I use like a suitcase, which holds my go-kit, some antenna stuff, and a weeks worth of clothing, and a second that I have the pick-and-pluck foam for, that I plan to fit out as a dedicated "radio equipment only" case.
Picture

Happy hamming!
0 Comments
<<Previous
Forward>>

    Categories

    All
    Antenna
    Cw
    Digital-modes
    Flying-with-gear
    Home QTH
    Miscellaneous
    Mobile
    Operating Events
    Portable
    POTA
    Shack Build
    Technical


    - N3VEM -

         Welcome to my Ham Radio Blog!  This blog was started primarily to share my two concurrent shack builds - my mobile station and my home station.  Over time, this has grown to include sharing about my operations, and general radio-related thoughts that I have as a newer operator.  
         
    ​Enjoy!

    RSS Feed


    Picture
    POTA!

    Picture
    Proving that hams do indeed still build stuff!

    Picture
    100 Watts and Wire is an awesome community, based around an excellent podcast. 

    Archives

    September 2020
    July 2020
    January 2020
    September 2019
    August 2019
    July 2019
    June 2019
    May 2019
    March 2019
    January 2019
    December 2018
    November 2018
    October 2018
    September 2018
    August 2018
    July 2018
    June 2018
    May 2018
    April 2018
    March 2018
    February 2018
    January 2018
    December 2017
    November 2017
    October 2017
    September 2017
    August 2017
    July 2017
    June 2017
    May 2017
    April 2017
    March 2017
    February 2017
    January 2017
    December 2016
    November 2016
    October 2016
    September 2016
    August 2016
    July 2016
    June 2016
    May 2016
    April 2016
    March 2016
    February 2016
    January 2016
    December 2015
    November 2015


Picture
Copyright © 2015
 Vance Martin is a participant in the Amazon Services LLC Associates Program, an affiliate advertising program designed to provide a means for sites to earn advertising fees by advertising and linking to amazon.com.