NOVEMBER 3 VICTOR ECHO MIKE
  • Blog
  • Events and Activations
  • Diversions
  • About
  • Gallery
  • Contact
  • Links
  • Subscribe
  • Search
  • Blog
  • Events and Activations
  • Diversions
  • About
  • Gallery
  • Contact
  • Links
  • Subscribe
  • Search
NOVEMBER 3 VICTOR ECHO MIKE

ham radio Projects and musings from a (Relatively) new operator

Ready to Close 'em Up

11/29/2017

2 Comments

 
     The walls that is....
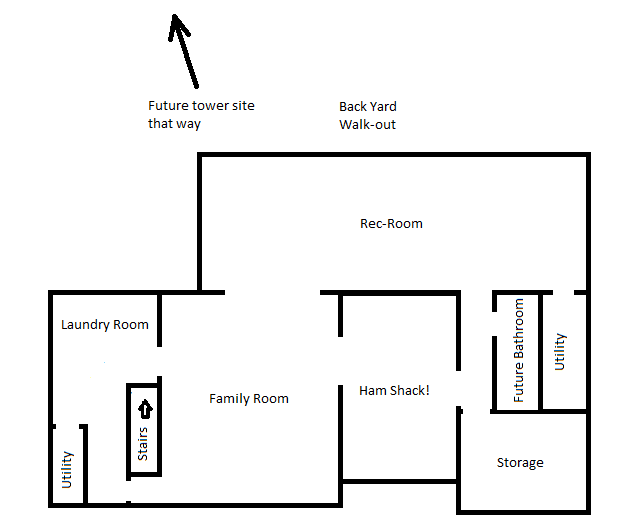
     The Thanksgiving break was a productive one for me.  I've been zeroing in on getting my shack project to the point where I'm ready to start closing up the walls with drywall.  This project is actually combined with finishing the part of the basement under our addition, so there were a few things that I wanted to run across the space that will become the rec-room before I closed things up.  To give a little perspective on the space I'm working in, so that you can picture it a little easier, here's a rough drawing of our basement.  The scale is a little out of wack, but you'll get the idea:
Picture

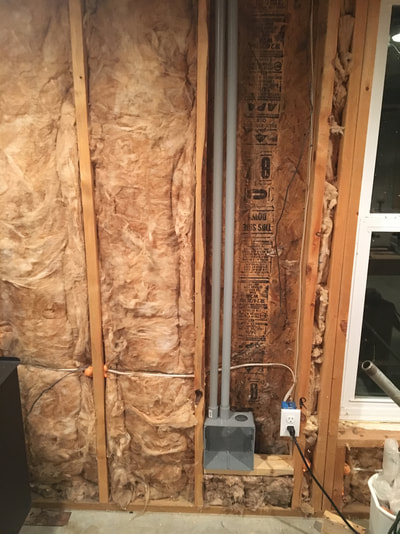
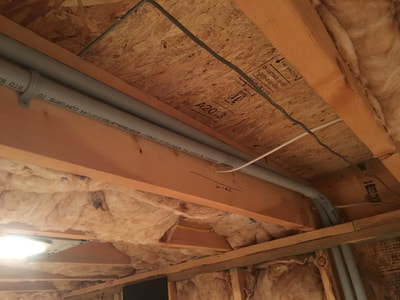
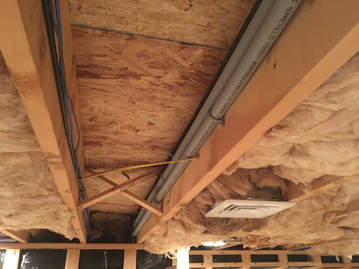
     In my last post I mentioned several things I was planning, and these were precisely the things I ended up getting done.  The first thing I put in was some empty conduit, because even though I am pulling stuff through now, it's hard to anticipate future needs.  In one section the fit was tight, so 1" conduit was the widest I could put in without a lot of concrete busting.  Because of that I made 2 runs side by side, from the back wall of the shack, to an access box that I installed in the back wall of the walk-out basement.

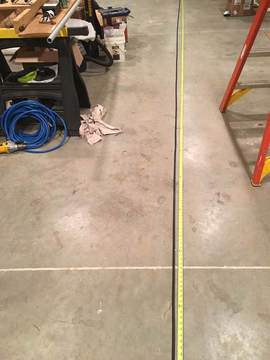
     Next up was the coax.  I ordered enough Times Microwave LMR-400 from DX Engineering to pull 4 runs across the space.  As a side note here, DX Engineering means business with their shipping! My order was big enough to get the free shipping, and it was almost 24 hours on the nose from the time I ordered it till the time it was sitting on porch - impressive!  I ordered the coax in bulk, so I rolled it out lengthwise down the long stretch of the rec-room to cut it into 4 sections.
Picture

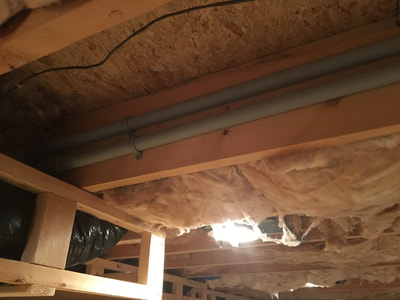
In addition to the coax, I also ordered enough for a single run of control cable, anticipating a rotor at some point in my future.  Finally, I knew I wanted some network cable running from the shack to the tower for potential future uses, so (at the suggestion of a couple different folks) I cut 2 lengths of that as well.  With all these cables cut to length, I tacked up the coax right above the conduit runs, and the control cable and network cables to the other side of the joist bay.
Picture

     In a separate area I also pulled a run of 12-2 Romex from the sub panel in the shack, to a location that I can get to from the outside.  My thought here is that if I end up needing power at the tower, I have a line ready for it, powered from the same source as everything else in the shack.
     As hard as it is to do, the next step was to stuff the insulation back in place, and hide all of my hard work!
Picture

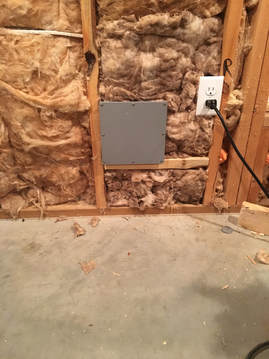
     So with all this stuff done, I'm ready to start closing up the walls.  When I eventually do put up the tower, I'll be able to take the cover off this box, roll the coax and cables out of the way, and drill straight through the back of the box and the exterior wall, to put a conduit to an entrance panel right on the other side of this wall, with runs out to the tower.  easy-peasy!

     Next step, drywall.  I've never hung drywall before, but I decided it was finally time for me to try and tackle it on my own.  I won't be working in the blind though - I have a brother-in-law that hangs and finishes drywall, and a neighbor that used to work for a large drywall distributor, so I'll be leaning on their expertise pretty hard.  If you see anything I missed that you think I should do before I close things up, or if you have any drywall tips, please feel free to leave me a comment - It'll be a few days before I get started, and tips are always welcome!
Previous: Shack Build
Next: Shack Build
Back to Part 1
2 Comments

Blowin' in the Wind

11/22/2017

2 Comments

 
     The last time I gave you an update on my home shack, I was running piping for the radon mitigation system in my basement.  Well, I finally put the (hopefully!) finishing touches on that part of the project!
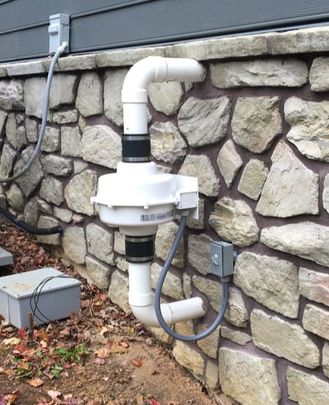
     All that was left for the radon system was to install the manometer on the inside piping (that's the u-shaped thing with the liquid in it, that tells you if the fan is running), and to order and install the fan on the outside of the house.  A weatherproof single gang box and switch, some conduit, and some liquid-tight, did the trick to polish this off:
Picture

     I still have some grading to do along this side of the house from the addition we did, so don't judge my dirt and leaves too hard :-)  With everything wired up and the final bits and pieces in place, it was time to turn the breaker on, and then throw the switch, so that I could say (to the tune of the well known Bob Dylan Song) "The radon my friend, is blowin' in the wind.  The radon is blowin' in the wind."
     With the fan running, I turned my attention back to the inside of the basement, where me and my trusty caulk gun went all over the basement sealing every crack and expansion joint we could find.  All that's left now is to let the system run for a couple of days, and then conduct another radon test to see if I'm done, or if I still have more work to do.

Some Other Stuff Too

     The radon system isn't the only thing I worked on in the last few days.  I also pulled the service cable from the main breaker panel in the house, to my new shack. After weighing cost, distance, current requirements, etc.  I ended up deciding to use 2-2-2-4 cable, protected with a 90 amp breaker.  This kept the cable from being too obnoxiously large, while giving me more than enough capacity for the demands that will be on the panel in my shack.  The next step for this will be to sheath the run that will be exposed in the shack with EMT.  

     In addition to this real work, I did some "planning" work as well.  Before I close up walls I want to run some coax and wire in the general direction of where the eventual tower will be.  Trying to guess how much wire you'll need in the future is almost always bound to leave you wishing you had done more.  Conduit is a great thing, but in the area were I need to run it, I have some restrictions on sizes of what will fit.  After getting some feedback from the twitter crowd, here's what I think I'm going to shoot for:
  • 4 runs of LMR 400
  • 2 empty conduits.  One inch is all that will fit in the one section, but at least it will be there for whatever comes up in the future.
  • 1 multi-conductor control cable (for rotors etc. in the future)
  • 1 network cable (just in case I want to stick any Ethernet devices up there)
  • A couple of strategically placed access hatches

     Luckily, if I find in the future that I missed something, I will still be able to add to this - it will just require a much longer run around the side of the house.  

     If you have any input or thoughts for me, please feel free to share them!  It will probably take me a couple weeks (or a month...) to round all this stuff up and find the time to get it pulled into place.  Till then, have a good one!
Previous: Shack Build
Next: Shack Build
Back to Part 1
2 Comments

Ham Radio Media

11/15/2017

0 Comments

 
     I enjoy ham radio media.  There are many times when work, family, or home obligations have me away from my equipment, but my brain and ears are still free.  For me, ham radio podcasts are THE thing that I use to pass this time, whether that's during dishes, lawn mowing, flights, or boring meetings (wait - scratch that last one, my boss might read this.)  I do enjoy a couple of YouTube channels when I can sneak them in  (OH8STN and Ham Radio 2.0 to name a couple) but video is unfortunately more of a commitment than I usually have time for.
     With that in mind, there are a a whole bunch of podcasts that I listen to, and at one time I had considered doing some "reviews" of them, but in reality, giving reviews of stuff just isn't my bag.  For ham radio media, I think reviews are somewhat misplaced anyway, because there is a critical feature of podcasts that I think is awesome:
​Delayed Listening
     Since we can play podcasts whenever we want, we don't need this weird "competition" thing going on.  If the shows were only available live, you might be forced to choose one over the other, but since you can listen whenever you want, I don't feel the need to worry about who is "better" than the next person.  I can just kick back, enjoy, and learn something from whomever I am listen too!
     I think that this is most evident in the fact that many of these folks will do appearances on each other's shows, recommend specific episodes that each other have done if it relates to the topic at hand, etc.  For me, ham radio is about community, and most of these folks have that nailed down, right into the content the provide!
     Having said all that, and in the spirit of non-review, I just want to share the podcasts that I listen to, and encourage you to check them out.  I am providing links to websites for those that have one, but to listen to the actual podcasts, just search for them by name in your favorite podcast player (Here's a couple articles on podcast players for reference:  iOS apps here, and Android apps here.)
    So, to all of you who do all the work making these shows, THANK YOU!  I appreciate all of you and the content you provide!  In no particular order, here's whats in my podcast player:
ICQ Podcast
Ham Radio 360

100 Watts and A Wire
Ham Radio 360 Workbench
Everything Ham Radio
Field Radio Podcast
​QSO today
Ham Talk Live
ARRL The Doctor is In
Amateur Radio Newsline
DitDit.fm
SolderSmoke
Linux in the Ham Shack
The Phasing Line Podcast
Foundations of Amateur Radio
​ARRL Audio News

     As a final thought - yes, even though this is a lot of shows - I regularly find myself opening up my podcast player and realizing that I've listened to everything that is new, and wishing there were more!
0 Comments

Mind Blown

11/8/2017

1 Comment

 
     I love ham radio, and a big reason is because of the random connections you can make!  I recently ended up having a great chat with KA5FDX via PSK31.  For non-hams who may be reading this, KA5FDX is actually a person named James.  PSK31 is a mode where you hook your computer or mobile device to your ham radio, and it allows you to do what looks very similar to instant messaging, but without the internet, cell network, or wires between the people talking.
     Of all the random things that two people can end up chatting about, James and I ended up discussing the most obvious one - relativity!
Picture
Specifically, we ended up talking about the speed of light, and how far into space you would need to travel to be able to look back at earth through a high-powered telescope and witness specific historical events as the light from the planet eventually reaches the far corners of the galaxy.
     I'm no physicist, so this isn't going to be a lesson in that, but it did make me consider something that should...

Blow your Mind!

     Let me take a step back, and slowly ease you into this, so that I don't blow your mind all at once :-)
Picture
     Take a moment to consider an every-day conversation.  You and I sit in a room and talk to each other.  Since sound travels 343 meters/second (there are a lot of variables to that, but we'll stick with it for simplicity), when we talk it takes .002 seconds for the sound to get back and forth between us (sitting a meter apart.)  That's so fast it's pretty much instant.  What if we were on opposite sides of the country?  That's 4,313,042 meters, so if we could shout loud enough it would take 3 1/2 hours for the message to travel that far!  That's actually rather slow when you think about it, considering that we have built planes that are capable of covering that same distance in just over 30 minutes (The X-15 traveling at Mach 6.7)

     What if I want to shout at someone in Australia?  At 16,767,755 meters, that is pretty much as far from me as someone can be, and still be on land.  In this case, if I could shout loud enough, it would take my voice nearly 14 hours to make the trip!
     Now, this is where the part comes in that many of us take for granted, but should BLOW YOUR MIND!

     I have, in my possession, a device that takes my slow-moving voice, translates it into a form of energy that travels at nearly the speed of light, and can re-translate the same coming back at me in the other direction, allowing me to have instant communication over that same distance, through nothing but the empty space between me and the person in Australia! 
​
     "Wow!" you say, "this device must be huge!"
     
     To which I respond, "Nope, it sits on the corner of my desk."  
    
     "Well, it must consume some crazy amount of power to propel things at the speed of light."

     "Not at all.  In fact, it probably uses less power than some of the lamps you have in your house."

     "Certainly then, this device you talk about must be pretty expensive, and complex!"

     "Not all all!  You can build one yourself for about $60!"

That my friends, is the pure magic of ham radio.  Mind Blown.


P.S.  
​I did a bunch of my sound-distance math with this fun calculator.  Also, don't forget to check out part 10 of my on-going build project to give your input.  Finally, make sure you subscribe so that you can get updates right in your e-mail!
​
1 Comment

Crowd-Sourced Project: Test Fitting

11/1/2017

 
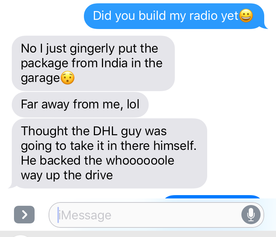
While I was out of town on a business trip, the yellow DHL envelope showed up at my house!  I was checking in on the tracking info, and the day it arrived I was in Boca Raton for work.  I wanted to check to make sure that it actually made it to my house, and not one of my neighbors, so I checked in with my YL:
Picture
With the main piece of equipment in hand, I can start figuring out how to put things together (maybe the DHL guy wants to help!)  If you need to know what things I'm talking about, feel free to start all the way back at part 1 or stick around for the quick version of "here's what you missed."
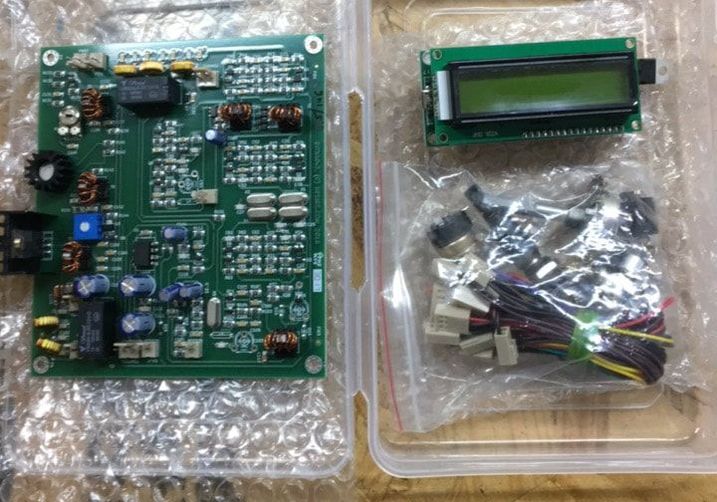
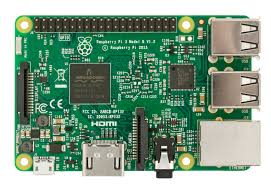
For the quick refresher, here's whats up; I ended up with a neat box.  The readers of my blog decided that I should build a portable HF station around the Bitx40, and also squeeze in a Raspberry Pi computer just for good measure.  
Picture
Picture

So now it's time to start trying to figure out how to stick this stuff in the box!  Rather than just do this in a void, I'll be working a little bit at a time, and getting input as I go!  The rest of this post will be a combination of my thoughts and a survey form, so as you read along, you can click to share your thoughts and vote - just remember to hit submit at the end!  If you only answer some of the questions (or none) that's fine too - just enjoy reading about my thought process!

Voting now Closed

Stay tuned for results, and the next steps in the project!


Thanks to all those that have been playing along so far!  It has been fun seeing where this project goes, and it should continue to be interesting as we keep moving forward!
Back to Part 9
Part 11 Coming Soon!
Back to Part 1

    Categories

    All
    Antenna
    Cw
    Digital-modes
    Flying-with-gear
    Home QTH
    Miscellaneous
    Mobile
    Operating Events
    Portable
    POTA
    Shack Build
    Technical


    - N3VEM -

         Welcome to my Ham Radio Blog!  This blog was started primarily to share my two concurrent shack builds - my mobile station and my home station.  Over time, this has grown to include sharing about my operations, and general radio-related thoughts that I have as a newer operator.  
         
    ​Enjoy!

    RSS Feed


    Picture
    POTA!

    Picture
    Proving that hams do indeed still build stuff!

    Picture
    100 Watts and Wire is an awesome community, based around an excellent podcast. 

    Archives

    September 2020
    July 2020
    January 2020
    September 2019
    August 2019
    July 2019
    June 2019
    May 2019
    March 2019
    January 2019
    December 2018
    November 2018
    October 2018
    September 2018
    August 2018
    July 2018
    June 2018
    May 2018
    April 2018
    March 2018
    February 2018
    January 2018
    December 2017
    November 2017
    October 2017
    September 2017
    August 2017
    July 2017
    June 2017
    May 2017
    April 2017
    March 2017
    February 2017
    January 2017
    December 2016
    November 2016
    October 2016
    September 2016
    August 2016
    July 2016
    June 2016
    May 2016
    April 2016
    March 2016
    February 2016
    January 2016
    December 2015
    November 2015


Picture
Copyright © 2015
 Vance Martin is a participant in the Amazon Services LLC Associates Program, an affiliate advertising program designed to provide a means for sites to earn advertising fees by advertising and linking to amazon.com.