NOVEMBER 3 VICTOR ECHO MIKE
  • Blog
  • Events and Activations
  • Diversions
  • About
  • Gallery
  • Contact
  • Links
  • Subscribe
  • Search
  • Blog
  • Events and Activations
  • Diversions
  • About
  • Gallery
  • Contact
  • Links
  • Subscribe
  • Search
NOVEMBER 3 VICTOR ECHO MIKE

ham radio Projects and musings from a (Relatively) new operator

Power to the Shack

5/1/2019

0 Comments

 
Post contains affiliate links     
     Over the last couple months I've shared some nuggets of information here, on Twitter, and on Instagram, about my dc power distribution for my on-going shack build.  I promised some more details, so here they come!
     Pretty early on in the design of my shack, I knew I wanted to have a 12v power distribution arrangement of some type.  The most obvious reason was because that's what most of our gear runs on, but secondarily, I wanted to make sure that some of my task lighting and other shack "appliances" are also 12v, so that I would have the option of some solar, battery-back up, etc. in the future.  This dictated my basic requirements for dc distribution - a hefty power supply and/or batter charger, fuses or breakers for the different 12v circuits, and some basic control options (relays or switches) to turn stuff on and off.  
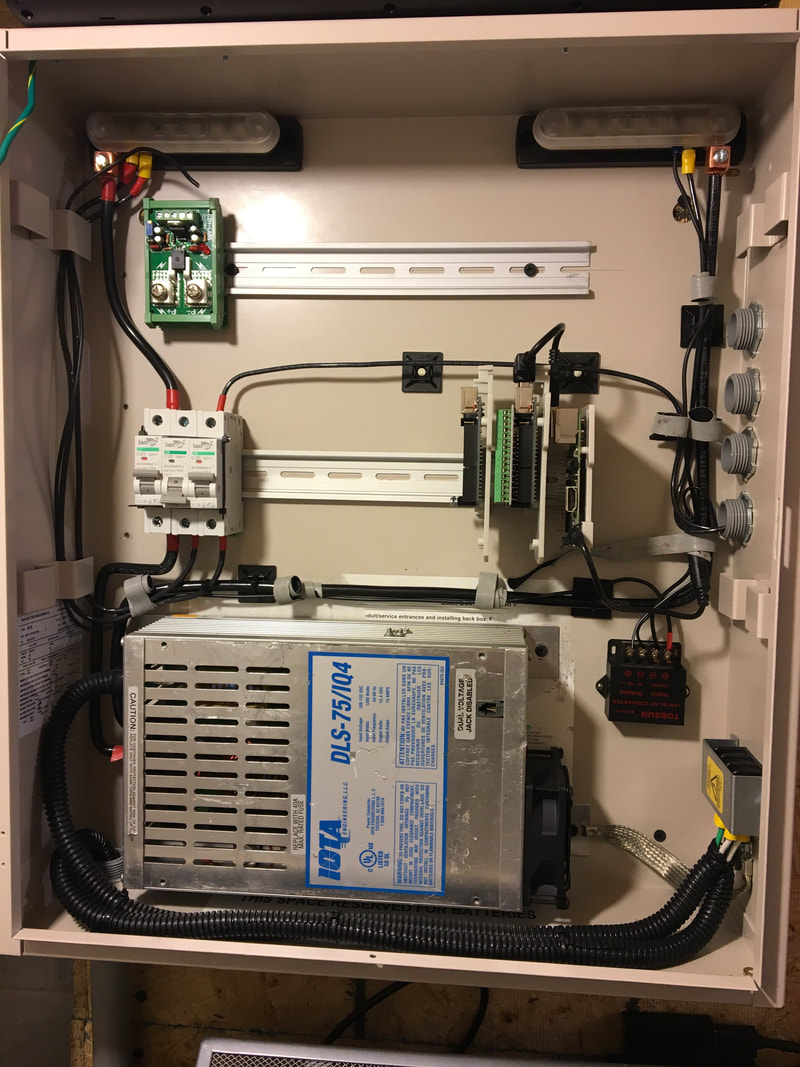
     Step 1 in this process - figure out what to mount all the stuff in!  I personally like the look and workmanship of a proper cabinet and din rail.  What I ended up using for the box was something re-purposed.  I used to lug around some work equipment for training purposes, but with changes in products, and some abuse from being on so many planes, some of the equipment needed to be scrapped, so after gutting, I kept one of the back-boxes.  To meet my power / future battery charging needs, I ordered a 75amp power supply/charger, and started with that:
Picture

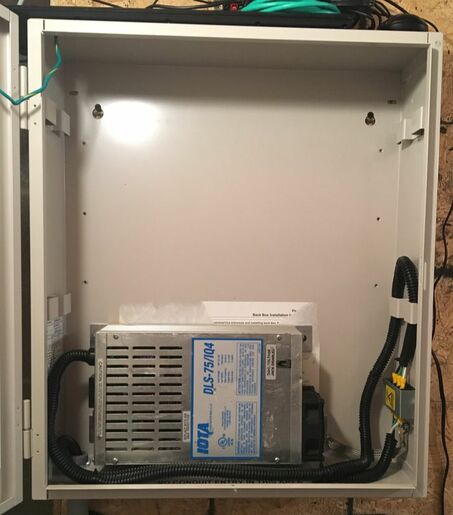
    While I can't help you out with sourcing a back-box exactly like this, I can share a link for the power supply.  I chose the IOTA DLS-75 because they can be had relatively inexpensively, and for a large switcher, they seem to get pretty decent reviews from other hams in regards to being RF quiet etc.  The model I got is a combined power supply / batter charger, so it will also cover me for future battery-backup when I'm ready to add it. 
This is the exact model that I picked up.  You can click on the picture to grab one from Amazon, or if you're lucky like me, you might be able to snag one from ebay for a little bit cheaper.
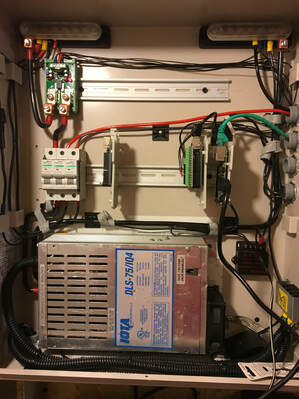
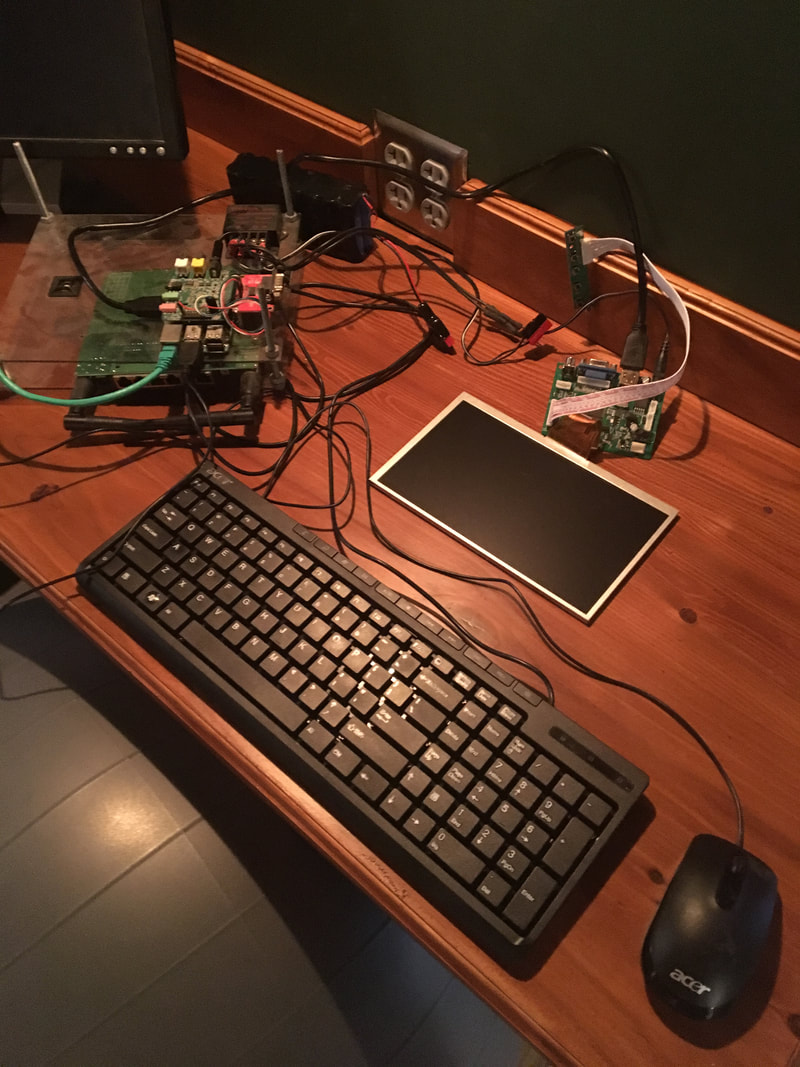
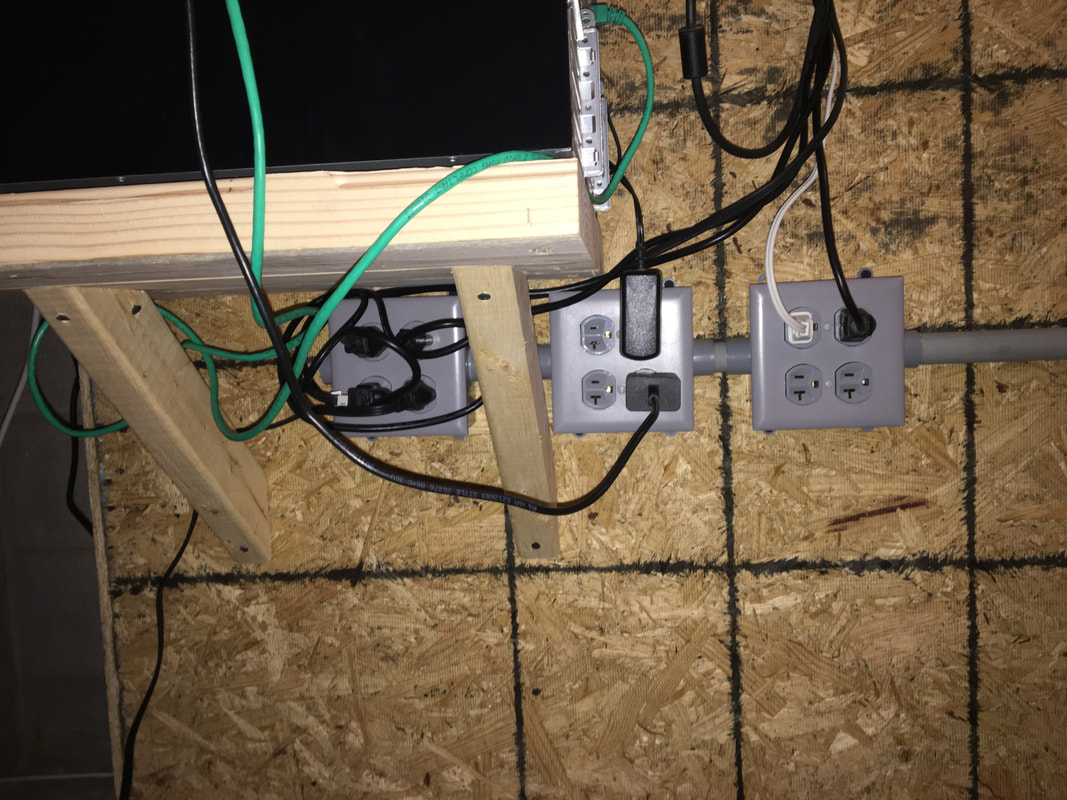
Next in line (because I like the tidiness that can be ​created using din-rail stuff) I ordered up some din rail and some DC breakers.  To start, I grabbed a 63 amp breaker for the "main" a 25 amp breaker to power the main rig, and a 20 amp breaker to wire up misc. 12 v lighting etc.  I also grabbed some bus-bar, and these nifty little din-rail mount plates to hold a raspberry pi and a couple arduino uno cards.  The plan for these was to build in some power monitoring and logging.  I also picked up a little arduino hat that breaks out screw terminals for the input and output pins, to make it easier to wire up sensors.  It also gives a small prototyping area in the center, which may or may not be useful :-)

     Once I had this stuff and started wiring things up, I realized pretty quickly that I had a noisy fan in the power supply I got, so I ordered a replacement fan.  At the same time, I ordered a couple other tidbits:
Picture

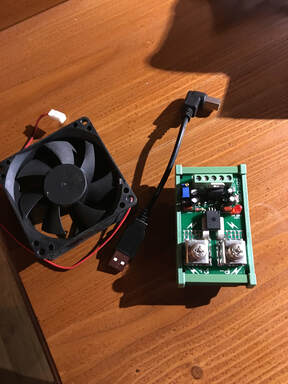
    The little green thing on the right is a din-rail mount dc current sensor, good for up to 100 amps!

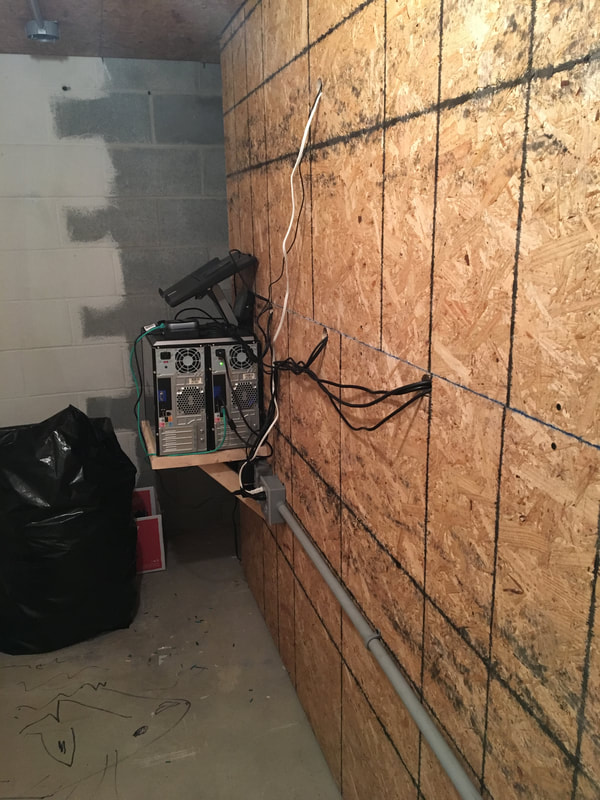
​     There's still a lot of bits I need to add, and wiring to tidy up as I do it, but as I started piecing things together, this is what it started to look like:
Picture

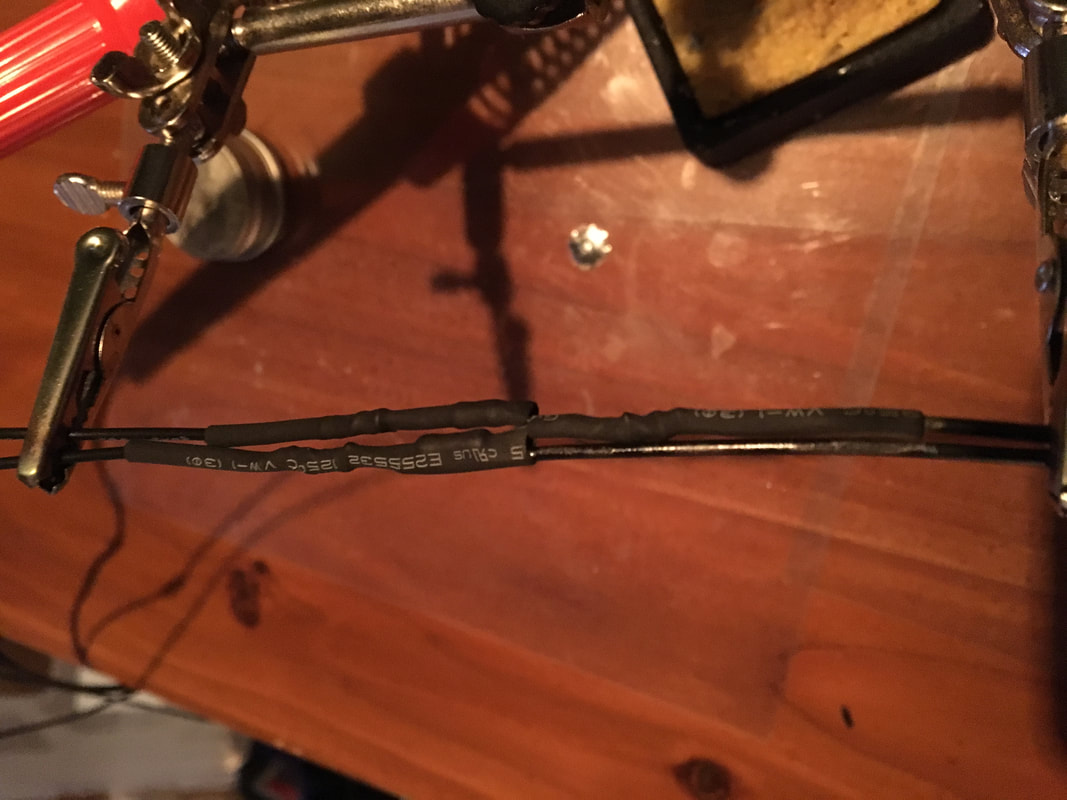
    Wiring up the DC current sensor was pretty easy - feed it power with anything from 8 - 35 volts, and then read the voltage output from the sensor connection terminals.  2.5 volts is 0 amps, and up or down from there gives your your current in either direction (after throwing it into a quick formula to convert the voltage to current).  Since this measures current in both directions, you could easily use this to monitory battery charging/discharging as well!

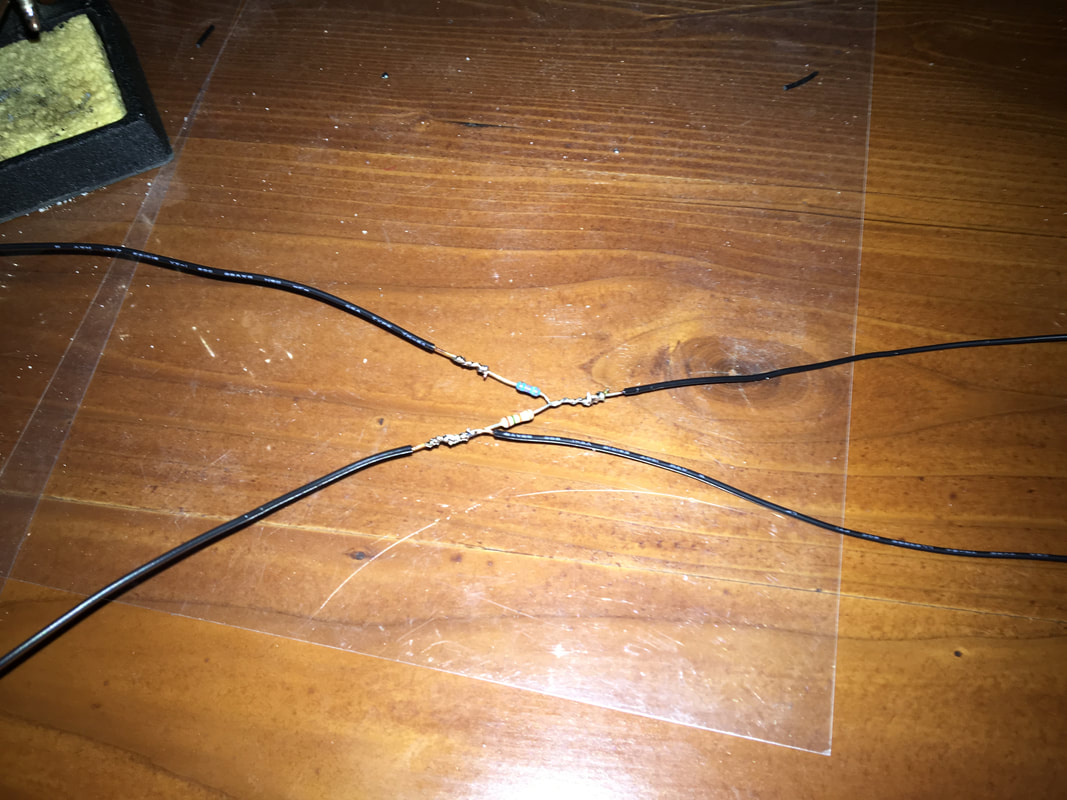
    To monitor the main voltage, I just whipped up a little voltage divider to feed the arduino.  Rather than use something specified somewhere, I just sat down with this calculator, and the pile of resistors in my junk-box until I found a combo I had that worked well.  I then wired up the resistors into a harness, so the voltage divider is now in-line in the wiring between the the arduino and the bus bars where I connected to sample the voltage.
Picture
Picture
Picture

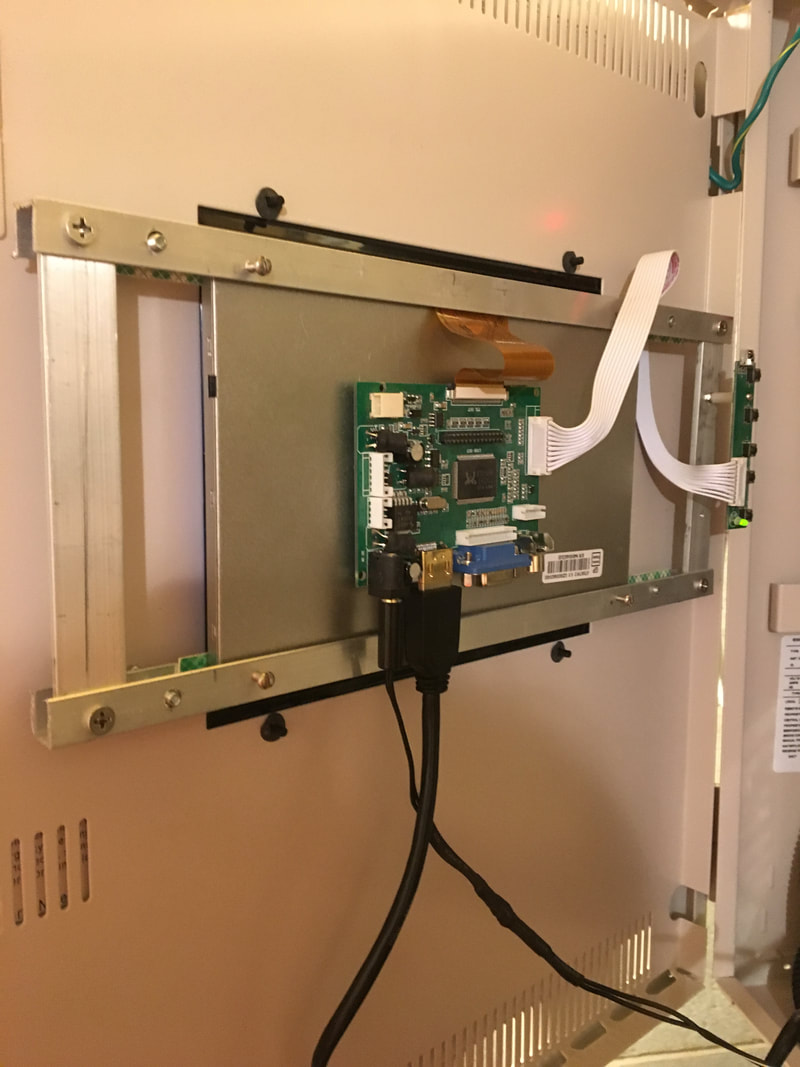
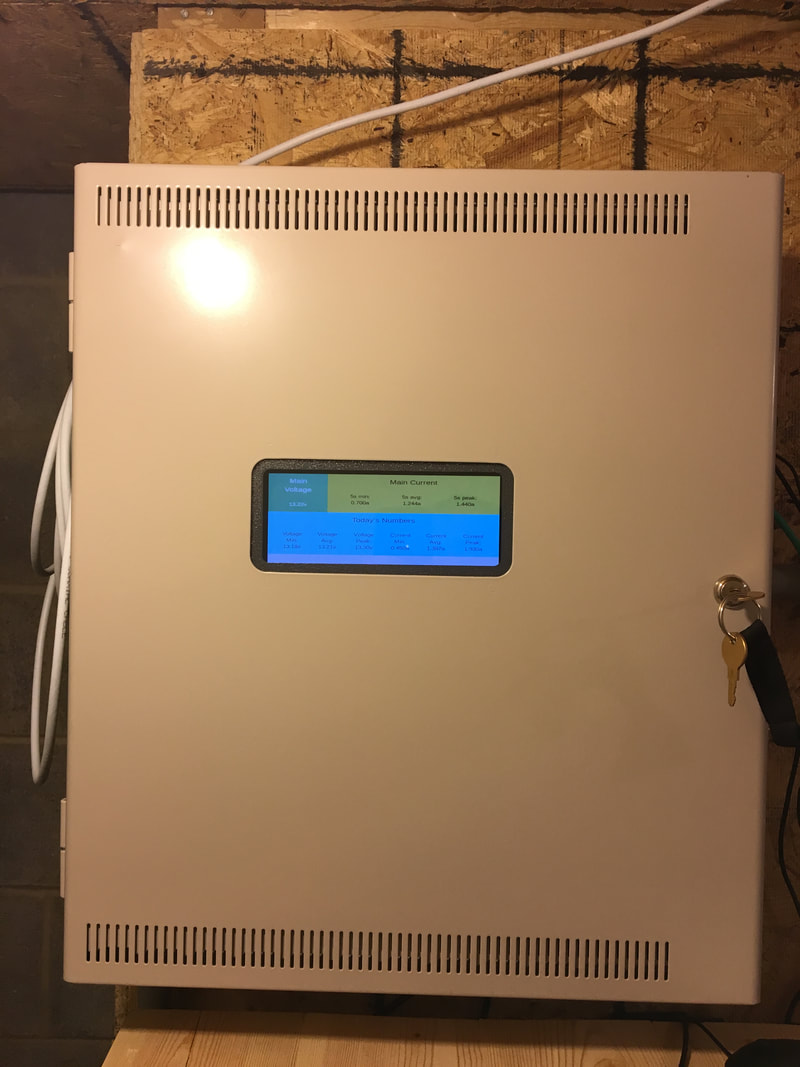
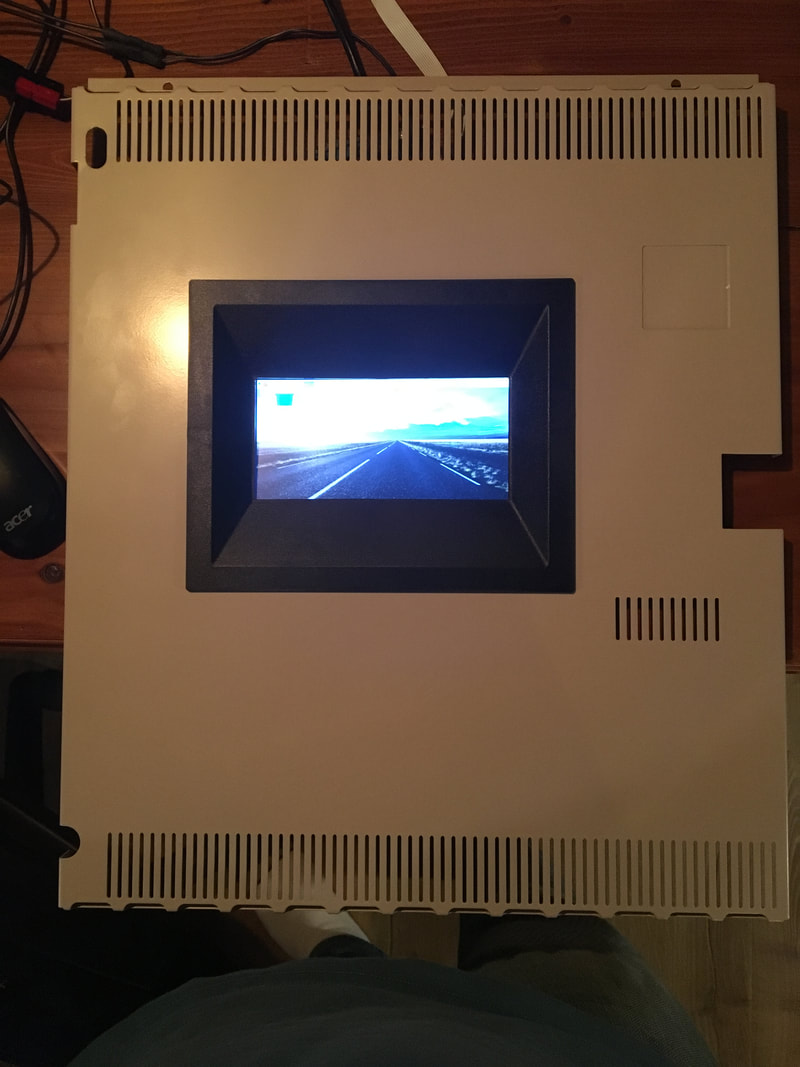
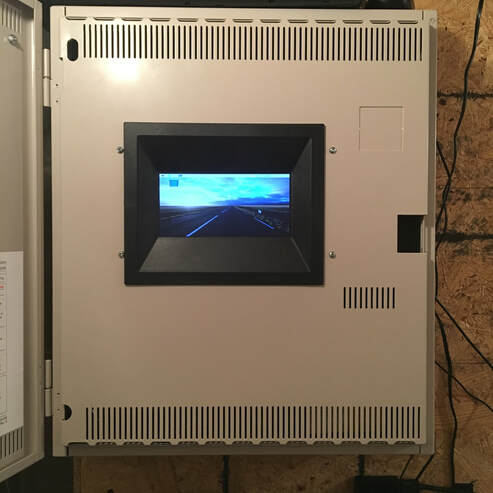
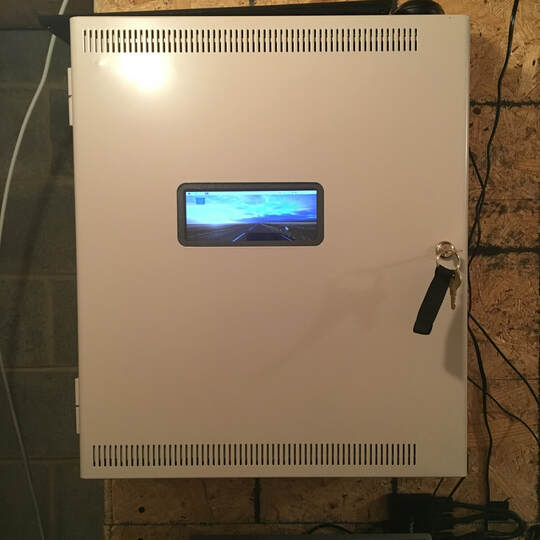
    With basic power and sensors wired up, I mounted up the front panel of the box, which has the display for the Raspberry Pi mounted to it.  (If you missed it, I shared some info when I did that several weeks ago - you can check out the details here.)

   Next, I whipped up some code!  To save time for those who may feel this post is already getting a little long, I'll share the details on that code another time, but if you're super interested, drop me a note and I will send you copies to do with as you please.  The quick summary is that I have the Ardunio reading the voltage and current sensors, and it dumps that data out of it's serial port.   I then have the raspberry Pi running a LAMP stack.  A Python script running on the Pi reads the serial data and stores it in a mySQL database so I can explore and manipulate the data it captures using all the mySQL stuff I'm accustomed to.  I also whipped up a little PHP web site (only accessible on my local network at the moment) that displays the data.  I have the display on the front of the power box showing the page in full-screen mode all the time, and I can also pull it up on my browser any time I want as well - it's fun to pull it up and make contacts while watching the numbers change :-)
Picture
Picture
Picture

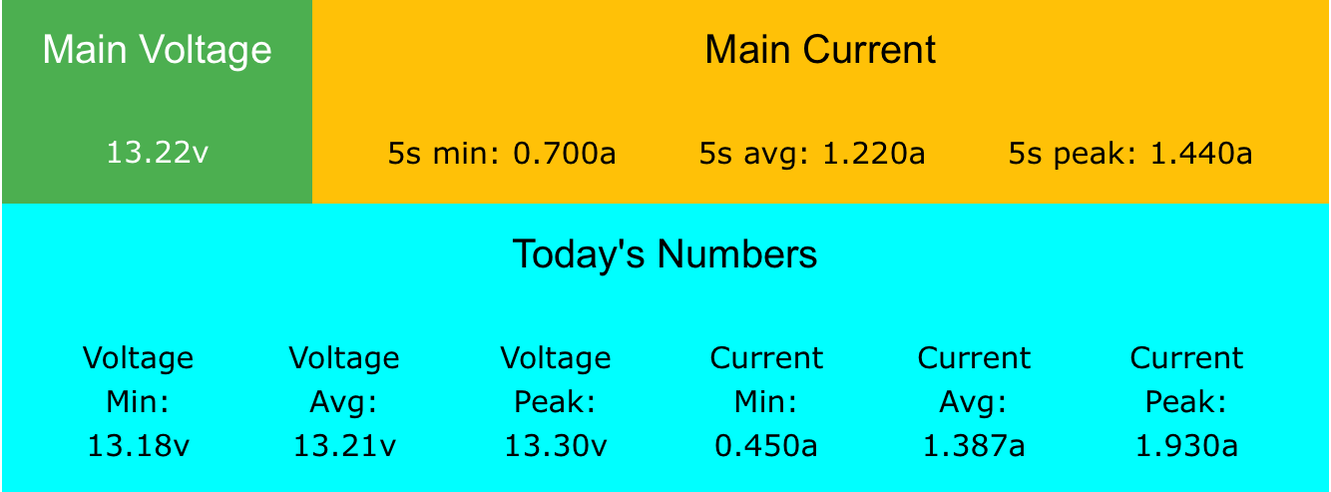
     So there you have it - the shack power distribution update!  There's still a lot of work to do on this, but at the moment I have functioning power for the rig and some task lights, and I'm recording data about my power usage.  This means that when I get ready to drop some big back-up batteries on this situation, I'll have a good idea of what size of batteries to shoot for.

​73 for now!
Previous Shack Build
Next Shack Build
Back to Shack Build Part 1
0 Comments

Sick days - might as well play radio!

3/19/2019

0 Comments

 
Post Contains Affiliate Links     
     The last couple months have been the launch of a major work project, and the start of a second one.  I seem to have this trend, that when I am crazy busy like that, if things slow down suddenly, then I get sick :-(  I guess being so busy, I tend to just push through, and then it sneaks up on me later...
     Anyway, I had just that scenario - the last couple months have been pretty intense, and now I'm sitting home with the flu.  Might as well play radio!  Since I've been so busy, I've just been slowly plugging away at miscellaneous projects, so I'll just give an update on the radio things I managed to sneak in during the last couple months:
  • Started working on the DC power distribution for the ham shack.  If you read this post you might recall that I stuck a raspberry pi in the box, to be the display for the power monitoring.  Since then, in little bits and pieces, I've started fitting out the insides of the box with a power supply/battery charger (so that the shack can have battery backup!) some Din rail, a couple DC breakers, some Arduino boards, and a big hefty current monitoring board that I'll use with the Arduino, to monitor total shack current draw.
  • I also got some 12v lighting installed over the desk.  I was in desperate need of task lighting, and I wanted 12v lighting so that it could run off the shack power supply/charger, and eventually be backed up by the batteries that I plan on adding.
  • I also finally put my "go-box" on my desk, and dropped a coax down into the room, so that I could actually play radio while I continue working, and debate the "big" purchase of a permanent shack-rig.
Picture
  • I also made a new battery purchase to go along with the "go-box."  Most airlines permit up to 2 batteries, under 160 watt-hours, in your carry-on.  A Bioenno 12v 12ah battery fits nicely under that limit :-)
Picture
​
  • Lastly for now - with some changes at work, we E-scrapped the training equipment that I used to lug around (because we upgraded our product) so I was left with a bunch of really nice Pelican cases.  I gave one to my boss, because he wanted one for lugging around camping equipment, I gave one to my radio club for storing club equipment, and I shipped one off to the Ohio Valley Experimenter's Club (OVEC) because I happened to hear KF7IJZ mention on the Workbench podcast, that they needed a tote of some sort for club gear, since it travels between sites regularly.  After passing them around, I was left with 2 - one that I use like a suitcase, which holds my go-kit, some antenna stuff, and a weeks worth of clothing, and a second that I have the pick-and-pluck foam for, that I plan to fit out as a dedicated "radio equipment only" case.
Picture

Happy hamming!
0 Comments

Reduce, Reuse, Recycle

1/16/2019

0 Comments

 
Post contains affiliate links     
Picture
     One of the things that we try to do in our house is generate as little trash as possible.  We're certainly not perfect, but it does usually take us a couple months to fill a single curbside sized trash can (excluding our recent construction project.)  One of the benefits of being in the mindset of not generating waste, is that you start getting in the mind-set of re-purposing and reusing things.  This translates well to my ham radio hobby and my on-going shack build, as much of the stuff in the shack so far has been salvage, dumpster saves, or at least purchased used.  With this little bit of background, I'd like to share another progress update, because it was done with mostly re-purposed stuff.

As I was planning dc power distribution and monitoring for the shack, I had made up my mind that I wanted to use an electrical cabinet and some din-rail mounted stuff for equipment power distribution, dc breakers, fusing, control relays etc.  I wasn't quite satisfied with the price/size combinations I was coming across as I googled around, so I set the thought aside while doing other tasks for a few days.  One of those tasks happened to be breaking down some work equipment that needed to go to e-waste.  As I was staring at the metal box I was pulling the stuff out of (that would have ended up in dumpster at work) it dawned on me - here's the cabinet for my power distribution!
The equipment that was originally in the box had a small operator interface, so the box was designed with holes for a display to show through.  Rather than just have a weird hole, I went back to my re-purposing mind set.  I pulled out an old college project where I had used a raspberry pi and a small display, and gutted it :-)  I figured I could use the pi and display to write myself some power monitoring software to keep track of what the shack is doing.  For a gut check, I put the display on my desk, connected the pi, and powered up, just to make sure it still worked, and then I laid the panel over top of it, to see if I could get the overscan settings on the pi adjusted so it would line up with the opening:
Picture
Picture
 
 The display that I had was purchased some time ago, but it was one of these, that can be had from Amazon for pretty cheap.  This isn't touchscreen or anything, but for my purposes that would be just fine, considering it was something I already had!  It took some fiddling with the overscan settings on the pi, but I was able to get the display area of the screen to a size that would perfectly fit the hole in the front panel of the enclosure.
Since it looked like I was going to be able to make this work, I grabbed some U channel aluminum at the local big-box hardware store, and whipped up a little frame to hold the monitor in place.
Picture
I ended up putting a thin strip of weatherstripping in the channel on the side that would be the front of the monitor.  I then drilled and tapped holes on the back side, so that I could put the monitor in the frame, and put in a couple screws with just enough tension to press the edge of the monitor into the weather stripping to hold the monitor nicely in place.  Once it was in the box, I was pumped about the way it turned out!
Picture

    The pictures above shows the box with the outside door swung open.  When that door is closed, there is just a smaller opening so that the display is still visible.  This box also had the benefit of being nicely vented, so heat build-up shouldn't be an issue (I can always add a fan if it is.)
Picture

Now I just need to start adding the power distribution parts, sensors for monitoring them, and write some software!
Previous Shack Build
Next Shack Build
Shack Build Part 1
0 Comments

Grounding & Bonding

1/2/2019

0 Comments

 
Post Contains Affiliate Link     
     The month of December was a wild ride for me!  I was in Colorado for the 2 weeks before Christmas, training a new team of folx how to use the processes/systems that I've been working on for the last 18 months.  It was rough on the YL, having the kiddos on her own that long, but I'll be working from my basement office/shack for the next several months, without doing any traveling :-)
     Speaking of the basement office/shack, I obviously haven't gotten anything major done since I was away, but I did get a little bit done over the weekend.  I had been debating for some time what to use as a bus bar behind the desk for station grounding/bonding.  Ultimately, I went with the "budget" option that, per N0AX in "Grounding and Bonding for the Radio Amateur" is perfectly acceptable; a piece of copper pipe.  In his book he recommends 1/2" pipe, but I used 1" pipe for the extra surface area, and because for a short length, it wasn't that much more expensive.
Picture

     As I mount the gear, it's face will be flush with the other side of the wall, and it's backside will stick through, just above the copper bus bar/pipe, giving me easy access to the common ground.

     I also wanted the first ground rod to be as close to the operating position as possible.  Since this wall is 4' back, to run my strap from the pipe to the ground rod up (or down) and over to the wall, then to the ground rod outside, would have meant at least 15' of strap before hitting ground.  To avoid the potential issue with a long ground connection, I actually drilled a hole in the floor, and hammered in the first ground rod right into the dirt under the house.  This keeps my ground connection to less than 2'.  From that rod, I'll then tie to the one outside (which in turn I will connect to the main electrical panel's ground rod.)  Some self-leveling concrete caulk, and I'm ready to add the straps.
Picture

     I still have a lot of work to do, but it's certainly fun being able to finally work on the shack "infrastructure" now that the living space part of the room is done!
Previous Shack Build
Next Shack Build
Shack Build Part 1
0 Comments

Monitoring

12/9/2018

0 Comments

 
Post Contains Affiliate Links     
     No, I'm not referring to monitoring the bands (not at the moment anyway!)  I'm referring to monitoring up my new ham shack!  Since my new shack is also my new office, and I work from home, I needed to get my monitors mounted because I use them every day, and the mess of wires on the desk was making me bonkers!  With that intro - here's my recent accomplishment:
     I had 3 monitors to mount, so I started by marking the center-line of the wall.  After that I measured the offset to the mounting holes for the brackets I used.  Then I marked the hole locations, and measured and leveled off the center bracket markings for the outer brackets.  The bottom piece of tape is just where I measured that the bottom of the monitors would land, because I wanted to make sure there would be room below for the future HF rig to slide under them.
Picture

     With the markings done, I drilled holes, and hung up the first monitor - looking good so far:
Picture

​Below are the brackets I used, and they are a steal on Amazon!  I got them for like 12 bucks each and they are just as heavy duty as anything I put my hands on at the local home centers and electronic stores.  I also can't say enough for the anchors I used.  They are way better than standard toggle bolts - they hold better, and because of the design their backs don't fall into the wall if you need to back the screws out.  (word of caution - no matter how good the toggle, don't hang monitors just on drywall - you need to hit wood!  In my case, the back of the desk area is 3/4" plywood, so no worries on holding power there.)

Anyway, since I was satisfied with the positioning of the first monitor, up went the next two.  This looks much better than the mess with the wires everywhere:
Picture

But wait...where did those wires go?  Well, once I was sure the monitors where just where I wanted them, I swung them out of the way, drilled holes, and passed all the cabling through, back into the service area behind the operating position:
Picture

As you can see in the picture above, I made a fancy little shelf to hold my towers and laptop stand back here, so that this stuff could live out of the way, instead of under my desk at my feet, spewing hot air all over me:-)  I just needed to get power to all this stuff, so I ran some conduit from the junction box where I left the ends of the circuits for this type of stuff, so that I would have easy access.  Since I was doing it this way, I was also able to just pull the circuit and put plenty of outlets right at the equipment, rather than needing to rely on a dinky power-strip:

Just don't be too rough with your comments on my cord routing :-)  They will be getting tacked and tidied up once the radio's are in, and I have the more final mess of wires to route and tack down.
P.S. I just got my statement from my work letting me know what my annual bonus is going to be, so I've started "the talks" with the finance manager in our house (my awesome YL!) about what may or may not be able to be diverted towards a new HF rig :-)
Previous Shack Build
Next Shack Build
Shack Build Part 1
0 Comments
<<Previous
Forward>>

    Categories

    All
    Antenna
    Cw
    Digital-modes
    Flying-with-gear
    Home QTH
    Miscellaneous
    Mobile
    Operating Events
    Portable
    POTA
    Shack Build
    Technical


    - N3VEM -

         Welcome to my Ham Radio Blog!  This blog was started primarily to share my two concurrent shack builds - my mobile station and my home station.  Over time, this has grown to include sharing about my operations, and general radio-related thoughts that I have as a newer operator.  
         
    ​Enjoy!

    RSS Feed


    Picture
    POTA!

    Picture
    Proving that hams do indeed still build stuff!

    Picture
    100 Watts and Wire is an awesome community, based around an excellent podcast. 

    Archives

    September 2020
    July 2020
    January 2020
    September 2019
    August 2019
    July 2019
    June 2019
    May 2019
    March 2019
    January 2019
    December 2018
    November 2018
    October 2018
    September 2018
    August 2018
    July 2018
    June 2018
    May 2018
    April 2018
    March 2018
    February 2018
    January 2018
    December 2017
    November 2017
    October 2017
    September 2017
    August 2017
    July 2017
    June 2017
    May 2017
    April 2017
    March 2017
    February 2017
    January 2017
    December 2016
    November 2016
    October 2016
    September 2016
    August 2016
    July 2016
    June 2016
    May 2016
    April 2016
    March 2016
    February 2016
    January 2016
    December 2015
    November 2015


Picture
Copyright © 2015
 Vance Martin is a participant in the Amazon Services LLC Associates Program, an affiliate advertising program designed to provide a means for sites to earn advertising fees by advertising and linking to amazon.com.