NOVEMBER 3 VICTOR ECHO MIKE
  • Blog
  • Events and Activations
  • Diversions
  • About
  • Gallery
  • Contact
  • Links
  • Subscribe
  • Search
  • Blog
  • Events and Activations
  • Diversions
  • About
  • Gallery
  • Contact
  • Links
  • Subscribe
  • Search
NOVEMBER 3 VICTOR ECHO MIKE

ham radio Projects and musings from a (Relatively) new operator

Crowd-Sourced Project: Brainstorming Results

8/10/2017

0 Comments

 
If this is the first you are stumbling upon my "Crowd-Sourced" project series, feel free to go back to part 1 to come up to speed.  For the less patient, here's the "what you missed last time" version:
Picture
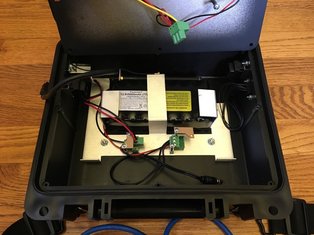
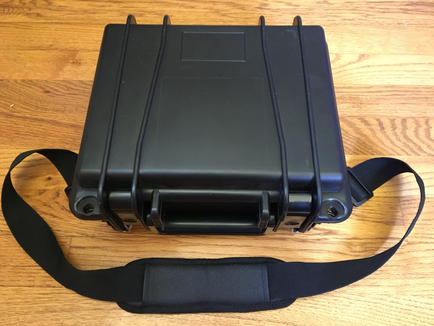
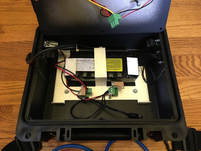
One of the pieces of equipment that my work revolves around comes in these neat little boxes.  We had a couple that were getting scrapped, so I nabbed one of them, and gutted it down to the box, and the battery that was built into it.  I figured I would use it as a ham-radio project, but since I was undecided exactly what I wanted to build, I started putting it up to a series of votes.  Through that voting, it was decided that I should build a small/portable HF station into the box.  In the most recent installment I asked for feedback on what radio architecture to use, whether I should do a kit, build from plans, or use a pre-built radio, and whether or not I should try to squeeze a computer into the package.

Since you are probably most interested in the results, I'll share those first, but please stick around after that, because in the voting process, there were, as C+C Music Factory says, some "Things That Make You Go Hmmmm"

What Architecture of radio?

With this, we were deciding whether to go the route of an SDR radio, or something based in hardware.  I must admit that the results here surprised me, but the overwhelming majority - 70% - voted to go with a "traditional" architecture.

If a Traditional Architecture is chosen, should I still try to squeeze in a small form-factor comptuer?

This was a resounding yes, 60% of the vote.

If an SDR Architecture is chosen, should we go with a computer dependent, or a computer free option.

Since going the SDR route wasn't chosen, this question is no longer applicable, but just for fun, 55% said to use a computer, 35% said to go computer free, and 10% didn't care.

What should I use as the "Base" for the radio?

With this question, I was basically deciding if I should do a kit-built radio, build something from scratch/plans, or just buy an off-the-shelf radio that's ready to go.  This category did not have a clear winner, with 35% voting to buy something finished, 30% voting to build from a kit, and 30% voting to build from scratch/plans, and 5% that didn't have an opinion.  

Summary of the Vote

I did ask for comments along with the votes, and many individuals had input that I'll put into the next round of planning as I share the next steps.  For now though, the results of this vote, and the prior votes, bring us to this point:

I'm going to be building a small HF station into this box, and powering it from the existing battery.  The station will be based on a traditional architecture (non-SDR), with a small form-factor computer included.  Because the final vote was so close, the radio itself might be off-the-shelf, a kit, or built from plans.  

Choosing the actual radio will be what we vote on in the next installment.  For that, I will be using the input from everyone that gave it, along with some research on my own.  I will also narrow down the options to things that are feasible - some of the suggestions, while great, were either too physically large for the box, or are out of the range of what I'm willing to spend for this project.

What about those things that make you go hmmmm?

I hope you stuck around this long, because I think there are some good educational nuggets in here.  
  • It seems like there is a bit of "whats in the black box?" going on in our hobby right now, and there are still quite a few individuals that don't really know what is "under the hood."  Many people have speculated on this, but for me, there is a some proof in the pudding because a number of the votes for a "traditional" architecture included recommendations for radios and/or kits that were software defined.  The same thing happened several times the other way around as well.  If you're not familiar with SDR, I'd recommend starting with the ARRL's information.
  • I think even for those that know what SDR is, there are still some misconceptions.  As least one person in their comments said that if I go SDR, I must have a computer (they referred to the Flex Radio series). It probably bears stating that being connected to a computer isn't what makes a radio software defined - processing in software what has traditionally been done in hardware (mixers, filters, modulators, etc.) is what makes a radio software defined.  All of the software work can be (and is often) done on-board.  There are actually several options, both kit and off-the-shelf, that are software defined radio's that do not require a computer.  The easiest way to think of it is by picturing it as the radio with a very tiny computer built right in, so that you have a single-board unit with everything in one small package.
  • Just an interesting observation, with SDR marching to the forefront, and being what most radio's in the future will probably be, I'm surprised there weren't more votes for this route.  This is a good lesson though, in the fact that what we assume can often be quite different from what the "majority" thinks.
  • I also had an interesting observation confirming something in human behavior.  I've known from the start that some of my blog posts are probably "too long" because most of us just skim things and move on. Many of the voters haven't been with us from the start, and just skimmed and voted without going back to catch up.  I know this, because there were quite a few comments suggesting things that those of you who have been along from the start voted out.  There were also quite a few suggestions for things that were way too large for the box in question, or were downright silly.  No hard feelings - I do it too - it's just interesting to observe, and that's why I have to take some time between posts in this series to filter through everything.
  • We often hear the more seasoned hams complaining that no one builds anything anymore.  I think this proves that wrong, because while the vote was a dead heat between the 3 options, another way of looking at it was that only 35% chose an off-the-shelf option, while 60% chose a more home-brew option (the tie at 30% each for build from plans vs. build from kit.)  George and Jeremy (KJ6VU and KF7IJZ did their forum in Dayton on this topic)
That's all I have for now folks!  Sometime in the near future I'll have the next part in this series ready to go, and we'll decide on things like which radio and which computer to use!
Back to Part 5
Continue to Part 7
Back to Part 1
0 Comments

DIY Rig Control in Python

8/3/2017

2 Comments

 
Picture
This is something I've been meaning to share for some time, but just haven't gotten around to actually sharing.  As some of you may be aware, I am an "adult-learner."  The company I work for has been graciously paying for my BS in Information Systems (I currently hold an Associates Degree, which they also paid for!)  For one of my classes we had an open-ended assignment to do a fairly significant project.  Obviously, I chose something radio related!  Some of the information here might be a little confusing if you're only a computer appliance operator, but I'd encourage you to skim through it - even if you learn just one small thing it's worth it!  If you're a software developer, this stuff is probably all very elementary, but I'm sure there are lots of folks like me who land somewhere in the middle that might get some benefit from this!

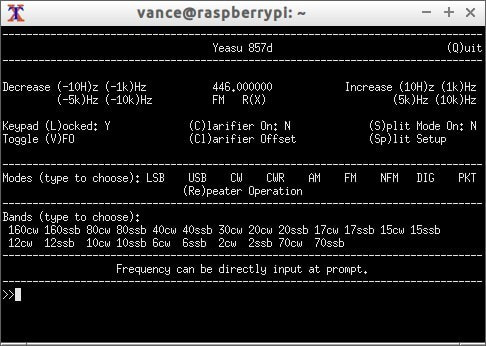
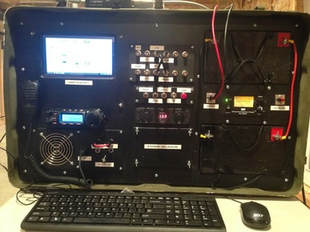
For the class, we had to write a project proposal, a plan, do the work, and then present our project.  I'll share all that so that you can look at the details if you want, but my "secret" mission was to learn a bit more about how software rig control actually works.  With that in mind, I wrote a software Class (huh? Whats that?) which I called yeasuControl, that would handle interfacing my Yeasu 857d with a Raspberry Pi.  To verify that yeasuControl worked as intended, I also wrote a very basic, text-based rig control program, which I named "radioInterface3" (I wrote it in Python 3, and my first 2 versions were a bust, so it just kind of worked out that there were 3's all around.)  For some wow-factor when I did my demonstration in the classroom, rather than run it straight from the Pi, I accessed the Pi via a separate PC over Broadband Hamnet (I wasn't yet aware of AREDN) with everything running off 12v power, to demonstrate the possibility of a field deploy-able, remotely accessible, radio station.
Picture
Technically, the software I wrote doesn't do anything new, but just like some people enjoy building their own radio's (even though you could just buy one), I think it's fun to write my own software (even though I could just download something!)  Pretty much everything that the software Class I wrote will do is already included as part of hamlib, but writing this myself helped me learn exactly what's going on when I connect those magic wires between my rig and computer!  Oh - this was also my first foray into Python, so I also used this project to learn a new language. (although, really, once you know any C based language, the rest of them are usually pretty easy to pick up.)
With the intro out of the way, I figure the easiest way to go about this is to just share the documents, and give a summary of each one.  You can feel free to download them, read them, and use them, if you want to see the nitty-gritty details.  Alternatively, you can just skim the descriptions to see what I did.  I'm sharing all of this under the "Karma License." (I just made this up - it means do whatever you want with it, but know that Karma will come for you if you deserve it based on what you do...)  
document_1_-_yaesucontrolpresentation.pdf
File Size: 407 kb
File Type: pdf
Download File

Presentation - This first document is an overview PowerPoint that I used when presenting my final project.  The presentation itself doesn't have a lot of information, because most of the demonstration was hands-on with the hardware and software.  (just a tip - If someone can understand your whole message just by looking at the PowerPoint, you probably included too much in the PowerPoint.)
document_2_-_project_proposal.pdf
File Size: 183 kb
File Type: pdf
Download File

Project Proposal - Before we actually started the project, we had to write a proposal, and get approval from our professor to begin.  In this proposal I explained the software I was proposing to write (the yeasuControl Class), and gave an example of it's potential use, by explaining what ARES, RACES, etc. are, and how those organization could use something like this.  This is where I detailed that the core of the project was the yeasuControl software, and that the scope of the project would revolve around this software - any actual interface software (radioInterface3) and hardware was just to support demonstrating yeasuControl's functionality.
document_3_-_project_plan.pdf
File Size: 149 kb
File Type: pdf
Download File

Project Plan - ​This is the fully fleshed out project and scope.  This included details on the management of the project, it's schedule (5 weeks from start to finish), and the scope.  For highlights, the main purpose was to write the Class, and to include in that class all of the functionality that Yeasu CAT control can support.  Secondary to the scope was writing a minimally viable user interface (radioInterface3), to demonstrate the functionality of the class.  Since it's text base, you could technically use this rig control software on a computer that doesn't have a GUI installed - for single board computers this is sometimes a benefit, because you don't lose processing power running a pretty window manager.  The scope also includes details on the types of hardware that the software should be able to run on, etc.  Because this was something that needed to be done rapidly, I had to keep the scope pretty tight.
document_4_-_yaesucontrol_class_documentation.pdf
File Size: 176 kb
File Type: pdf
Download File

Class Documentation - ​This is the documentation that explains each class object attribute, what it does, and how to use it.  For the non-IT minded, this document doesn't explain how an end-user uses a piece of software - it explains how a software developer would use this within the software they are making.  You can think of it like the manual that an engine manufacture would prepare for the auto-maker.  It's documenting a specific part, not a whole program.
document_5_-_radiointerface3_documentation.pdf
File Size: 164 kb
File Type: pdf
Download File

radioInterface3 Documentation - This is the document that reads like a user manual for the the program that could be considered the user-interface.  This program was written to be the most basic possible program (minimally viable) that would demonstrate the functions of the yeasuControl Class.  It is text based, but if you have a very low-power computer, that might be just the ticket you need.
python_files.zip
File Size: 7 kb
File Type: zip
Download File

Python Files - Here they are, the actual .py files containing the code I wrote. If you like to tinker around with Python programming, I hope these help.  If you're a pro, be nice when you critique my work (I am an amateur after all!) I don't have room for an entire Python lesson here, but if you do a Google search for "Python Basics" you'll find all sorts of information, including information on how to compile these and use them if you want to just take what I wrote and use it as-is.
So, there you have it!  I hope at least some of you can glean some useful information out of my work.  In the interest of the betterment of the ham radio hobby, and doing whatever I can towards our collective Elmering in the hobby, I'm offering all of this info, and the work I put into it, with no strings attached.  If you play around with it and have questions (like what serial interface I used with the Pi, etc.) feel free to check out my contacts page and reach out to me.

​  Enjoy!
2 Comments

Ham Radio Boom-Box

7/31/2017

0 Comments

 
Post contains affiliate links
Before I start - Don't forget to vote!  I'm still asking for your ideas on Step 5 in my Crowd Sourced Project.  As always - keep your money, just give me your ideas!  With that little ad out of the way, here we go...

​Its a miracle! I started and finished a project in the same week!

​I shouldn't be too rough on myself - quite a few of my ongoing projects are rather large, so progress tends to be slow, doing small amounts of work as time allows. This project however, was one that was a complete workshop tangent.
Picture

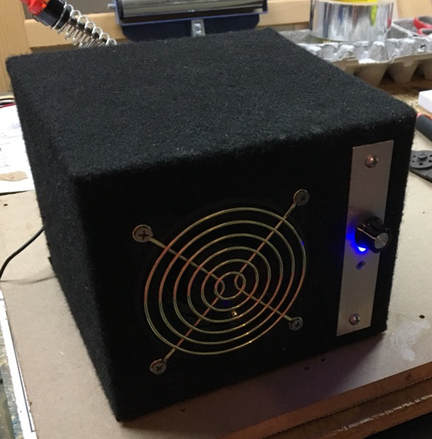
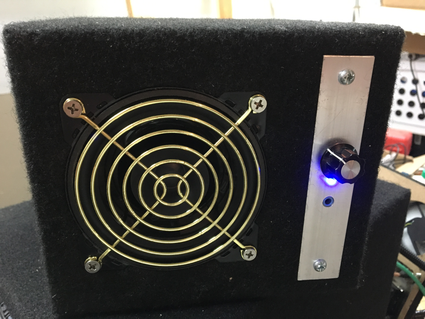
There it is - a "homebrew" speaker for ham radio use! The day I started this, I didn't even know I was going to do it. It all came about becasue I was working on another radio project (the "secret project" that I allude to from time to time) in the garage, and I wanted to be able to hear my rig over all the noise I was making. I started to look at powered speakers online, when suddenly it dawned on me that I probably had everything I needed to make one, primarily becasue the key components (a speaker and a small amplifier) I had left over from tearing this thing apart in order to work on version 2 (which still isn't done....sigh.)
Picture

So realizing that I had those parts, I started to dig in the piles in the garage and presto, within a couple days I had a small powered speaker! If you follow me on twitter you saw these pictures as I did each step, but here they are again with a few more details. Enjoy!
Picture
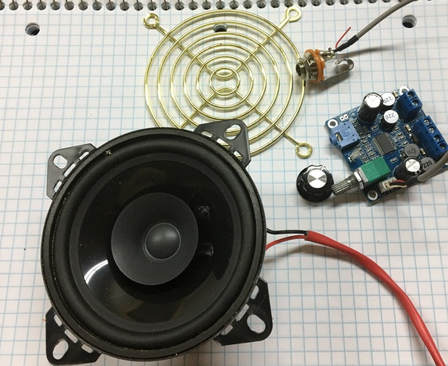
Here's some of the important parts after I dug through my bins to make sure I had what I would need. The speaker is a 4" car-audio speaker. The "grill" is a fan cover from a PC power supply. The knob came from my junk drawer, but I'm pretty sure it's from Radioshack. I also had a generic 1/4" mono jack salvaged from another scrapped project. Lastly - the amplifier. If I had skills like @SmittyHalibut I would have designed this myself, but I dont, and I had a cheapo that came from eBay or Amazon a while ago, so I just used what I had!

Pretty much any 4" speaker would work if you want to duplicate this.  You can pick up a really cheap one like I did at any auto-parts store, or you can check out Amazon - you can find options from cheap and good-enough sounding, to expensive and impressive sounding, and everything in between.
Any 80mm fan grill should work, if the speakers you buy don't come with a grill.  You just want to be certain that the grill you choose has enough clearance that the speaker surround doesn't hit it.  For the cheap speaker I used, this type of grill worked perfectly.
1/4 inch mono panel jacks aren't quite a dime a dozen, but they are less than a dollar a piece.  these are the ones I used.
Knobs are a pretty cheap commodity too.  I got mine at a local Radioshack a while back, but something like these from Amazon or elsewhere should do the trick.
Picture
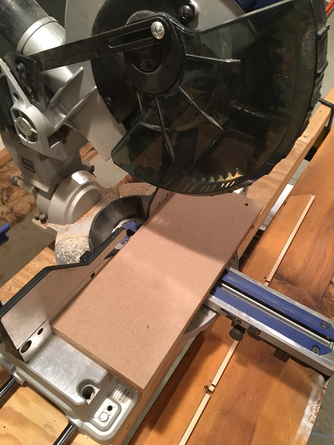
Next I needed to make the enclosure. I had some 1/2" MDF scraps from another project, so this is what I used to make the box. Just a tip - in my area at least, the Blue store only carries 3/4" MDF - if you want 1/2" go to the Orange store.
Picture
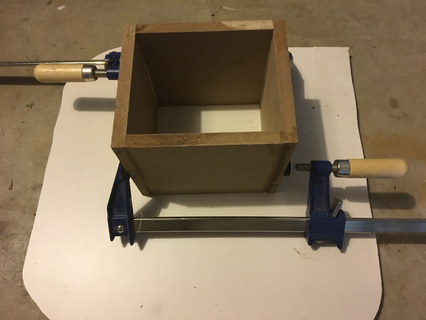
Glued up the 4 sides first. Here's a box-making tip that helps me - at these steps, cut your parts just a hair large, and glue them with a smidge of overhang. You can then do a quick zip with a flush cut router bit to get a perfect corner after the glue sets (or sand them down if you don't have a router. Same result, just takes longer.)
Picture
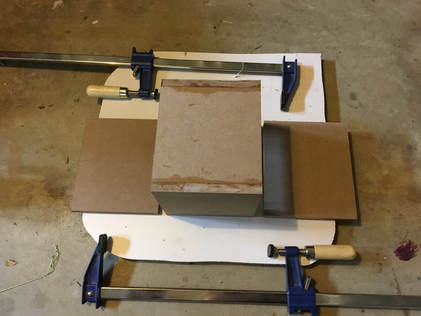
After the glue had overnight to set up, I got the front and back ready to glue in place.
Picture
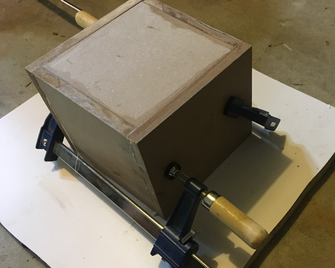
When gluing on the front and back I also cut my parts a little large and then routed them flush after the glue dried. I should probably mention that my router is one of my favorite tools. Don't worry about the fact that the box is now completely sealed shut. You'll see how I handled that shortly.
As I built the box, I didn't design it to any specific size.  Technically, speakers usually perform best with an optimized air space behind them, but for communications quality SSB, and even basic CW, I wasn't too worried.  During the banter on Twitter with KR6ZY, KD9EAS, K4CDN, and some others, Mark mentioned the enclosure designs that are specifically resonant for CW frequencies.  If you're a big CW person, you might want to do a Google search for "resonant CW speaker."  Another option if you want a more size-specific air space would be to get one of the rubber baffles designed to go into the hole before the speaker.  I'm cheap (err... I mean frugal) so I didn't go that route.
Picture
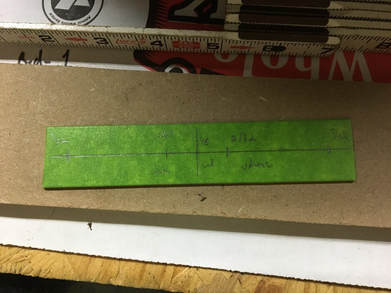
For the panel mount connectors I knew the plywood itself would be too thick, so I pulled out some aluminum scraps and cut them to size. I covered them with tape so that I could measure and mark my holes for the various connectors / knobs, etc.

If you have a hardware store near you, that is probably the best place to get MDF and aluminum, but you can order both of these things online.  Shipping rates can get strange with sheets of plywood or 4' lengths of aluminum, but there are places like online metals that will cut things to size for you.
Picture
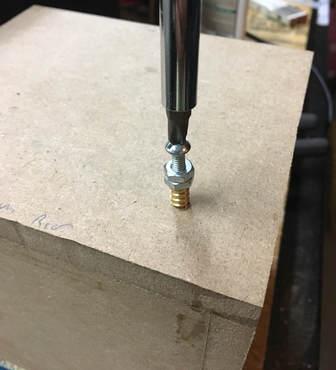
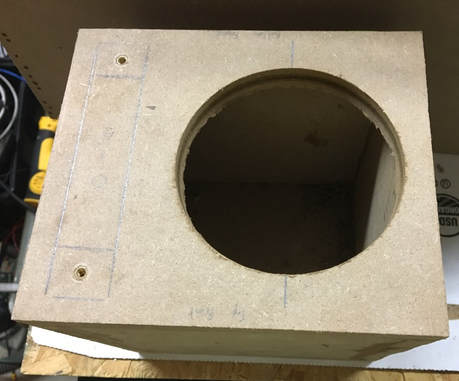
I layed out my panel parts and marked where I wanted them to go. To hold them in place I decided to use thread inserts so that I wouldn't need to access the inside of the box to hold a nut. On a woodworking forum somewhere I read to put them in this way, because trying to turn them in with a screwdriver using the built in slot always seems to break the little "ears"
Picture
The most important part - a hole for the speaker! Thank goodness for a 4" hole saw - I could have never made a cut that round with a jig saw! You can also see one of my panel marks clearly in this picture.
Picture
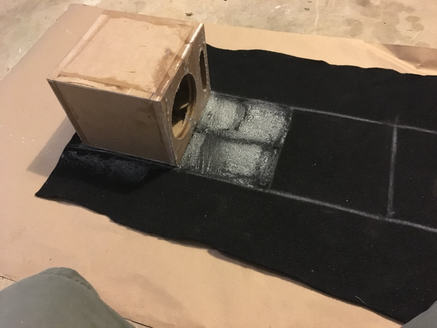
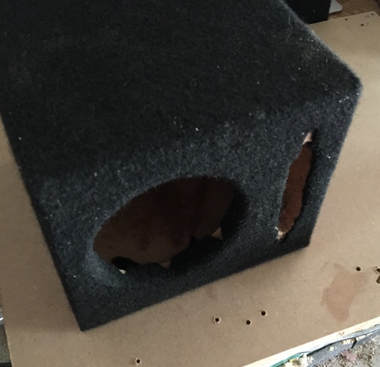
After cutting the holes for the panels I was ready to cover it in carpet, since that's the quick and easy way to finish a box like this. If you do a Google search for "carpeting a speaker box" you'll find all kinds of instructional videos and tips for this process. My biggest tip - a very sharp knife makes a world of difference!
Picture
Carpet done, and holes trimmed out!
Picture
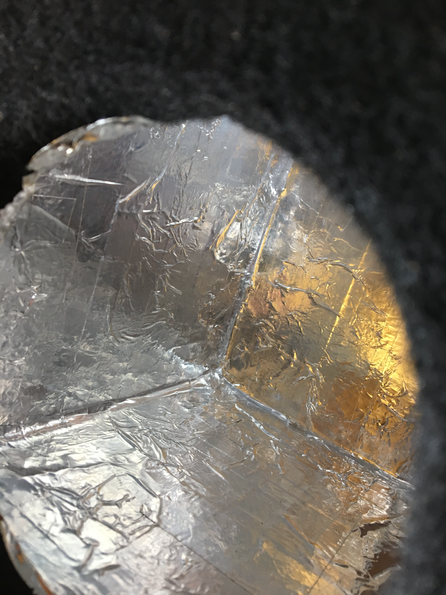
I have no idea if this step actually made a difference or not, but to try and keep RF out (and potential RFI from the little amp in) I lined the inside of the box with aluminum tape. I wasn't sure if this stuff would be conductive through the adhesive, so I checked, and it is! I might do this more often when I make small boxes for stuff, because it was pretty cheap and easy to do.
Picture
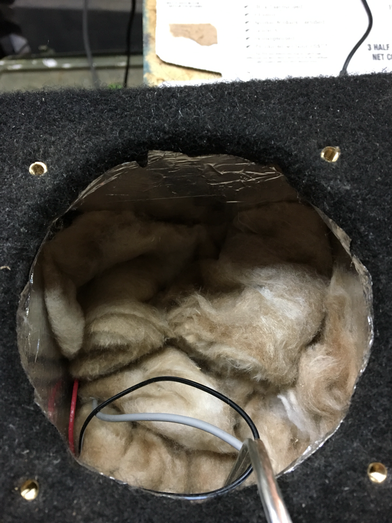
This is another step that I can't really say whether it helps or not, but quite often speaker enclosures are stuffed to keep sound reflections inside the box from doing weird stuff to what you hear on the outside. I had some imsulation scraps, so in they went (P.S. Thanks go to Will - KD9EAS for pointing out on twitter that this looks like a box full of Tribbles...)
Picture
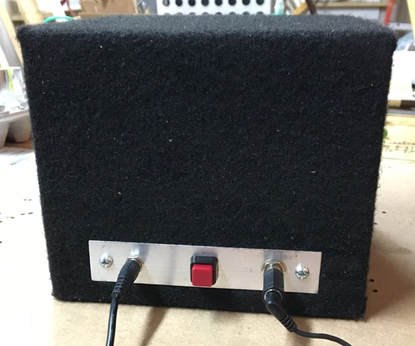
The rear panel got a 1/4 inch mono jack wired to just the left channel of the small amp. I used a coaxial power jack, mostly becasue I was out of PowerPole connectors. The positive lead runs through the switch at the center, to act as a "main power" button.
Most Radio power stuff is standardizing on PowerPoles for power connections, but I used a coaxial connection for 2 reasons - I had run out of power poles, and it's easier to make a round hole in a panel then a square one.  I figured I can always make a pigtail to go from this to PowerPoles the next time I order some parts.
Any switch would work for something like this, but in situations where the item might end up sitting close to something else, I like a push-button type, because they are a little lower in profile than a big old toggle switch.
Picture
On the front, the panel was drilled to match what was needed for the little amp - the volume control, the power LED (after bending it 90 degrees) and a 3.5mm TRS connector (this connector has a bonus! Be sure to read the text below!)
This is the amplifier board I used - the SMAKN® TPA3118 numeric 12V power amplifier board 

The 3.5mm jack on the small amp turned out to have a "bonus" functionality! It was really meant (I think) to be an alternative input from the ones on the board itself. It is just wired in parallel with the other inputs, so by plugging a mono to stereo adapter (remember that I was only using the left channel). I can use traditional stero headphones to monitor the input source for the amp.

Why is that a bonus? In field-day like situations, the speaker can be plugged into the rig, and the operator can plug headphones into the speaker. The operator can then use the rig's AF gain (volume) control to set a comfortable audio level for the headphones, and then anyone who wants to listen in on the action can adjust the speaker volume until their heart is content, without impacting what the operator hears in their headphones. I think thats a slick, unplanned for feature! You could always get the same effect by plugging both a speaker and headphones into a "Y" cable, but this has a more polished feel to it.
There you have it! A powered 12 volt speaker enclosure for the times that I need more punch than I can get with a more traditional passive one, and I made it entirely from stuff that I already had on hand!  If you're as luck as I am and have a good stash of parts, maybe you can do the same - if not, most of the individual part pictures in the post are Amazon links, so you can get what you need if you want the joy of rolling your own!
0 Comments

Crowd-Sourced Project: BrainStorming

7/27/2017

1 Comment

 
Welcome to 5th installment of posts centered around my crowd-sourced project!  Before I get to far, I just want to remind everyone that this ongoing project is crowd sourced, NOT crowd funded.  Keep your money.  Just share your ideas!  See Part 3 of this series if you need some details about crowd-sourced vs. crowd-funded (hint - they are NOT the same thing!)
If you are just joining us, you can go back to part 1 to come up to speed, or you can just read on for the quick summary.  For everyone else, sorry for the long delay between part 4 and this update - life happens!  

​Basically, what we have going on here, is that I ended up with a pretty neat box, complete with a Lithium Iron Phosphate battery, because it housed a piece of equipment at my work that was getting scrapped.  
Picture

As a ham, it was obvious to me that this box needed to turn in to a project.  Rather than just strike out on my own, I solicited input from the internet at large, to get ideas for what to do with the box.  The overwhelming majority said that I should built it out into a small HF station.  With that decision made, it's time to revisit this, and put some additional details around how we should go about that.  This means that it is once again time to put it to a vote!  If you have a couple of minutes, I'd recommend going back and reading the scope in part 1, so that you have it fresh in mind when you vote, but if don't, feel free to just start voting!

Voting is now closed - results coming soon!


Thanks for your input! 
Back to Part 4
Part 6
Back to Part 1
1 Comment

Crowd-Sourced Project

3/22/2017

3 Comments

 
Post Contains Affiliate Links
Picture
     N3VEM wants you (yes, you!) to help design a project!
     Many of you are probably already aware of the idea of "crowd-sourcing." For those of you that aren't familiar with it, Google defines crowd-sourcing as "the practice of obtaining information or input into a task or project by enlisting the services of a large number of people, either paid or unpaid, typically via the Internet."

 So, why am I talking about crowd-sourcing? Here's why:
Picture

Did I lose you yet?
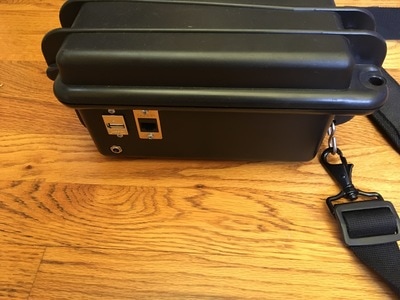
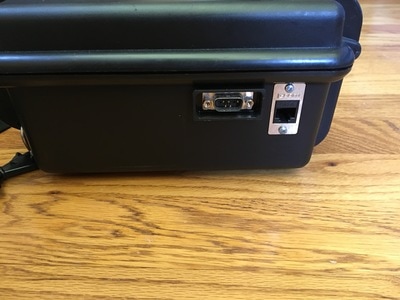
​      I hope not, because I'm finally ready to get to the point. One of the pieces of equipment that my work revolves around comes in these boxes. Recently, we had one that went bad, and it was getting scrapped. After pulling out the proprietary bits, I was left with this box that was just too cool to get rid of. My mind was instantly racing with radio-related ideas to use this for. For some reason, as I was brainstorming, it dawned on me that this could make a fun "community" activity - with the community in question being anyone who happens to stumble on my corner of the Internet, who also has even the slightest interest in, or curiosity about, ham radio.
So, what exactly is the activity? If you haven't figured it out yet, I want us to collectively brainstorm / design / build a project around this box. The brainstorming and designing will be the community effort. The building part will be me, probably exclusively, but a couple of you live close, so I might request to bring in some help if the ideas get too wild :-)
So, with introductions out of the way, I'm going to start with ground rules, then the project constraints, and what we have to work with. Since I am the ultimate builder, and probably the sole financial resource for this project, I will proudly hold the right to change/clarify the ground rules and/or scope at any time I feel it is necessary, and will also hold final go or no-go decisions on anything that involves my personal financial input. With that being said, I will strive to stick to the crowd-sourced intent, and will try to give details and reasons if I veer from that at any point.

Ground Rules

  • No idea is a stupid idea
  • disagreements and discussion are encouraged, but if you get trollish about it, you'll be removed from participation - this is meant to be fun!
  • If you think something "must" be part of the project, convince the rest of the crowd to agree with you (and also convince them to fund it if it is something pricey!)

Scope

Picture
This will be pretty loose as far as project scopes go, but here's the current scope/constraints. This should be interesting, because we're starting with a box, and working backwards, instead of the other way around:
  • The end product must be ham radio centric
  • ​The end product should fit 100% within this box for storage and transportation. Things that need to be taken out of the box and "deployed" for use are okay.
  • This box is a Seahorse Model SE-300. (P.S.  as far as this type of case goes, the Seahorse cases are very reasonably priced!) Inside dimensions of the bottom are approximately 9.5"x7.4"x3". Inside dimensions of the lid are approximately 9.5"x7.4"x1"
  • The parts remaining in the box from it's previous life can either be re-used, modified, completely removed, or replaced, unless otherwise noted
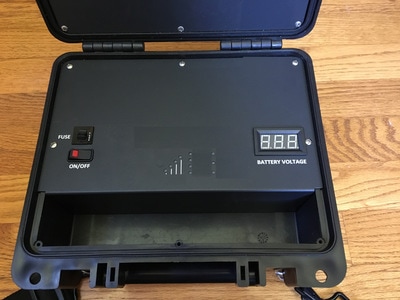
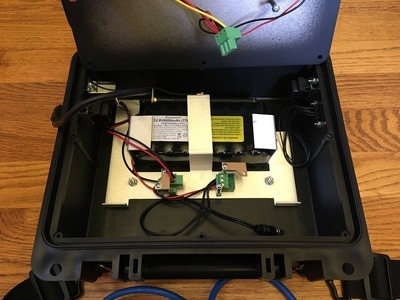
  • The box contains a 12v 6000mAh LiFePO4 battery (and charger). Preferably, this should be the power source, if the end product requires power.
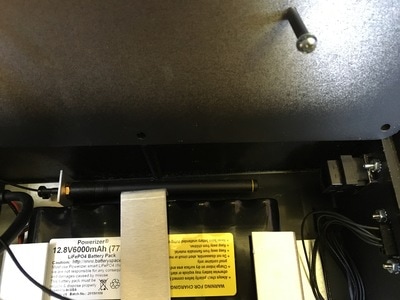
  • The mounting bracket that holds the battery is also the ground plane for a 900MHz antenna that was used in this box's prior life (I have no particular attachment to it, but wanted to let you know that it's there)
  • The box has the following bulkhead connectors that, in the past, interfaced equipment in the box to the outside world: (2) RJ45 Jacks, (1) DB9 male, (1) USB, (1) coaxial power connector currently used to connect the battery charger
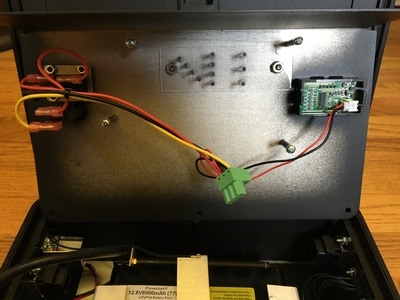
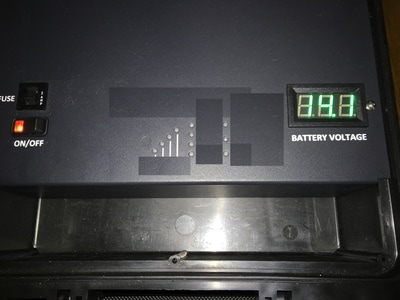
  • Box "display" panel has a 2amp fuse/holder, voltage meter, power switch (switched power from the internal battery), and some holes that previously had LED's shining through them.
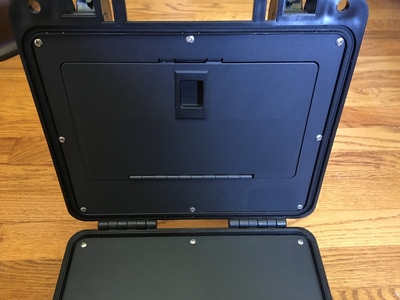
  • The lid of the box has a panel and door, making a storage compartment in the lid.
  • Drilling holes / screwing things into the box / panels is okay
  • Frugality is important. This doesn't mean things have to be cheap, but any cost has to have an associated benefit (I may ask to be "sold" on ideas if they seem pricey)
  • I prefer to reuse / recycle things wherever possible, but will buy parts if suitable things can't be found to re-purpose
  • I have, or have access to, most tools that could conceivably be needed. I am willing to beg/borrow/ask for help for anything I would need to use that I don't have, or don't have experience with (I don't own an Oscilloscope, or Spectrum Analyzer - yet)

Here are some pictures to help stimulate all those creative juices out there!  (As a note - excuse my bad photo-editing.  I had to hide some proprietary markings.  As the project moves forward I'll paint over those if the panels get re-used.)

​Now, as a member of the "crowd" here is the first assignment. Using the form below, submit your ideas for:
  1. ​The name of the project (as we learned from Amazon and Monster a name doesn't have to reflect what the thing actually is, so we might as well come up with that first - it will be easier to share what we're working on if we have something to call it!
  2. A short description giving a high-level idea for a project. The key here is short - we'll get into details once a project is picked - for now, just stick to ideas like "VHF/UHF go kit", "Flux Capacitor Module", "QRP station", or "Dilithium Crystal Power Box".
After ideas have have been gathered, we'll take a vote! Feel free to discuss and/or ask questions in the comments or on social media, but the final list of things to vote on will be compiled from the submitted forms.
Lastly, be sure to share this with everyone you know! A crowd-sourced project is more fun and more exciting the larger the crowd gets!  We'll keep the suggestion pool open for about a week before I make the list and put it out for a vote!

Suggestions Now Closed!

     Thanks for the suggestions everyone!  The time for submitting ideas has closed, but you can you use the links below to see where the group is in the project, and add your input!
Continue to Part 2
3 Comments
<<Previous
Forward>>

    Categories

    All
    Antenna
    Cw
    Digital-modes
    Flying-with-gear
    Home QTH
    Miscellaneous
    Mobile
    Operating Events
    Portable
    POTA
    Shack Build
    Technical


    - N3VEM -

         Welcome to my Ham Radio Blog!  This blog was started primarily to share my two concurrent shack builds - my mobile station and my home station.  Over time, this has grown to include sharing about my operations, and general radio-related thoughts that I have as a newer operator.  
         
    ​Enjoy!

    RSS Feed


    Picture
    POTA!

    Picture
    Proving that hams do indeed still build stuff!

    Picture
    100 Watts and Wire is an awesome community, based around an excellent podcast. 

    Archives

    September 2020
    July 2020
    January 2020
    September 2019
    August 2019
    July 2019
    June 2019
    May 2019
    March 2019
    January 2019
    December 2018
    November 2018
    October 2018
    September 2018
    August 2018
    July 2018
    June 2018
    May 2018
    April 2018
    March 2018
    February 2018
    January 2018
    December 2017
    November 2017
    October 2017
    September 2017
    August 2017
    July 2017
    June 2017
    May 2017
    April 2017
    March 2017
    February 2017
    January 2017
    December 2016
    November 2016
    October 2016
    September 2016
    August 2016
    July 2016
    June 2016
    May 2016
    April 2016
    March 2016
    February 2016
    January 2016
    December 2015
    November 2015


Picture
Copyright © 2015
 Vance Martin is a participant in the Amazon Services LLC Associates Program, an affiliate advertising program designed to provide a means for sites to earn advertising fees by advertising and linking to amazon.com.