NOVEMBER 3 VICTOR ECHO MIKE
  • Blog
  • Events and Activations
  • Diversions
  • About
  • Gallery
  • Contact
  • Links
  • Subscribe
  • Search
  • Blog
  • Events and Activations
  • Diversions
  • About
  • Gallery
  • Contact
  • Links
  • Subscribe
  • Search
NOVEMBER 3 VICTOR ECHO MIKE

ham radio Projects and musings from a (Relatively) new operator

wire, buddipole, & Strange neighbors

10/17/2016

5 Comments

 
Post Contains Affiliate Links
     Over the past couple of nights I'm sure I caused a bit of "what is that guy doing now?" conversation in my neighborhood.  Luckily, my immediate neighbors know I'm a ham, so when they see me messing with masts, wire, and other related tid-bits, they know what I'm up to.  The other people driving by however, probably just think I'm weird. 
      So what "weirdness" was I up to this time?  Oh you know...just the basics - rigging up a wire dipole (oppa, inverted v style - womp womp womp womp).  ​
Picture
I was doing this (putting up wire, not doing the Gangnam Style Dance) in my front yard, because I was really playing around with something that I hope becomes an addition to my portable kit, and since my radio is in my car, it is easier to rig up an antenna out front, and run the coax to the trunk to test it out.
     Basically, this all started because on 40 meters the Buddipole is pretty narrow-banded.  I wanted the option for a full size 40 meter dipole when doing my portable stuff, and figured since I already had a feedline, a center insulator (in the form of the Buddipole Versa-T) and a bunch of other nic-nacs, I could just rig up a wire dipole to take along, so that I have the option available to me.
     So, first things first - acquire some wire (heh...that rhymed...) You can get wire just about anywhere, but for this project I just used standard 14 Gauge Stranded THHN wire.  If you're lucky, you might even have some laying around!
     Next I grabbed a couple of these L style Mechanical Connectors.
     Once I had these, I actually drilled out the hole so that a 3/8"-24 stud would pass through.  I also got a couple spacers with a 3/8" inside diameter from the local big-box hardware store (to be honest I don't remember if I picked these up at the blue store or the orange store, but they probably both have them.)  This combination of hardware gave me a way to attach the wire to the Versa-T (the Buddipole center-insulator/feedpoint), by using one of the Buddipole knobs.
Picture
     I've seen people advocate using ring terminals under the connection for the banana plug, but that's risky - it's plastic on plastic, so you're really relying on the inside edge of the ring terminal to happen to be touching the post that runs down the center - there is no firm metal on metal contact if you do that.  My method here firmly clamps all the metal bits together making a good connection, probably cable of handling more power than the wire being connected to it.
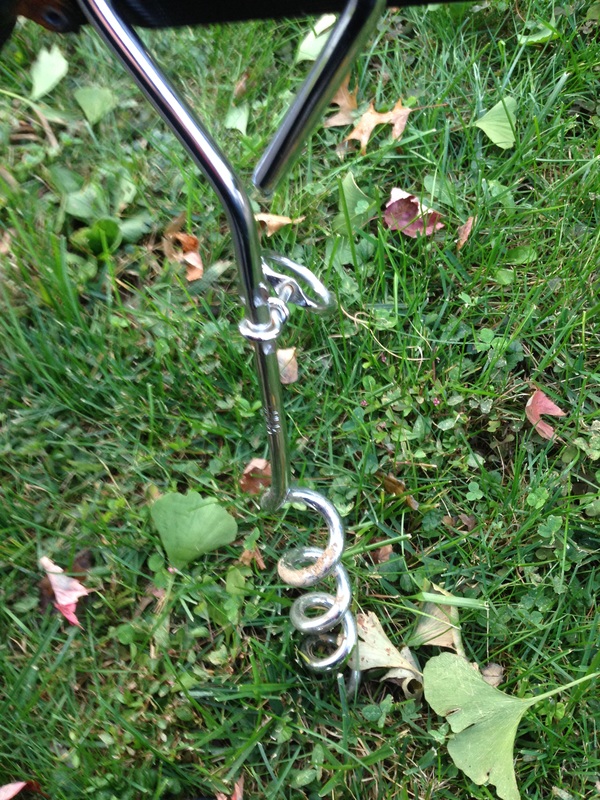
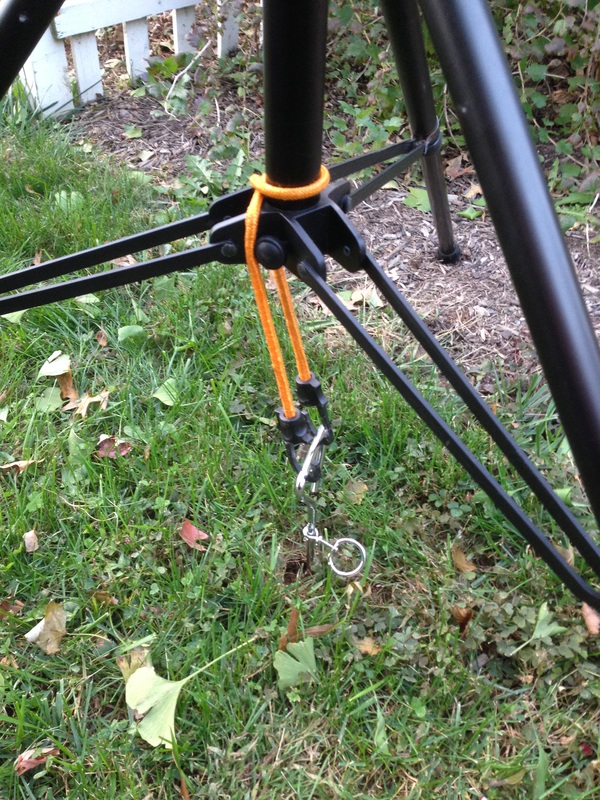
     One quick note on "guying" my Buddipole.  I use a method to simply anchor directly under the tripod instead of setting up bunch of guy wires.  My method uses a ground screw, intended for tying dogs out in the yard, and a bungee cord.
Picture
Picture
     Both of these fit in the bag with my Buddipole.  These ground screws are great - I'd recommend adding several to your go-kit because they are an easy way to guy lightweight stuff, without needing to also carry a hammer to pound traditional stakes into the ground.  Just make sure you know that you aren't screwing into something important!
     At the other end of the wire, I used a small Pulley/Hook assembly that also came from the hardware isle of one of the big box home centers.  This made it easy to tie a rope too, which allowed me to tie the rope off to a stake, and also pull the wire through the pulley.  Since this is for portable operations, I didn't do any permanent clamping - just twisted the wire back around on itself when I had it tuned to the length I needed.  This method also makes tuning easy because I can just wrap more or less of the wire back on itself to adjust the length.
Picture
     Also, even though it was probably not necessary, I decided I wanted the legs of the dipole to end just a little higher than where they ended up being, so I grabbed a couple driveway markers that I had in the garage, and stuck them in the ground and looped the rope around to bring the wire height at the ends up just a little bit.
Picture
     Along these lines, these fiberglass driveway markers are probably a good thing to have, to take along to events like field day so that you can mark off where coax is, run caution tape from post to post to block off area's around antenna's, support twin-lead off the ground, etc. etc.
    Tuning the wire took a little longer than normal, because aside from the normal up and down activity to adjust the lengths of the dipole legs, I was also being "helped" by future operator 1, while carrying future operator 2 (who had gotten tired of being in the stroller).  This means that most of the tuning was done one-handed while I said things like "don't put that there!" and "stop throwing sticks around!"
     It was all rewarded in the end though with:
​ 1)  A decent SWR across the band:  
Picture
2)  A rather picturesque "wire at a cloudy sunset" shot
Picture
3)  A contact with an Elementary School Radio club from a couple states away, that was on the air for the school-club-roundup.
     So, after all that, I now have a couple lengths of wire with some attached hardware that I can use in conjunction with my Buddipole.  In places where stakes aren't an option I often weigh down the bottom of the Buddipole with the spare tire from the car, or some other heavy object, and the ends of the dipole legs can be weighted with water jugs, logs, rocks, or whatever other medium-heavy object nature presents me with.  Because of the height of the center of this dipole, the antenna in this configuration is definitely more of an NVIS setup - at least until I lay hands on that taller mast I've been eyeballing....

     Once again, thanks for stopping by!  Please feel free to stay awhile and click around the categories at the right, and the links at the left for more Ham Radio fun and musings!
5 Comments
Mark
10/18/2016 11:25:57

how high was the Versatee ?

Reply
Vance - N3VEM
10/18/2016 11:32:24

A better question might be how low was it ?
It was just mounted on the "standard" Buddipole mast, so about 10' or so off the ground. I'm sure I was shooting a lot of signal straight up into the clouds, but that's the kind of compromises we make for portable Ops I suppose!

Reply
Pat VE9ES / VE6PDB
10/19/2016 10:23:49

I did a similar, but larger / cheaper setup. I used a painters pole (18') in the middle with a piece of PVC pipe drilled to sit on top of the paint roller I had cut off at the handle to make a "spike" and with strain relief type holes on the ends for the antenna to feed through. I ran 100' of automotive wire out in each direction down to another piece of PVC pipe as an insulator, to rope and down to a large heavy metal piece I had sitting around at each end (old industrial shelving brackets). I put an SGC-231 in the middle hanging from the pole and tested it. I did great from 80 up, making contacts to all over Europe, USA, South America and was heard in Australia and Japan, but people didn't let me reply from the pileups. FT-857D was the rig. I bought poles for the ends and was going to make bases for them to make it portable, but moved to an apartment before I got to that.

Reply
Vance - N3VEM
10/19/2016 11:50:40

Sounds like a good setup! The main reason I used the Buddipole parts as my center was because I already had it ?. If I didn't have that, I would have probably done something more along the lines of what you described.

Reply
Richard - VE6PCO link
4/28/2019 01:36:20

I was actually thinking of doing this today and stumbled across your page. I have the long version and would like to do the same as you did. Could always throw a tuner on it to tweak SWR. Great job and thanks for the ideas...

Reply

Your comment will be posted after it is approved.


Leave a Reply.

    Categories

    All
    Antenna
    Cw
    Digital-modes
    Flying-with-gear
    Home QTH
    Miscellaneous
    Mobile
    Operating Events
    Portable
    POTA
    Shack Build
    Technical


    - N3VEM -

         Welcome to my Ham Radio Blog!  This blog was started primarily to share my two concurrent shack builds - my mobile station and my home station.  Over time, this has grown to include sharing about my operations, and general radio-related thoughts that I have as a newer operator.  
         
    ​Enjoy!

    RSS Feed


    Picture
    POTA!

    Picture
    Proving that hams do indeed still build stuff!

    Picture
    100 Watts and Wire is an awesome community, based around an excellent podcast. 

    Archives

    September 2020
    July 2020
    January 2020
    September 2019
    August 2019
    July 2019
    June 2019
    May 2019
    March 2019
    January 2019
    December 2018
    November 2018
    October 2018
    September 2018
    August 2018
    July 2018
    June 2018
    May 2018
    April 2018
    March 2018
    February 2018
    January 2018
    December 2017
    November 2017
    October 2017
    September 2017
    August 2017
    July 2017
    June 2017
    May 2017
    April 2017
    March 2017
    February 2017
    January 2017
    December 2016
    November 2016
    October 2016
    September 2016
    August 2016
    July 2016
    June 2016
    May 2016
    April 2016
    March 2016
    February 2016
    January 2016
    December 2015
    November 2015


Picture
Copyright © 2015
 Vance Martin is a participant in the Amazon Services LLC Associates Program, an affiliate advertising program designed to provide a means for sites to earn advertising fees by advertising and linking to amazon.com.