NOVEMBER 3 VICTOR ECHO MIKE
  • Blog
  • Events and Activations
  • Diversions
  • About
  • Gallery
  • Contact
  • Links
  • Subscribe
  • Search
  • Blog
  • Events and Activations
  • Diversions
  • About
  • Gallery
  • Contact
  • Links
  • Subscribe
  • Search
NOVEMBER 3 VICTOR ECHO MIKE

ham radio Projects and musings from a (Relatively) new operator

No New News

11/12/2015

0 Comments

 
     I think I might have a reader!  I got one hit on this blog that I'm pretty sure wasn't me.....yippiee!  It's pretty early on, and I really havn't told anyone that I'm doing this blog yet, so anyone reading it at this point probably found it by accident.  For anyone who happens to stumble on this corner of the internet, I just started this blog as a way to document the build out of my ham radio shack at home, and the install of the radio equipment in my new 2016 Ford Fusion.  I haven't made any progress in the last couple of days for 2 main reasons. First, I have full time job, so most of my project work has to be on the weekends.  Second, I do some traveling for my work (which is why I want to be thorough on my mobile install!) and I was out of town the first half of the week this week.  
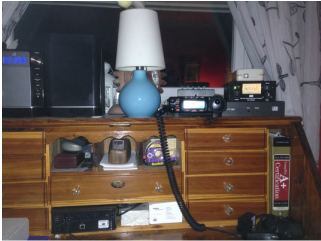
     I do have a question though, for anyone who happens to stumble on my blog - what is your preferred / favorite mounting location and method for the microphone you use for your radio?
0 Comments

Ouch!

11/8/2015

0 Comments

 
      Well, it's 12:30 UTC (that's 7:30am for those of us who live on  the East Coast of the US.)  My hands are still aching from last night, but I had to get up and share what I accomplished yesterday on my new 2016 Ford Fusion.  It doesn't look like much, but it's the part of any radio install that I dread.  For many, the dreadful part is drilling holes in new body work.  For me, the battle is finding a place and a way to get power wires through the firewall and routed to the location of the radio.  Last night, that battle also involved 2 sliced fingers, a sliced knuckle, and just a little bit of blood.  Ouch!
     I started the project last night by popping off the trim at the front passenger side of the car, so that I could pull back the carpet from the firewall. I looked to see what I could see - I was hoping for an unused grommet or some easy place to fish the power wires through.  No dice.  I got out and looked at the same area from the firewall side.  Nothing.  I got back in and looked some more.  I got back out and looked again - still nothing.  I'm not sure how long this went on, but you get the idea.  I was really hoping to find an easy, exisiting, location to get wires through here because of how much room there was in the engine bay on this side  - oh well, that would have made things too easy.
     I finally gave up, and moved to the drivers side.  After some reaching, bending, and twisting around I was able to find one of the factory wiring harness pass throughs, and it seemed pretty roomy...awesome!  In the engine bay, this turned out to be right behind the battery, so I undid the battery hold downs and slid the battery forward a little bit to get myself some additional room.  To get the wires fed through, I did a fancy trick that I either made up, or read about and didn't remember.  I proceeded to grab an old coat hanger, cut it into a straight wire, and poked it through from the inside out.

Picture
Bingo! There's the other end of my "fish-wire".  I attached my power wire to the other end of this and pulled it through.  I had to pull pretty hard to get the end of the zip cord to widen the hole in the grommet enough for it to pull through, but after that it was easy going!

     Here's my spool of wire on the inside of the car, fed up through the grommet.  Sorry for the weird lighting - the lights I use to be able to see my work do strange things to my iPhone camera as it tries to focus.
Picture
     Before doing anything else, I cleaned up the wires in the engine compartment.  I added 2 fuse holders (one for the negative and one for the positive.  I also dressed the wires with splitloom, and slid the battery back in place. Most people probably wouldn't know I even added anthing now that its all done!  (Except for maybe the couple extra fuse holders that you might able to find, if you look closely.)
Picture
Just a note here - All the big manufaturers tell you to connect both positive and negative leads directly to the battery.  I actaully connected my negative to the "jump point" as outlined by the ​​K0BG article on wiring because this car, like many new ones, has some fancy "stuff" in the negative lead for system monitoring, that you end up bypassing if you connect straight to the battery.

     My bad on this next one - I didn't take any pictures while I had the trim off and the carpet rolled back.  Basically, I took the door sill trim off, rolled the carpet back, and ran the wires along the channel underneath.  Once again, sorry for the weird lighting in these pics.
Picture
Picture
Picture
   All that to get the wires here, in the trunk.  As you may have guessed by where the power wires are routed - the radio body will be getting installed back here. These will get tucked behind the upholstry for final routing, when the time comes. ​  At this point, you may also notice that there is an extra pair of power wires popping out.   There will be a distribution block back here, and I pulled an extra pair of power wires from the trunk, back to the front, for a small CB radio that will end up getting installed.  
​     Oh No!  Did he really say CB?  What honest ham radio operator has a CB, let alone calls it that?  Well, this one I guess.  Because of the amount of time I spend on the road, I like having a small CB, which pretty much always stays on channel 19.  Often, I don't even have a mic connected, but I like being able to flip it on when I'm getting into weird traffic stuff in other cities - the truckers always know whats up, and are usually talking about it when the traffic is bad.
     For those who are curious, I used an app called "Circuit Wizard" by Blue Sea Systems to decide what gauge of wire to use.  It's pretty slick actaully - you put in all kinds of specs on the equipment, the wire, the type of install (does it go through an engine compartment) and it spits out what gauge of wire you should be using.

     So whats next? I supposed I might tackle drilling the hole for the NMO mount on the roof next, or I might work on routing the cables needed for the remote mounting of the radio body.  Stay tuned to find out which!  

​     P.S.  For those who know about my home shack project, the next step on that will be more concrete sealer (just to make sure the cat smell is gone for good) and framing up some walls.  My next weekend that isn't already full of stuff will probably involve a trip to Lowes for some lumber.
0 Comments

The Mobile Shack Has Arrived!

11/6/2015

2 Comments

 
Many of the folks in the local radio club, and on the local repeater (Red Rose Repeater Association) have heard me lamenting the length of time it was taking for my new vehicle to arrive.  Well, the wait is finally over!  Today I picked up my new 2016 Ford Fusion SE.
Picture
I can hardly wait to start making holes in it!  I have big plans for the radio install in this vehicle (well, maybe medium size plans compared to some of the stuff I've seen on them-there inter-nets.)  You'll have to watch the progress to see how the plans that are in my head play out in the car, but here is the high level plan:
  1.  Install radio 
  2. Talk 
  3. Have fun

Picture
The plan is to use the convenient empty space under the climate controls to mount the control head of the radio [ed. you can see my first pass at this here, and my upgraded version here].  I've held the control head in place, and it should be a good fit.  When the car is in park, the shifter will be close, but while driving it will be quite easy to operate the radio.  As the project progresses you'll see why I'm not too worried about the control head feeling close to the shifter while in park.

Picture
There is just enough room in the center console for a couple things too [ed. like an "other" radio].  The little tray will come out, and the plan is to eventually put a couple radio nick-nac's in here.

Picture
 Looks like there is plenty of clearance with the trunk open.  The plan is to put an antenna on the roof of the car [ed. which I did!], and another mounted on the center of the trunk [ed. did that too!].  Based on this, I should be able to open the trunk without the trunk mounted antenna hitting anything.  Speaking of trunks....there's enough room in there for a body!  (Radio body that is......) I have big plans for this space too, but that's a secret...you'll have to follow along to see what goes on in here.

Picture
Picture
And of course - one of the important parts.  I'm not a motor-head, so I could care less about the engine.  What I'm interested in is the battery, and how easy it will be to connect power to.  Easy access, and plenty of room to work with power wiring.  Awesome!
Picture
Picture
Picture
As an added bonus, I struck a deal with the YL - she wanted to go to IKEA tomorrow, which is close enough to HRO (at least from where we live) that she's willing to ride along to the candy store after a trip to the infamous Swedish furniture monger, so that I can pick up a couple bits of stuff that I just have to have right away.

P.S.  I've heard that IKEA is the Swedish word for marital spat....
2 Comments

Welcome!

11/5/2015

0 Comments

 
Picture
     Good evening all!  As I write this post I am sitting in what serves as both my temporary office, and my temporary shack, listening to some DX talking on 7.156.  The thing that stinks, is that I can't really join the fray - my rain gutters, which are doing double duty as my antenna just aren't up to the task [ed. read more about my gutter antenna here].  That will eventually change!  We recently did an addition on our house, and the room that used to be our basement catch-all storage room / cat litter box area (gross!) will be turning into my new office, and my new shack!  Additionally, I am finally going to pick up my new car tomorrow, so my radio equipment that has been patiently waiting since being removed from the old car will finally get pressed back into service.  I've been talking with a number of the local hams about the status of these things (or really the lack of status) so I decided to start this blog while things are in the early stages, so that everyone can play along, give a newbie feedback and advice, and hopefully have some fun!
     As I make progress on these projects, I'll post info and pictures about what I'm doing here [ed. there are a bunch of pictures in the gallery too!].  While the two main ongoing projects will be the vehicle install and the shack build, if other things pop up, I might just slip them in here as well. ​  

Picture
For starters, here is where the home QTH project started:


Picture
And here is where it stands today:
​


​Not much progress I know, but at least it's started!  A couple highlights that you can't really see in the pictures however:
  • This room is under the garage, so in addition to a shack and an office, it could also serve as a prepper bunker, because it is basically an underground concrete cube!  This will have implications for getting coax in and out, but I own a pretty big hammer drill, so I think I'll be okay.
  • The front wall faces the driveway, so before repaving after the recent housework, I buried an 8' ground rod under the driveway, bonded that to two additional 8' ground rods on either side of the drive way, and also bonded it to an 8'ground rod that projects horizontally into the room.  The thought is that I can eventually build an extensive safety and RF ground system outside, that circles the whole house - the bit that would have to go under the driveway is already done!
  • I spent weeks (and I mean like, multiple months worth of weeks) dehumidifying and using some active enzymes to get the cat smell out of the room.  I just sealed the concrete this past week so now the room is minty fresh!  (well, maybe not quite, but at least the room doesn't smell like cat butt anymore!)
  • There are a total of 3 pieces of conduit, 2" in diameter, installed that run from this room clean to the attic.  There is also conduit and a large outside junction box to the side of the house, that is just waiting for coax, connectors, and other fun entrance panel type stuff.

​​     As for the mobile Shack, well, no pictures yet, because the car is sitting at the dealer waiting for me to pick it up at 16:00 UTC (Thats 11:00am Eastern Standard for the non-hams that may stumble on my little corner of the Internet).

Use the Buttons Below to Read More on the Topics in This Post

Next: The Mobile
Next: Home Shack
Next: Gutter Antenna
0 Comments
Forward>>

    Categories

    All
    Antenna
    Cw
    Digital-modes
    Flying-with-gear
    Home QTH
    Miscellaneous
    Mobile
    Operating Events
    Portable
    POTA
    Shack Build
    Technical


    - N3VEM -

         Welcome to my Ham Radio Blog!  This blog was started primarily to share my two concurrent shack builds - my mobile station and my home station.  Over time, this has grown to include sharing about my operations, and general radio-related thoughts that I have as a newer operator.  
         
    ​Enjoy!

    RSS Feed


    Picture
    POTA!

    Picture
    Proving that hams do indeed still build stuff!

    Picture
    100 Watts and Wire is an awesome community, based around an excellent podcast. 

    Archives

    September 2020
    July 2020
    January 2020
    September 2019
    August 2019
    July 2019
    June 2019
    May 2019
    March 2019
    January 2019
    December 2018
    November 2018
    October 2018
    September 2018
    August 2018
    July 2018
    June 2018
    May 2018
    April 2018
    March 2018
    February 2018
    January 2018
    December 2017
    November 2017
    October 2017
    September 2017
    August 2017
    July 2017
    June 2017
    May 2017
    April 2017
    March 2017
    February 2017
    January 2017
    December 2016
    November 2016
    October 2016
    September 2016
    August 2016
    July 2016
    June 2016
    May 2016
    April 2016
    March 2016
    February 2016
    January 2016
    December 2015
    November 2015


Picture
Copyright © 2015
 Vance Martin is a participant in the Amazon Services LLC Associates Program, an affiliate advertising program designed to provide a means for sites to earn advertising fees by advertising and linking to amazon.com.