NOVEMBER 3 VICTOR ECHO MIKE
  • Blog
  • Events and Activations
  • Diversions
  • About
  • Gallery
  • Contact
  • Links
  • Subscribe
  • Search
  • Blog
  • Events and Activations
  • Diversions
  • About
  • Gallery
  • Contact
  • Links
  • Subscribe
  • Search
NOVEMBER 3 VICTOR ECHO MIKE

ham radio Projects and musings from a (Relatively) new operator

Finishing Off The Mast

2/10/2017

0 Comments

 
Post contains affiliate links
     So, for the very observant among you, you may have realized that I finished my "Mast-from-junk" but didn't fill you in on all the details!  So how would you know this?  The giveaway would probably be that if you happened to read my post on Winter Field Day this year or happened to watch my video about Winter Field Day you would have realized that I used it!
     With that being said, if you want to read about how my junk-mast project got started, check out Part 1 of the story before continuing on here.  If you already read Part 1, or if you just like to shoot from the hip and decided you'll figure it out as you go - read on!
     For a quick refresher (or for those that don't want to go back and read) here's the quick summary - I had been eyeballing fiberglass masts, and while deciding what to buy, I stumbled upon a telescoping fiberglass pole that was bound for a dumpster in one of the many commercial buildings that my work takes me to.  From there, I decided to start piecing together other bits of junk, or at least cheap stuff, to make myself a functional mast.
     At the point I left off, I had the mast, and I had inserted a piece of broom handle that had painter's pole thread on the end, and I had started fixing that all together.  Sometime shortly after that post I also stumbled onto a short section of scrap PVC that I needed to make a "splint" over a hole that had been drilled in the bottom section of the pole.  Now that you're caught up, here we go!
Picture
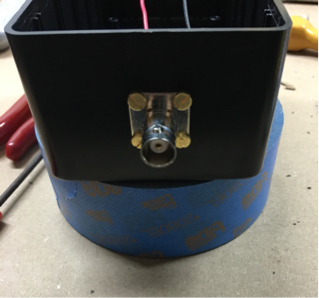
     One of the next things I added to the mast was an eye-hook.  Since I had filled the gap around the pole in the middle with epoxy (I used the loctite stuff you can get from amazon or a local supplier because it flows nicely to fill the gap, but cures nice and hard), I drilled a hole through the mast, epoxy, and center pole, and added this eye-hook that I dug out of the hardware drawer in my garage.  This means that the top of this mast can now accept a buddi-pole thread adapter, anything that I can clip into the eye-hook, or anything that I can clamp around the mast (since the top is pretty solidly filled with epoxy.)
     With the top of the mast done, I wanted to add guy rings, so that I could attach ropes etc. to keep things tall and straight.  Thankfully, I managed to dig up some scrap pieces of HDPE plastic that I had left over from the mounting panel that I made for the control head of the radio in my car (you can read about that project in my post called New and Improved.)  If you don't happen to have this stuff lying around, I'd recommend grabbing some, as it comes in handy for all kinds of radio-related projects where you need to make mounting panels, brackets, etc. and you need something that looks nice, and isn't metal.
     I had some of this that was white, and some that was black, but for making guy rings, I figured it doesn't matter if they match or not!
     I let the guy rings "float" so that they can rotate around their section of the pole which makes putting things up easier.  The top guy ring stays on the mast because it can't slide down past the section below it, and it can't slide up past the eye hook.  The bottom section is trapped between between the fitting for the next section up, and the "splint" that I made to span the hole that someone drilled through the pole in the past.  As a note - I didn't permanently attach the splint till the guy ring was in place - otherwise I would have run into a small problem....
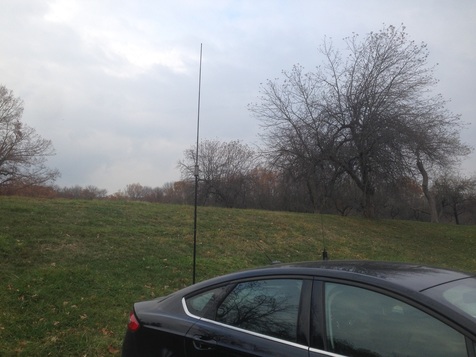
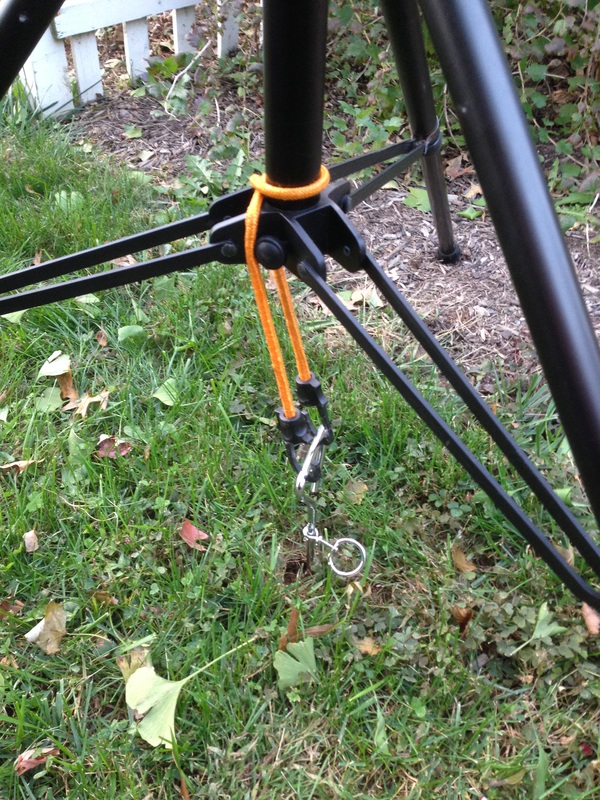
     All that was left to do at this point was to add guy ropes. Thanks to life being busy, I didn't actually get around to that until we were actually setting up for Winter Field Day!  If you watch the video some of what we're doing when you see us with the tape measure stretched out is actually measuring and cutting the guy ropes.  The worked out well...below is close-up of the guy ropes attached to the pole, and a picture from Winter Field Day with the mast standing at full height, in all of its saved-from-the-trash glory. 
     All in, since most of the parts I used were junk or scraps, this mast cost me about 60 cents per foot of height.  Compare that to the $4.00 plus per foot of height for a commercially made mast, and I think I did alright - don't you?
Back to Part 1
Continue to Part 3
0 Comments

Quick and Dirty Feedpoint

1/26/2017

3 Comments

 
Post Contains Affiliate Link
     A wise person (my YL) once quoted another wise person (not sure whom) and told me "Don't let the perfect be the enemy of then good." Along those lines, I hadn't really gotten around to putting together a decent wire antenna that I could use independent of my Buddipole on my portable operations.
     There are times where a wire would have been nice for the speed, or where I had tall trees available. My hang up (no pun intended...) was that I wanted the "right" balun to put at then feedpoint. Buying one just didn't feel right because I know I'm capable of making one, but I hadn't gotten around to making one either because I wanted the "right" parts.
     With that thought simmering away in my head, and Winter Field Day fast approaching, it dawned on me that I had stumbled on one of those small project boxes while cleaning some stuff up in the garage. I decided to get over my paralysis of wanting to make it perfect, and just put together something that was good. I had some hardware, and a quick trip to the hardware store got me some more. I didn't have anything to wind a balun but I figured what the heck, why not make a basic feedpoint now, and I can always wind up a ferrite core for a proper balun in the future.
     If you hung on through all that, congrats! Here's the nitty gritty of my feedpoint/future balun:
First, I drilled some holes in the bottom, and installed a panel mount BNC connector (why BNC? Because it's what I had!)
Picture

​Next, I soldered a bit of wire to the center pin, and used a ring terminal to attach another bit to then shell of then connector.
Picture

Also, because I like to at least try to make sure things are straight, I always put painters tape on things, and then measure and mark where to drill:
Picture

     So here's the shortcut, and why I call this quick and dirty.  Ultimately, I'd like to actually make this into a proper balun, but since I don't have any ferrite beads/rings/rods available, for now it is just a generic feedpoint.  The thought here though, is why let not having a ferrite hold up the whole works?  This will work just as well as the typical coax spliced directly to dipole feedpoint that is so common, but gives me the ability to upgrade.  I'll just make sure that I keep it in the back of my mind so that the next time I'm ordering stuff from a place that would have it, or the next time I'm wandering the rows at a hamfest, I can pick up what I need.
Picture

     All that was left for now however, was to put the lid on, add the wire connection hardware on the outside, and put a couple small holes in the bottom to allow any accumulated condensation to drain.
Picture
  
     So, looking at this final picture, it doesn't look so dirty after all...maybe I should have called this post "Quick, Upgradable Feedpoint" instead.

     Whats you're favorite feedpoint construction method?  Leave a comment and let me know!
3 Comments

Loving the standards

11/27/2016

4 Comments

 
Post contains affiliate link
Picture
     No, I'm not referring to the Jazz standards by Duke Ellington or John Coltrane - I'm referring to the "standards" that exist in ham radio and electronics.  While the standards aren't always followed, it is nice to be able to rely on certain things, like the fact that red wires are generally positive and black wires are generally negative.  It's also great that powerpoles are generally assembled with "Red on the Right."  Another "standard" that we use in Ham Radio is the 50 ohm antenna/feedline system standard.  Then there's the pneumonic that my dad taught me as a kid to remember the legs of a transistor - his name and his two buddies - Ed, Barry, & Charlie (Emitter, Base, Collector.)  None of these however, are the standard that I'm geeking out about today.
     Today, I'm excited about the 3/8-24 thread standard that we use for antenna's.  I have no idea how this standard came about, or even if it's really the ideal thread and bolt size for our service's application, but I'm still pumped about it.  Why is that?  Because it makes playing around easier when parts made by different manufacturers fit together!  In my case, I'm thankful for it, because it let me play around, and use parts from my Buddipole Antenna in my mobile mount while I activated Hopewell Furnace for National Parks on the Air.

Picture
  
     For this arrangement I put 2 of the 11 inch arms together, screwed them into the mount on my trunk, followed by the coil, and then one of the telescoping whips to top it off.  Because I was shooting for the 20 meter band, and I wanted as much efficiency as possible, I basically started with the telescoping part fully extended, and the tap on the coil set to jump over pretty much the entire coil - this made the antenna resonant a frequency higher than 20 meters, meaning the antenna was electrically to short.  To "lengthen" the antenna I just adjusted the coil by moving the tap down (physically) a couple windings at a time, until I found the point where one tap made the antenna just a little to short, and the next tap made it just a little too long.
     Since I started with the telescoping whip fully extended, I chose the tap that made the antenna just slightly too long, and then I adjusted the telescoping whip to make shorter, to fine tune the antenna where I needed it.  It worked great!
     Now, without an actual antenna range, and all kinds of fancy measurement tools, I can't actually make any performance claims, but it "felt" like this worked better than my 20 meter hamstick normally does.  My logic is this:
  • It ended up being a slightly longer antenna than the hamstick.  More antenna element and less coil generally makes for a more efficient antenna, all else being equal.
  • The coil for the Buddipole has a much larger diameter and more spacing between windings than the tiny wire tightly wound around the fiberglass rod inside the hamstick.  A Bigger coil, bigger wire, more space between windings also generally makes for a more efficient antenna.
  • The diameter of the antenna element is larger, so in theory this should also be more broad-banded than the hamstick.
     Now, for 20 meters, I'd probably be even better off with something that can be full size, with no coil, like this little number from MFJ (17' telescoping whip), but since I don't have one of these, I'll just make what I have work.  At some point I plan on grabbing a couple of these at it would definitely help give me more flexibility with my portable antenna stuff.  Once I do, I'll be sure to share what I find as I play around with it.

     Playing around with this arrangement also made me realize that I have a couple other options that should work better than my hamsticks too (when I'm parked anyway - I'm not about to use this while going 70mph down the highway, I have no idea what wind loads the Buddipole parts where designed to handle!)  The first and most obvious would be to use the same arrangement, but with the tap on different spots of the coil to use it for 6, 10, 12, 15, 17, 30, and 40 meters.  I also realized that it "might" work to put both coils in a row, one after the other, to use it on 80 meters - I'll let you know how that works out when I have time to try it.
    With all that being said, I'll wrap up with a salute to the 3/8-24 standard, and say "thank you" to all the manufacturers that so kindly make stuff according to the standards!
4 Comments

A New Antenna

11/16/2016

0 Comments

 
     I'd like to shoot some RF in your direction:
Picture
     During a recent NPOTA activation of the Petersburg National Battlefield (where, by they way, the hours on the website are wrong - I learned the hard way that the Eastern Front Visitor's Center closes at sunset, not 8pm as stated on the web) I took the above picture.  
     The canon here was very close to the parking area, and I suddenly had the urge to run a wire over to it, clip it on with a battery clamp, load it up with tuner, and use it as an antenna.  Alas, the paint was really thick, so that wouldn't have actually worked.  I mentioned this on the old trusty book of faces, and Scott Davis had an idea....
     So.....without further ado, I bring to you the newest antenna design to be sweeping the amateur radio world - look out G5RV....here comes....

The SDLC

Otherwise known as the Scott Davis Loaded Cannon
Picture

Where will you use yours?

    whats the strangest antenna you've used?

Submit
0 Comments

wire, buddipole, & Strange neighbors

10/17/2016

5 Comments

 
Post Contains Affiliate Links
     Over the past couple of nights I'm sure I caused a bit of "what is that guy doing now?" conversation in my neighborhood.  Luckily, my immediate neighbors know I'm a ham, so when they see me messing with masts, wire, and other related tid-bits, they know what I'm up to.  The other people driving by however, probably just think I'm weird. 
      So what "weirdness" was I up to this time?  Oh you know...just the basics - rigging up a wire dipole (oppa, inverted v style - womp womp womp womp).  ​
Picture
I was doing this (putting up wire, not doing the Gangnam Style Dance) in my front yard, because I was really playing around with something that I hope becomes an addition to my portable kit, and since my radio is in my car, it is easier to rig up an antenna out front, and run the coax to the trunk to test it out.
     Basically, this all started because on 40 meters the Buddipole is pretty narrow-banded.  I wanted the option for a full size 40 meter dipole when doing my portable stuff, and figured since I already had a feedline, a center insulator (in the form of the Buddipole Versa-T) and a bunch of other nic-nacs, I could just rig up a wire dipole to take along, so that I have the option available to me.
     So, first things first - acquire some wire (heh...that rhymed...) You can get wire just about anywhere, but for this project I just used standard 14 Gauge Stranded THHN wire.  If you're lucky, you might even have some laying around!
     Next I grabbed a couple of these L style Mechanical Connectors.
     Once I had these, I actually drilled out the hole so that a 3/8"-24 stud would pass through.  I also got a couple spacers with a 3/8" inside diameter from the local big-box hardware store (to be honest I don't remember if I picked these up at the blue store or the orange store, but they probably both have them.)  This combination of hardware gave me a way to attach the wire to the Versa-T (the Buddipole center-insulator/feedpoint), by using one of the Buddipole knobs.
Picture
     I've seen people advocate using ring terminals under the connection for the banana plug, but that's risky - it's plastic on plastic, so you're really relying on the inside edge of the ring terminal to happen to be touching the post that runs down the center - there is no firm metal on metal contact if you do that.  My method here firmly clamps all the metal bits together making a good connection, probably cable of handling more power than the wire being connected to it.
     One quick note on "guying" my Buddipole.  I use a method to simply anchor directly under the tripod instead of setting up bunch of guy wires.  My method uses a ground screw, intended for tying dogs out in the yard, and a bungee cord.
Picture
Picture
     Both of these fit in the bag with my Buddipole.  These ground screws are great - I'd recommend adding several to your go-kit because they are an easy way to guy lightweight stuff, without needing to also carry a hammer to pound traditional stakes into the ground.  Just make sure you know that you aren't screwing into something important!
     At the other end of the wire, I used a small Pulley/Hook assembly that also came from the hardware isle of one of the big box home centers.  This made it easy to tie a rope too, which allowed me to tie the rope off to a stake, and also pull the wire through the pulley.  Since this is for portable operations, I didn't do any permanent clamping - just twisted the wire back around on itself when I had it tuned to the length I needed.  This method also makes tuning easy because I can just wrap more or less of the wire back on itself to adjust the length.
Picture
     Also, even though it was probably not necessary, I decided I wanted the legs of the dipole to end just a little higher than where they ended up being, so I grabbed a couple driveway markers that I had in the garage, and stuck them in the ground and looped the rope around to bring the wire height at the ends up just a little bit.
Picture
     Along these lines, these fiberglass driveway markers are probably a good thing to have, to take along to events like field day so that you can mark off where coax is, run caution tape from post to post to block off area's around antenna's, support twin-lead off the ground, etc. etc.
    Tuning the wire took a little longer than normal, because aside from the normal up and down activity to adjust the lengths of the dipole legs, I was also being "helped" by future operator 1, while carrying future operator 2 (who had gotten tired of being in the stroller).  This means that most of the tuning was done one-handed while I said things like "don't put that there!" and "stop throwing sticks around!"
     It was all rewarded in the end though with:
​ 1)  A decent SWR across the band:  
Picture
2)  A rather picturesque "wire at a cloudy sunset" shot
Picture
3)  A contact with an Elementary School Radio club from a couple states away, that was on the air for the school-club-roundup.
     So, after all that, I now have a couple lengths of wire with some attached hardware that I can use in conjunction with my Buddipole.  In places where stakes aren't an option I often weigh down the bottom of the Buddipole with the spare tire from the car, or some other heavy object, and the ends of the dipole legs can be weighted with water jugs, logs, rocks, or whatever other medium-heavy object nature presents me with.  Because of the height of the center of this dipole, the antenna in this configuration is definitely more of an NVIS setup - at least until I lay hands on that taller mast I've been eyeballing....

     Once again, thanks for stopping by!  Please feel free to stay awhile and click around the categories at the right, and the links at the left for more Ham Radio fun and musings!
5 Comments
<<Previous
Forward>>

    Categories

    All
    Antenna
    Cw
    Digital-modes
    Flying-with-gear
    Home QTH
    Miscellaneous
    Mobile
    Operating Events
    Portable
    POTA
    Shack Build
    Technical


    - N3VEM -

         Welcome to my Ham Radio Blog!  This blog was started primarily to share my two concurrent shack builds - my mobile station and my home station.  Over time, this has grown to include sharing about my operations, and general radio-related thoughts that I have as a newer operator.  
         
    ​Enjoy!

    RSS Feed


    Picture
    POTA!

    Picture
    Proving that hams do indeed still build stuff!

    Picture
    100 Watts and Wire is an awesome community, based around an excellent podcast. 

    Archives

    September 2020
    July 2020
    January 2020
    September 2019
    August 2019
    July 2019
    June 2019
    May 2019
    March 2019
    January 2019
    December 2018
    November 2018
    October 2018
    September 2018
    August 2018
    July 2018
    June 2018
    May 2018
    April 2018
    March 2018
    February 2018
    January 2018
    December 2017
    November 2017
    October 2017
    September 2017
    August 2017
    July 2017
    June 2017
    May 2017
    April 2017
    March 2017
    February 2017
    January 2017
    December 2016
    November 2016
    October 2016
    September 2016
    August 2016
    July 2016
    June 2016
    May 2016
    April 2016
    March 2016
    February 2016
    January 2016
    December 2015
    November 2015


Picture
Copyright © 2015
 Vance Martin is a participant in the Amazon Services LLC Associates Program, an affiliate advertising program designed to provide a means for sites to earn advertising fees by advertising and linking to amazon.com.