NOVEMBER 3 VICTOR ECHO MIKE
  • Blog
  • Events and Activations
  • Diversions
  • About
  • Gallery
  • Contact
  • Links
  • Subscribe
  • Search
  • Blog
  • Events and Activations
  • Diversions
  • About
  • Gallery
  • Contact
  • Links
  • Subscribe
  • Search
NOVEMBER 3 VICTOR ECHO MIKE

ham radio Projects and musings from a (Relatively) new operator

Crowd-Sourced Project

3/22/2017

3 Comments

 
Post Contains Affiliate Links
Picture
     N3VEM wants you (yes, you!) to help design a project!
     Many of you are probably already aware of the idea of "crowd-sourcing." For those of you that aren't familiar with it, Google defines crowd-sourcing as "the practice of obtaining information or input into a task or project by enlisting the services of a large number of people, either paid or unpaid, typically via the Internet."

 So, why am I talking about crowd-sourcing? Here's why:
Picture

Did I lose you yet?
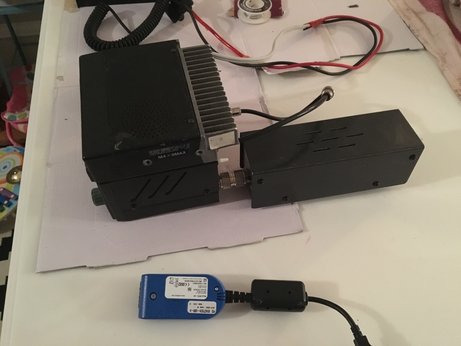
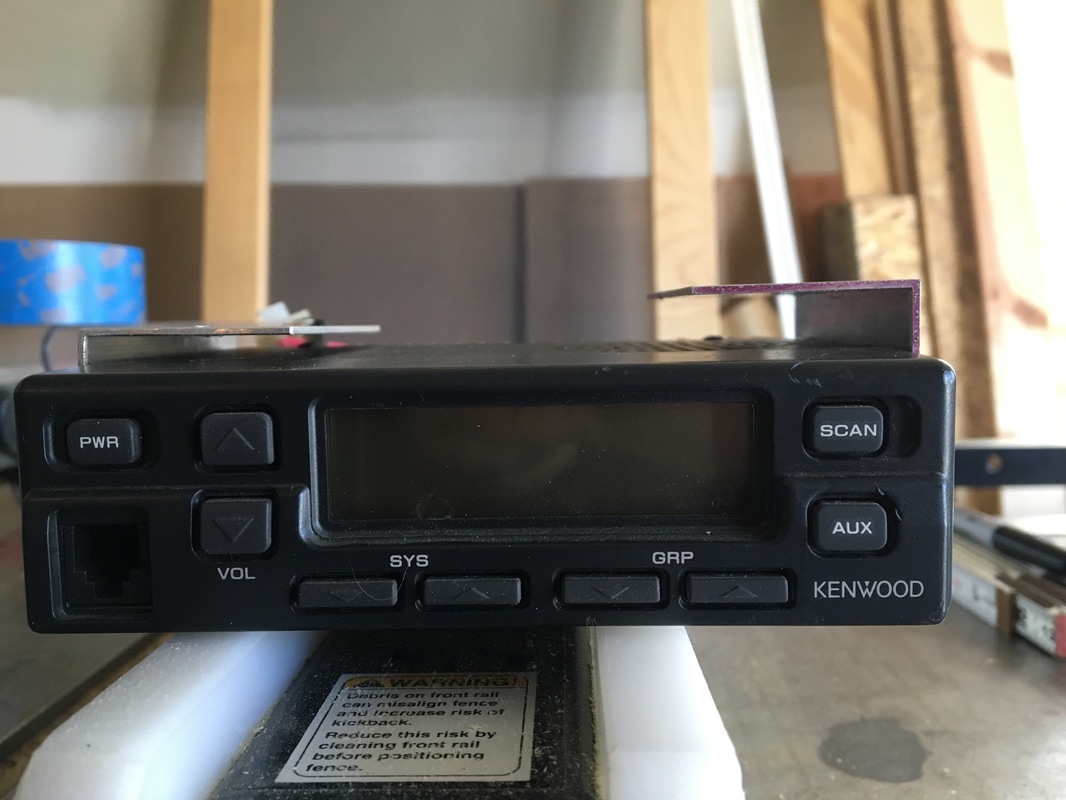
​      I hope not, because I'm finally ready to get to the point. One of the pieces of equipment that my work revolves around comes in these boxes. Recently, we had one that went bad, and it was getting scrapped. After pulling out the proprietary bits, I was left with this box that was just too cool to get rid of. My mind was instantly racing with radio-related ideas to use this for. For some reason, as I was brainstorming, it dawned on me that this could make a fun "community" activity - with the community in question being anyone who happens to stumble on my corner of the Internet, who also has even the slightest interest in, or curiosity about, ham radio.
So, what exactly is the activity? If you haven't figured it out yet, I want us to collectively brainstorm / design / build a project around this box. The brainstorming and designing will be the community effort. The building part will be me, probably exclusively, but a couple of you live close, so I might request to bring in some help if the ideas get too wild :-)
So, with introductions out of the way, I'm going to start with ground rules, then the project constraints, and what we have to work with. Since I am the ultimate builder, and probably the sole financial resource for this project, I will proudly hold the right to change/clarify the ground rules and/or scope at any time I feel it is necessary, and will also hold final go or no-go decisions on anything that involves my personal financial input. With that being said, I will strive to stick to the crowd-sourced intent, and will try to give details and reasons if I veer from that at any point.

Ground Rules

  • No idea is a stupid idea
  • disagreements and discussion are encouraged, but if you get trollish about it, you'll be removed from participation - this is meant to be fun!
  • If you think something "must" be part of the project, convince the rest of the crowd to agree with you (and also convince them to fund it if it is something pricey!)

Scope

Picture
This will be pretty loose as far as project scopes go, but here's the current scope/constraints. This should be interesting, because we're starting with a box, and working backwards, instead of the other way around:
  • The end product must be ham radio centric
  • ​The end product should fit 100% within this box for storage and transportation. Things that need to be taken out of the box and "deployed" for use are okay.
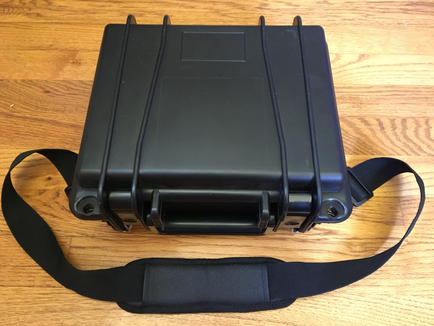
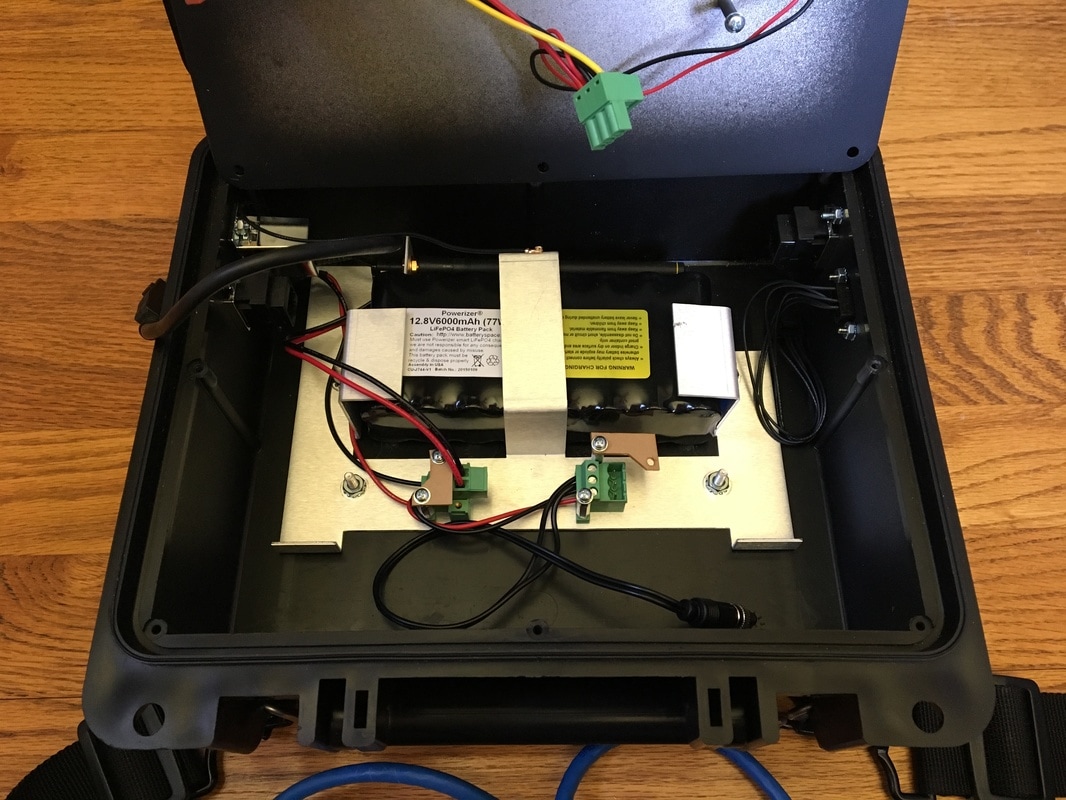
  • This box is a Seahorse Model SE-300. (P.S.  as far as this type of case goes, the Seahorse cases are very reasonably priced!) Inside dimensions of the bottom are approximately 9.5"x7.4"x3". Inside dimensions of the lid are approximately 9.5"x7.4"x1"
  • The parts remaining in the box from it's previous life can either be re-used, modified, completely removed, or replaced, unless otherwise noted
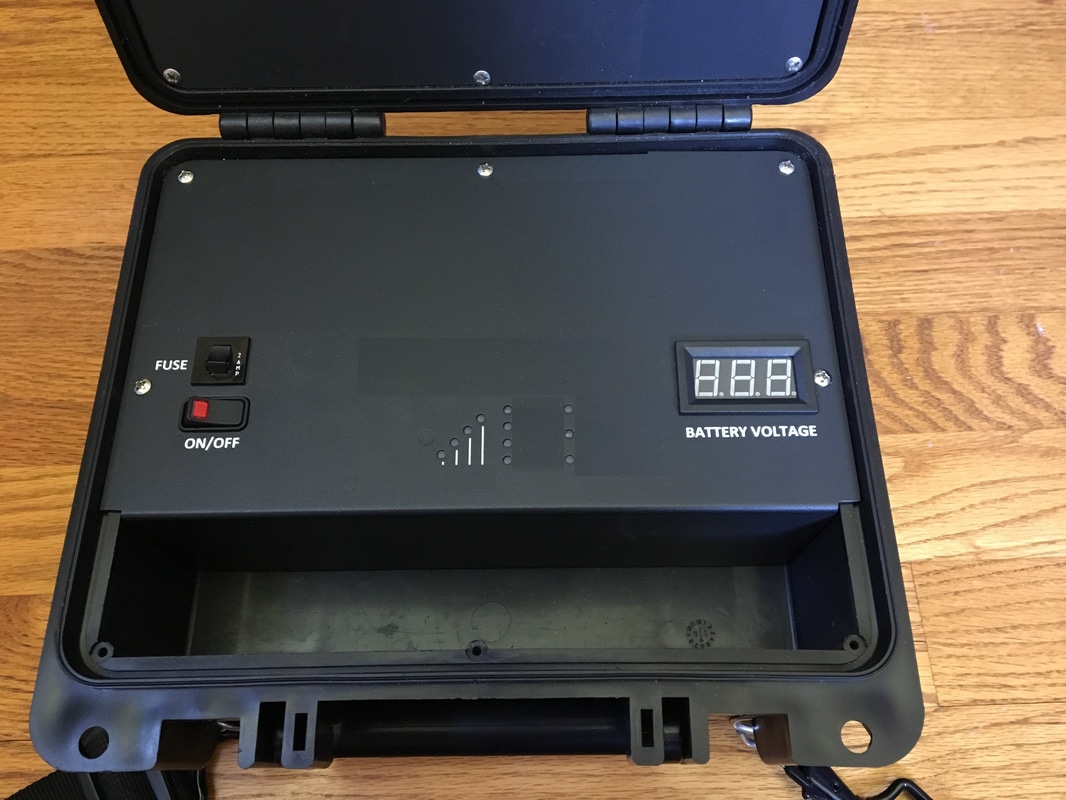
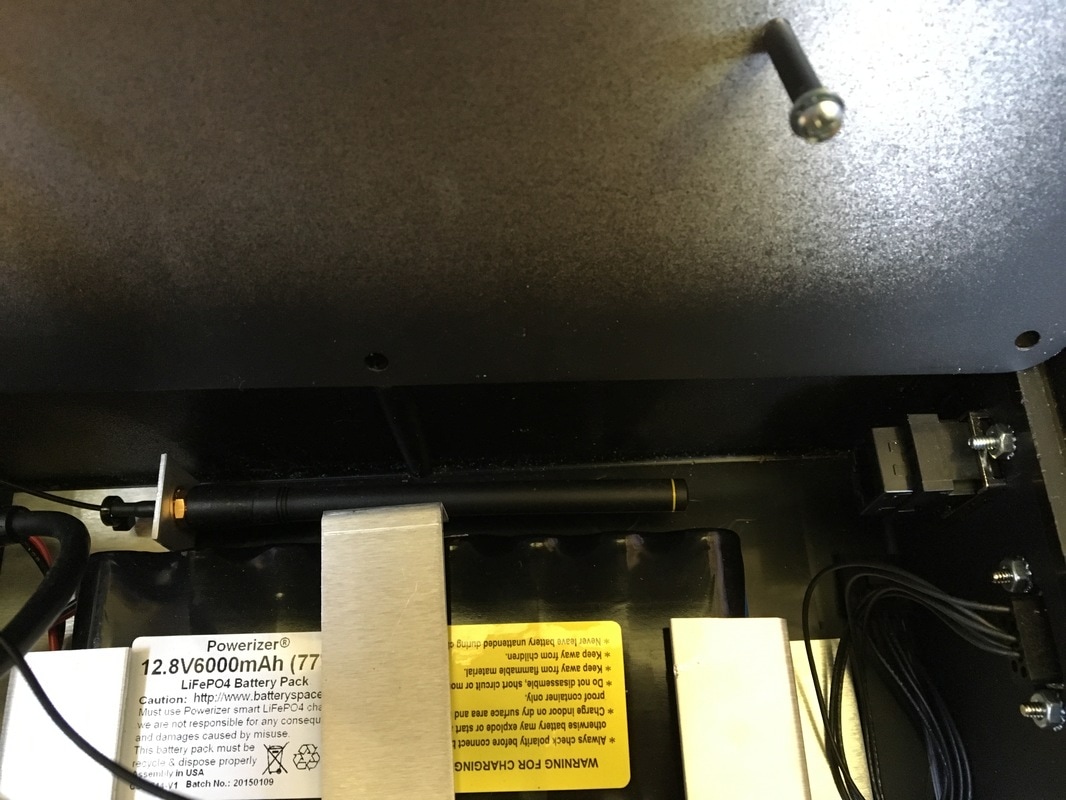
  • The box contains a 12v 6000mAh LiFePO4 battery (and charger). Preferably, this should be the power source, if the end product requires power.
  • The mounting bracket that holds the battery is also the ground plane for a 900MHz antenna that was used in this box's prior life (I have no particular attachment to it, but wanted to let you know that it's there)
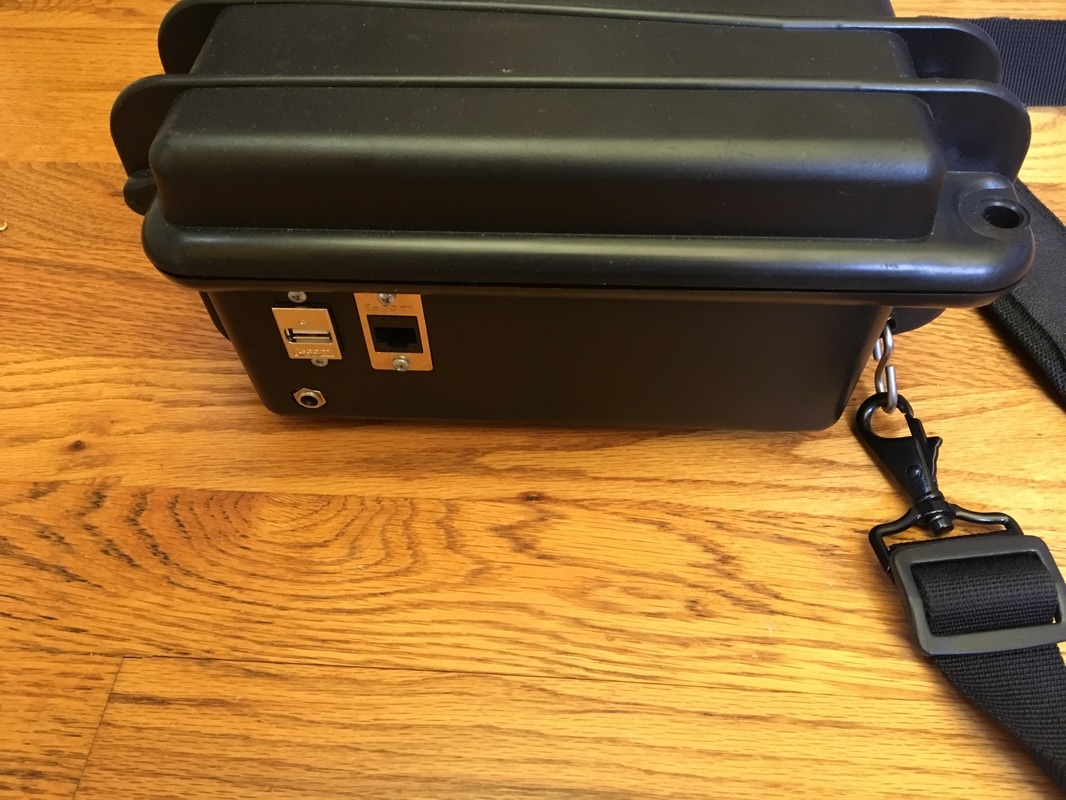
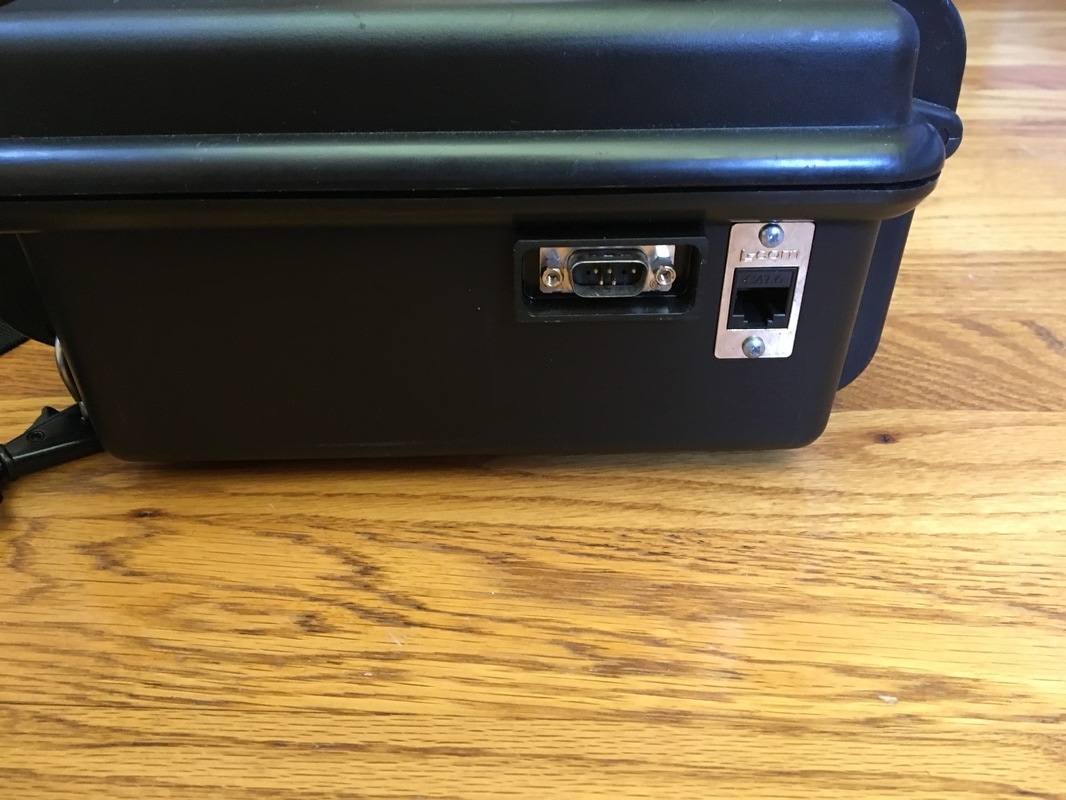
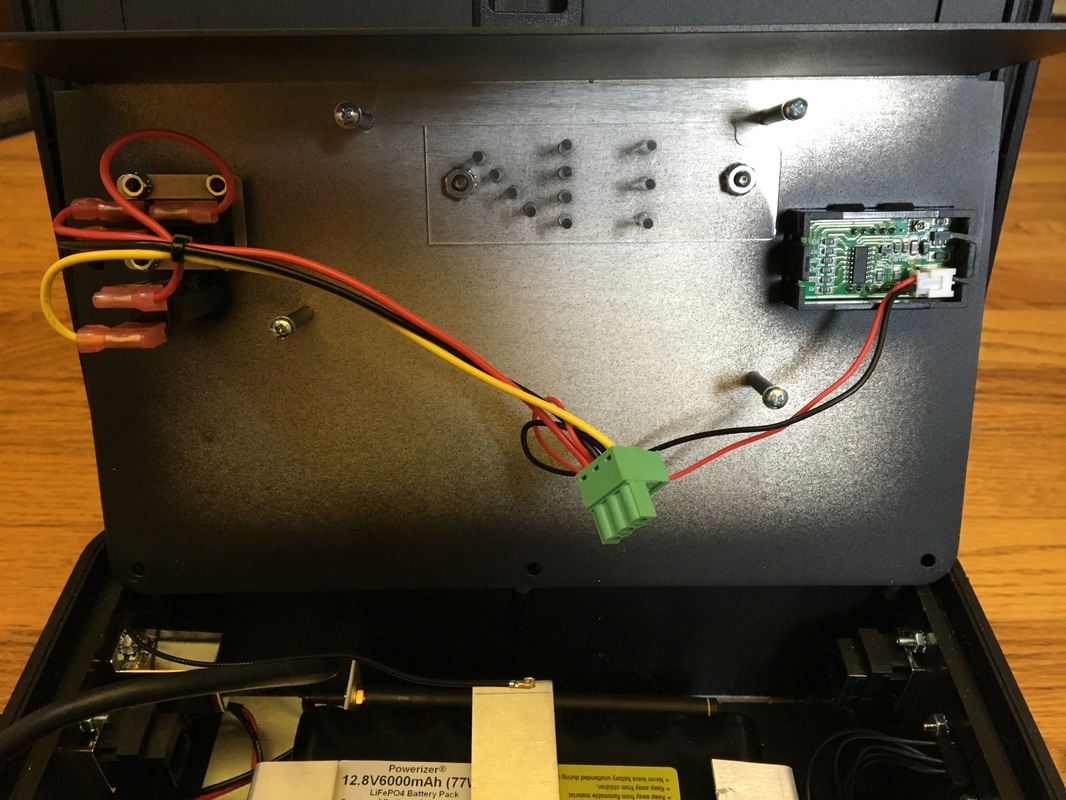
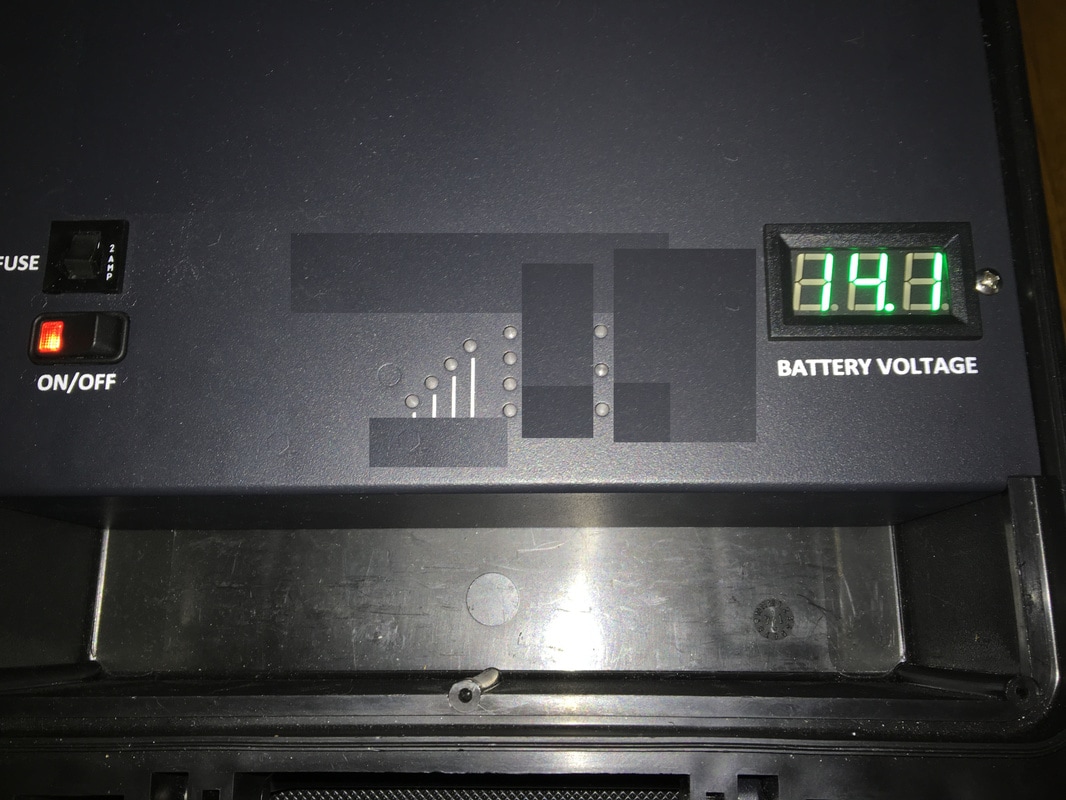
  • The box has the following bulkhead connectors that, in the past, interfaced equipment in the box to the outside world: (2) RJ45 Jacks, (1) DB9 male, (1) USB, (1) coaxial power connector currently used to connect the battery charger
  • Box "display" panel has a 2amp fuse/holder, voltage meter, power switch (switched power from the internal battery), and some holes that previously had LED's shining through them.
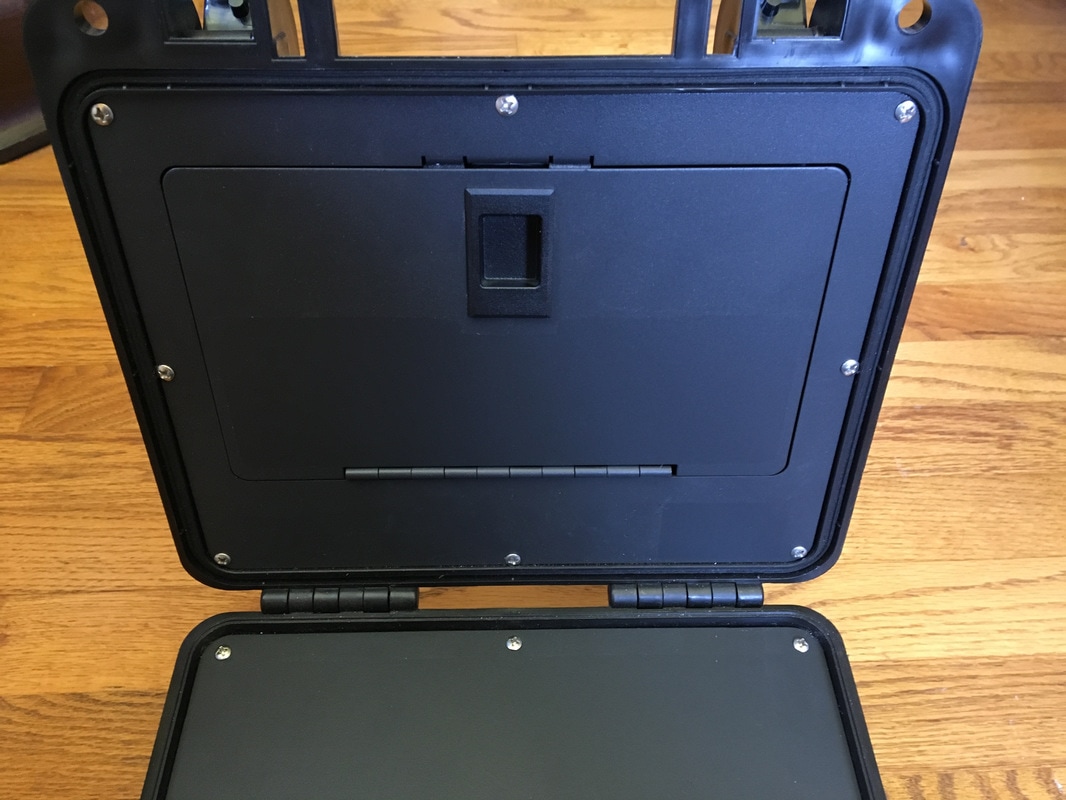
  • The lid of the box has a panel and door, making a storage compartment in the lid.
  • Drilling holes / screwing things into the box / panels is okay
  • Frugality is important. This doesn't mean things have to be cheap, but any cost has to have an associated benefit (I may ask to be "sold" on ideas if they seem pricey)
  • I prefer to reuse / recycle things wherever possible, but will buy parts if suitable things can't be found to re-purpose
  • I have, or have access to, most tools that could conceivably be needed. I am willing to beg/borrow/ask for help for anything I would need to use that I don't have, or don't have experience with (I don't own an Oscilloscope, or Spectrum Analyzer - yet)

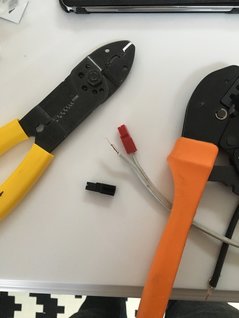
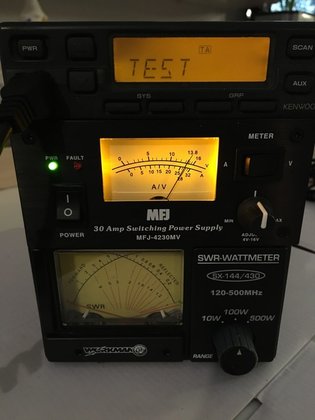
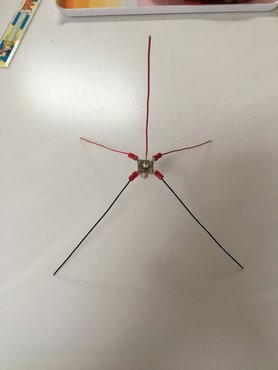
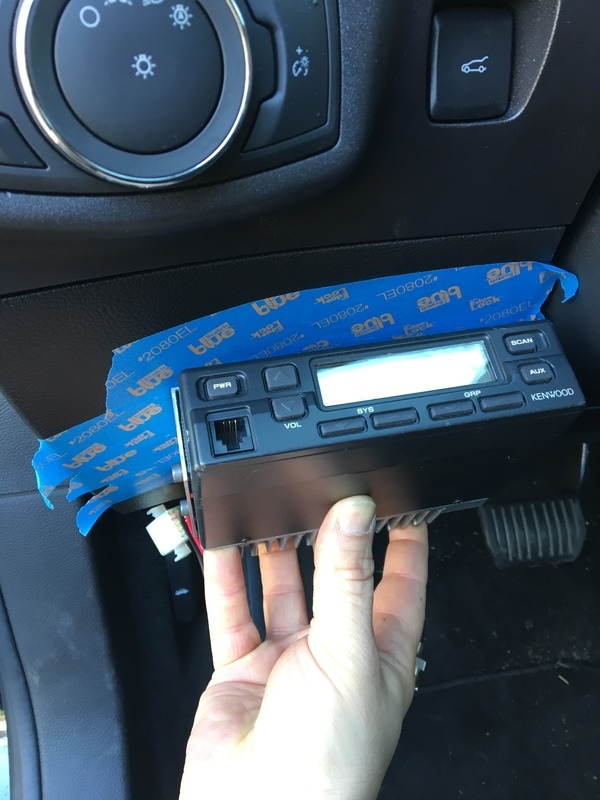
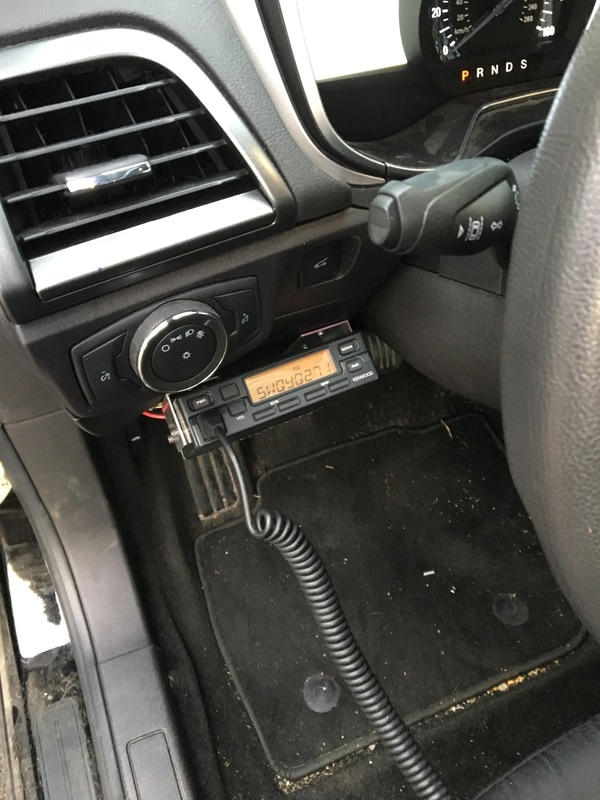
Here are some pictures to help stimulate all those creative juices out there!  (As a note - excuse my bad photo-editing.  I had to hide some proprietary markings.  As the project moves forward I'll paint over those if the panels get re-used.)

​Now, as a member of the "crowd" here is the first assignment. Using the form below, submit your ideas for:
  1. ​The name of the project (as we learned from Amazon and Monster a name doesn't have to reflect what the thing actually is, so we might as well come up with that first - it will be easier to share what we're working on if we have something to call it!
  2. A short description giving a high-level idea for a project. The key here is short - we'll get into details once a project is picked - for now, just stick to ideas like "VHF/UHF go kit", "Flux Capacitor Module", "QRP station", or "Dilithium Crystal Power Box".
After ideas have have been gathered, we'll take a vote! Feel free to discuss and/or ask questions in the comments or on social media, but the final list of things to vote on will be compiled from the submitted forms.
Lastly, be sure to share this with everyone you know! A crowd-sourced project is more fun and more exciting the larger the crowd gets!  We'll keep the suggestion pool open for about a week before I make the list and put it out for a vote!

Suggestions Now Closed!

     Thanks for the suggestions everyone!  The time for submitting ideas has closed, but you can you use the links below to see where the group is in the project, and add your input!
Continue to Part 2
3 Comments

Can I buy You a License?

2/24/2017

0 Comments

 
Post contains affiliate links
     Believe it or not - it can be that simple.....What radio license can you just run out buy?  GMRS.  
     GMRS (FCC Part 95 Subpart A) is a radio service intended primarily for family communications (although there are some older businesses grandfathered in.)  In case you don't know about GMRS, it is basically a service where you are required to be licensed, but the only stipulations for getting the license are having about $60 available to mail to the FCC, being a person (not a business, government, or representative of one), and being 18.  Once you've done that, you, and anyone you're related too, can use your license.  
     GMRS is very similar to the little blister-pack radios you can buy at the chain stores.  Those radio's are normally part of the Family Radio Service, or FRS.  There are some shared frequencies between FRS and GMRS but power levels and allowable antenna types vary.  The biggest difference is, that you can use more power, larger antenna's, setup and use repeaters, etc. with GMRS.  There are a limited number of frequencies (specific channels) that you can use, but that shouldn't be a hurdle.  There are even commercial UHF mobile and HT radios out there that are type accepted for the GMRS service, so if you can get your hands on them, you can actaully put together a decent little station.
     So why am I writing about GMRS?  Because of my daughter!  She has been expressing a lot of interest in my ham radio activities, so I decided that setting up a couple GMRS radio's would be a good way for her to be able to "practice" for the big show!  The idea was to put 1 radio in the house, and 1 in my car, so that when I'm around town, we can chat, without the need for me to be standing over her shoulder.  With that thought in mind, this saga began around christmas time - and what a saga it turned out to be...

Who can use the GMRS license?  Pretty much anyone who would show up at your family reunion.....
(1) Licensee;
(2) Licensee's spouse;
(3) Licensee's children, grandchildren, stepchildren;
(4) Licensee's parents, grandparents, stepparents;
(5) Licensee's brothers, sisters;
(6) Licensee's aunts, uncles, nieces, nephews; and
(7) Licensee's in-laws.

     We ordered some Kenwood TK-840 commercial radio's online just before christmas.  Based on the searching I did, these radio's were type accepted for GMRS. Getting things off ebay, you never know what to expect - and this proved to be no different.  The radio's came, and the first thing I noticed was that there were F connectors, instead of anything normally used for radio, on the coax pigtails.  To make things even more interesting, they weren't even really attached.  It was almost like someone had gone to RadioShack, bought some connectors, and just kind of jammed them onto the end of the coax.  Whoever did it wasn't even good at applying electrical tape...
     Luckily, the coax itself seemed to be properly connected, so I figured we would just make putting connectors on part of the project as my daughter and I got these radio's ready to go (her first lesson in solder was about iron safety!)  Next came the power leads.  Again, it wasn't technically the proper cord, but I found out what it was that had been used, and looked up the current handling capacity, and it was rated for enough current to handle what these little radio's would do, so we added some powerpole connectors.
Picture
     With the powerpole connectors on (this goes WAAAAY easier with the proper crimper!!!), and proper RF connectors in place, I hooked the radio's up to a dummy load, through a meter, just to make sure they worked.  Everything seemed to be in order - so far so good!
Picture
     The next step was to get my hands on the programming software for these rigs.  That software, which was made by Kenwood, is called KPG25D.  It isn't officially available any longer, but through the magic of the internet most people can get ahold of it fairly simply.  Writing out all the details of how to use the software would take up a lot of space, so I'll just leave it at this - you'll need this stuff, which you can find online if you search around a bit:
  • The programming manual (or you can just sort of figure it out as you go)
  • The KPG25D programming software
  • This is DOS software, so another catch is that you either need to get your hands on an old computer, or use a DOS emulator - I used DosBox 
  • A USB to serial converter cable (if your computer doesn't have a serial port)
  • The Kenwood Programming cable that matches the radio

     All this does take some finagling, but Google helped me, so you can either search around like I did, or contact me and i'll help answer any questions you might have!
     Armed with all the stuff above, we programmed the GMRS frequencies into the radio's, and fired them up for a test:
Picture
     For the astute folks out there, you'll notice that the power meter isn't budging - for some reason these radio's, which worked fine before I reprogrammed them, now won't transmit!  I poured through lots of notes, and eventually realized that I had gotten version "2" of these radio's which only work on the commercial portions of UHF, and are now basically worthless because they are wideband, so they can't be used in commercial service any longer, and they won't transmit anywhere in the amature or GMRS bands.  Grrrrr.....no wonder they were so cheap.  (Anybody want to buy 3 worthless radios?  If not I'll hold on to them - maybe I can use them as exciters when I start building microwave transverters....)
So, with that lesson learned the hard way, we went back to ebay and paid just a bit more. This got us 2 additional radios that were the proper version. While we waited for them to arrive we (my daughter and I) spent a couple hours one evening passing the time by building her very first antenna, tuned specifically for the GMRS frequencies:
Picture
     As soon as the new radio's arrived, we opened them up, and thanked our lucky stars that these were in much better shape (a Ham must have had them!) - all we had to do was add powerpoles to the power leads, and we were ready to start programming radio's.  After we had them programmed, we connected the antenna to my daughter's radio, and a dummy load to mine (P.S, a dummy load will work as an antenna over short distances....sometimes even long distances as many will attest to!)  We then had a short test conversation from one end of the kitchen to the other - awesome!  Working Radio's!
     Next, we had to decide where to install my little helpers radio.  Putting radio's around the house can be an interesting exercise, because the install location needs to meet the criteria of everyone who might be involved - in this case, the criteria was:
  • Somewhere near power so I don't have to run a long cord
  • Somewhere easily accessible to my daughter
  • Somewhere that she will be within earshot of adult when she's using it
  • Somewhere that it isn't seen during day-to-day living
  • Somewhere that we can put her small antenna now, but eventually run a line to a rooftop antenna
     The spot that met all these requirements was the cabinet that I just recently built into the entryway from our garage - it has power in it, because we wanted to be able to charge phones and such, it has shelves and hooks for our little ones' things, it's pretty central in the house (so when little operator is using it she'll be heard), AND it is normally behind closed doors, so no one has to see it that doesn't want too.

     With the little one's radio installed, it was time to make some new holes in my car!  I started by making up some brackets to mount the radio.  Because the surface where I was going to put this wasn't level, I needed one side to stand out further than the other, so custom making a bracket from aluminum angle was the word of the day.  While making those brackets, and marking the mounting locations for everything, I did my normal marking method - I covered the area with blue painters tape, and made all my measurements and marks on it.  After drilling away, I peeled the tape back off.  I use this same tape method when I drill a hole for antenna's as well.  this does 2 things - it makes it easy to mark and measure where to drill without leaving any permanent markings, but it also servers to "catch" all the little metal shavings from the drilling, so they don't lie on the finish of the car and cause rust spots.  
     Finally, after a couple months, this project is complete, and my daughter can talk to me while I'm tooling around town.  If you happen to be on the GMRS bandwagon and you ever hear a little girl and her dad talking about random nonsense in the Lancaster, PA area, and using the callsign WQYQ271, that's us!
0 Comments

Finishing Off The Mast

2/10/2017

0 Comments

 
Post contains affiliate links
     So, for the very observant among you, you may have realized that I finished my "Mast-from-junk" but didn't fill you in on all the details!  So how would you know this?  The giveaway would probably be that if you happened to read my post on Winter Field Day this year or happened to watch my video about Winter Field Day you would have realized that I used it!
     With that being said, if you want to read about how my junk-mast project got started, check out Part 1 of the story before continuing on here.  If you already read Part 1, or if you just like to shoot from the hip and decided you'll figure it out as you go - read on!
     For a quick refresher (or for those that don't want to go back and read) here's the quick summary - I had been eyeballing fiberglass masts, and while deciding what to buy, I stumbled upon a telescoping fiberglass pole that was bound for a dumpster in one of the many commercial buildings that my work takes me to.  From there, I decided to start piecing together other bits of junk, or at least cheap stuff, to make myself a functional mast.
     At the point I left off, I had the mast, and I had inserted a piece of broom handle that had painter's pole thread on the end, and I had started fixing that all together.  Sometime shortly after that post I also stumbled onto a short section of scrap PVC that I needed to make a "splint" over a hole that had been drilled in the bottom section of the pole.  Now that you're caught up, here we go!
Picture
     One of the next things I added to the mast was an eye-hook.  Since I had filled the gap around the pole in the middle with epoxy (I used the loctite stuff you can get from amazon or a local supplier because it flows nicely to fill the gap, but cures nice and hard), I drilled a hole through the mast, epoxy, and center pole, and added this eye-hook that I dug out of the hardware drawer in my garage.  This means that the top of this mast can now accept a buddi-pole thread adapter, anything that I can clip into the eye-hook, or anything that I can clamp around the mast (since the top is pretty solidly filled with epoxy.)
     With the top of the mast done, I wanted to add guy rings, so that I could attach ropes etc. to keep things tall and straight.  Thankfully, I managed to dig up some scrap pieces of HDPE plastic that I had left over from the mounting panel that I made for the control head of the radio in my car (you can read about that project in my post called New and Improved.)  If you don't happen to have this stuff lying around, I'd recommend grabbing some, as it comes in handy for all kinds of radio-related projects where you need to make mounting panels, brackets, etc. and you need something that looks nice, and isn't metal.
     I had some of this that was white, and some that was black, but for making guy rings, I figured it doesn't matter if they match or not!
     I let the guy rings "float" so that they can rotate around their section of the pole which makes putting things up easier.  The top guy ring stays on the mast because it can't slide down past the section below it, and it can't slide up past the eye hook.  The bottom section is trapped between between the fitting for the next section up, and the "splint" that I made to span the hole that someone drilled through the pole in the past.  As a note - I didn't permanently attach the splint till the guy ring was in place - otherwise I would have run into a small problem....
     All that was left to do at this point was to add guy ropes. Thanks to life being busy, I didn't actually get around to that until we were actually setting up for Winter Field Day!  If you watch the video some of what we're doing when you see us with the tape measure stretched out is actually measuring and cutting the guy ropes.  The worked out well...below is close-up of the guy ropes attached to the pole, and a picture from Winter Field Day with the mast standing at full height, in all of its saved-from-the-trash glory. 
     All in, since most of the parts I used were junk or scraps, this mast cost me about 60 cents per foot of height.  Compare that to the $4.00 plus per foot of height for a commercially made mast, and I think I did alright - don't you?
Back to Part 1
Continue to Part 3
0 Comments

Mast From Junk

1/10/2017

0 Comments

 
Post Contains Affiliate Links
     So, my YL has this thing she says about "putting things out there in the universe" and then being patient.  This week I got started on a project because of something I had left hanging out there in the universe, so maybe there is something to it after all....
     Those of you who follow along with my posts know that I have a Buddipole Mast/Antenna system that I use fairly often during portable operations.  It's great, especially when I'm flying somewhere for work, because it packs up pretty small.  There are times though when I'm driving somewhere that I'd like a taller mast.  I've spent a lot of time surfing around the web, and had kind of decided on a certain model of fiberglass mast that I liked because it seemed sturdy, had strong looking clamps to hold the sections, and depending on the model, had a top section that I could fit one of the pieces of my buddipole stuff onto, in order to use it with my buddipole parts if I wanted.  The drawback was the price.  It wasn't that expensive, but I just hadn't been able to get myself to pull the trigger.
     Cue the universe....
     I was in the Hudson Valley for work, and while on one of our jobsites I saw a pole standing in the corner with our guys equipment that looked strikingly like the masts I had been eyeballing, so I asked what it was.  They said they used to use it reach high stuff, but that the end was busted up, and they didn't use it anymore, and that they just hadn't gotten around to throwing it away.  I quickly offered to take it off their hands.
Picture
 
     It wasn't as tall as the one I was looking at, and was a bit rough in a couple spots, but is was free!  I figured I could try it out, and if I really liked it maybe I would buy the same thing, but taller.  To start, they were right about the end being busted up.  The fiberglass on the top was split, but only about 3 inches down.  My miter saw made quick work of that, so even though it was now 3" shorter, I had a good solid top.   I also noticed that the bottom section had a largish hole drilled in it for some reason (you can see that in the picture above).  I figured I would think up something to do about that along the way.  ​
     Since this was a free thing, I wasn't sure exactly how I was going to peice this together, but I decided to just let this one kind of "fall together" and see what happened.  The top section was 1.25" in diamater, so I didn't really have anything that would fit around that to adapt to my buddipole stuff, so at first I was thinking I'd just put an eye bolt through the top and use it to support the center of dipole, or wire etc.  Suddenly however, I remembered that in the scrap metal pile in the garage I had a broom handle from a no longer used broom, that had the same thread on the end as a painters pole:
Picture

     My Buddipole stuff does have an adapter to mount it's parts onto a painters pole, so I decided to try to re-purpose this, and make it so that this would be on the top of my mast, and then maybe I could give myself options - this to thread stuff onto, an eye bolt or 2 in order to hold it and also act as accessory places to hook wires or guys to, etc.  With that thought in mind I quickly chopped the top 18" or so off this handle, so that I had the business end available.
     Unfortunately, this handle didn't really fit snug in any manner that was convenient right away:
Picture

     What I needed was some way to hold this pole centered inside the top of the mast, while I figured out some way to permanently attach it so that it wouldn't move.  Step 1, center the handle in the mast, with just the thread sticking out the top.  That problem was easily solved with several wraps of electrical tape - just enough to make the fit snug:
Picture

     With the pole then inside, and the threads sticking out, I could see that I was getting somewhere:
Picture

     To start filling the gap, I grabbed two tubes of this stuff (Loctite Epoxy), and figured I could use it to fill the void, which would help to lock the handle in place and make the top part stiffer, giving me the option to clamp things around the mast as well, without fear of crushing the fiberglass:
Picture

     The thought is that once the epoxy cures, I would drill through the fiberglass mast, epoxy, and handle in 2 spots, and put eye bolts through.  I haven't gotten that done yet because it turns out that two tubes wasn't enough to completely fill the gap, so i'll need to grab more.  The thought here is that this will give me 2 spots to hook things too, and will also prevent the handle inside the mast from rotating.  
     My mind next turned to that hole in the bottom section.  More than just the ugliness of it, I worried that it would make a weak spot where the mast would potentially break.  The bottom section of the mast is 2" in diameter, so pretty quickly I thought that a sleeve of 2" PVC (PVC is sized by inside diameter) would be nice to slide over it and act like a splint.  Queue the universe again.  While I was debating purchasing a whole section of 2" PVC just to get a few inches of it, my work took me to the basements of some old buildings, that had piles of junk laying around in them.  What do you suppose just happened to be lying in one of those junk piles?  That right - a short section of 2" PVC!  
     I haven't cut it to length or permanently attached it yet, but here you can see how nicely it slides over that bottom section:
Picture

     So what comes next?  Well, I need to attach the PVC, and finish filling in the top at a minimum.  Before I do that though, I'd like to make a couple guy rings to attach guy ropes to.  The bottom one I want to slide on before I attach the PVC, as it will end up floating between the top of the PVC and the bottom of the first clamp.  The second one I plan on putting on the top section, so that it floats between the top clamp, and the eye hooks.  I had some HDPE flying around here from other projects, which would have been a perfect material to cut these out of, but apparently I used it all up, so here's my next request universe.....I could really use a couple old beat-up plastic cutting boards......
     I'll update everyone once I finish this, but so far I'm only into it for about $11.  since this is an 18' mast, that makes it about 61 cents per foot.  Not bad considering the commerial option I was looking at, while much taller, worked out to be $4.27 per foot....
Jump to Part 2 of this Project
0 Comments

finally some progress

7/3/2016

4 Comments

 
     So, I have finally made some forward movement on my home shack build!  As I get rolling on this project I'd love to hear feedback from everyone on what you would do if you had the opportunity to build your shack "from scratch" because that's exactly what I'm doing!  A while back I attached furring strips to the ceiling for the eventual ceiling treatment, and today I finally started framing some walls.
Picture
     Before I get too far, I'll explain a couple things in this picture - 1st, the door that looks partially obstructed by the framing is partially obstructed!  That was the original door into the room, and it is actually getting a pocket door framed up inside/in front of it.  Once the pocket door is in place, I'll remove this door from the other side.  This will help keep the dust out of the finished part of the basement while I work (and also keep the cats out...)
     You might also notice the wires hanging down in the boxed out area.  These are for computer network and TV distribution, and run up into the new addition - I put them in back when everything was torn apart, because that was the easiest time to do it!  In this same spot I have three 2" conduits running from this room clean up to the attic, to allow for whatever needs to get up there (like maybe some coax...)
     Lastly, if you are extra observant, you might notice that a couple of the wall sections are framed with the studs 2' on center instead of the standard 16".  This is because part of the strength of these walls will come from the eventual treatment that they get (I'm deciding between two options right now), so these studs are really just there to attach that treatment too, and not to provide strength like is needed for a standard drywall finish.
     The framed wall at the back of the picture is the wall that the operating desk will eventually be against.  If you look closely, you can see that this wall is actually some distance  from the foundation wall.  Here's another shot to help demonstrate this:
Picture
     The design I have bouncing around in my head allows for access to the back of the radio / computer / other equipment from this space, so that all of the wiring and everything else can be back here behind the walls, so that you don't see it from the room, but will also be very accessible by just walking back into this little "service" area that I am building in.
     What do you think?  What would you do with a similar space if you were turning it into your radio shack?  Leave a comment and let me know!
Previous: Shack Build
Next: Shack Build
Back to Part 1 of this Project
4 Comments
<<Previous
Forward>>

    Categories

    All
    Antenna
    Cw
    Digital-modes
    Flying-with-gear
    Home QTH
    Miscellaneous
    Mobile
    Operating Events
    Portable
    POTA
    Shack Build
    Technical


    - N3VEM -

         Welcome to my Ham Radio Blog!  This blog was started primarily to share my two concurrent shack builds - my mobile station and my home station.  Over time, this has grown to include sharing about my operations, and general radio-related thoughts that I have as a newer operator.  
         
    ​Enjoy!

    RSS Feed


    Picture
    POTA!

    Picture
    Proving that hams do indeed still build stuff!

    Picture
    100 Watts and Wire is an awesome community, based around an excellent podcast. 

    Archives

    September 2020
    July 2020
    January 2020
    September 2019
    August 2019
    July 2019
    June 2019
    May 2019
    March 2019
    January 2019
    December 2018
    November 2018
    October 2018
    September 2018
    August 2018
    July 2018
    June 2018
    May 2018
    April 2018
    March 2018
    February 2018
    January 2018
    December 2017
    November 2017
    October 2017
    September 2017
    August 2017
    July 2017
    June 2017
    May 2017
    April 2017
    March 2017
    February 2017
    January 2017
    December 2016
    November 2016
    October 2016
    September 2016
    August 2016
    July 2016
    June 2016
    May 2016
    April 2016
    March 2016
    February 2016
    January 2016
    December 2015
    November 2015


Picture
Copyright © 2015
 Vance Martin is a participant in the Amazon Services LLC Associates Program, an affiliate advertising program designed to provide a means for sites to earn advertising fees by advertising and linking to amazon.com.